The post Homemade Tikka Masala Paste appeared first on ProperFoodie.
]]>
👩🏻🍳 Why make this recipe
I love to make my own pastes for all my curries, you just can't beat the sweet and spicy aromas of fresh curry paste hitting the surface of a hot pan. Use this tikka masala curry paste recipe to make a chicken marinade for this amazing chicken tikka masala curry.
Theres also a whole world of pastes to explore once you've mastered making this one (see links below)! I also love to make my own biryani masala marinade for a tasty homemade fish biryani.
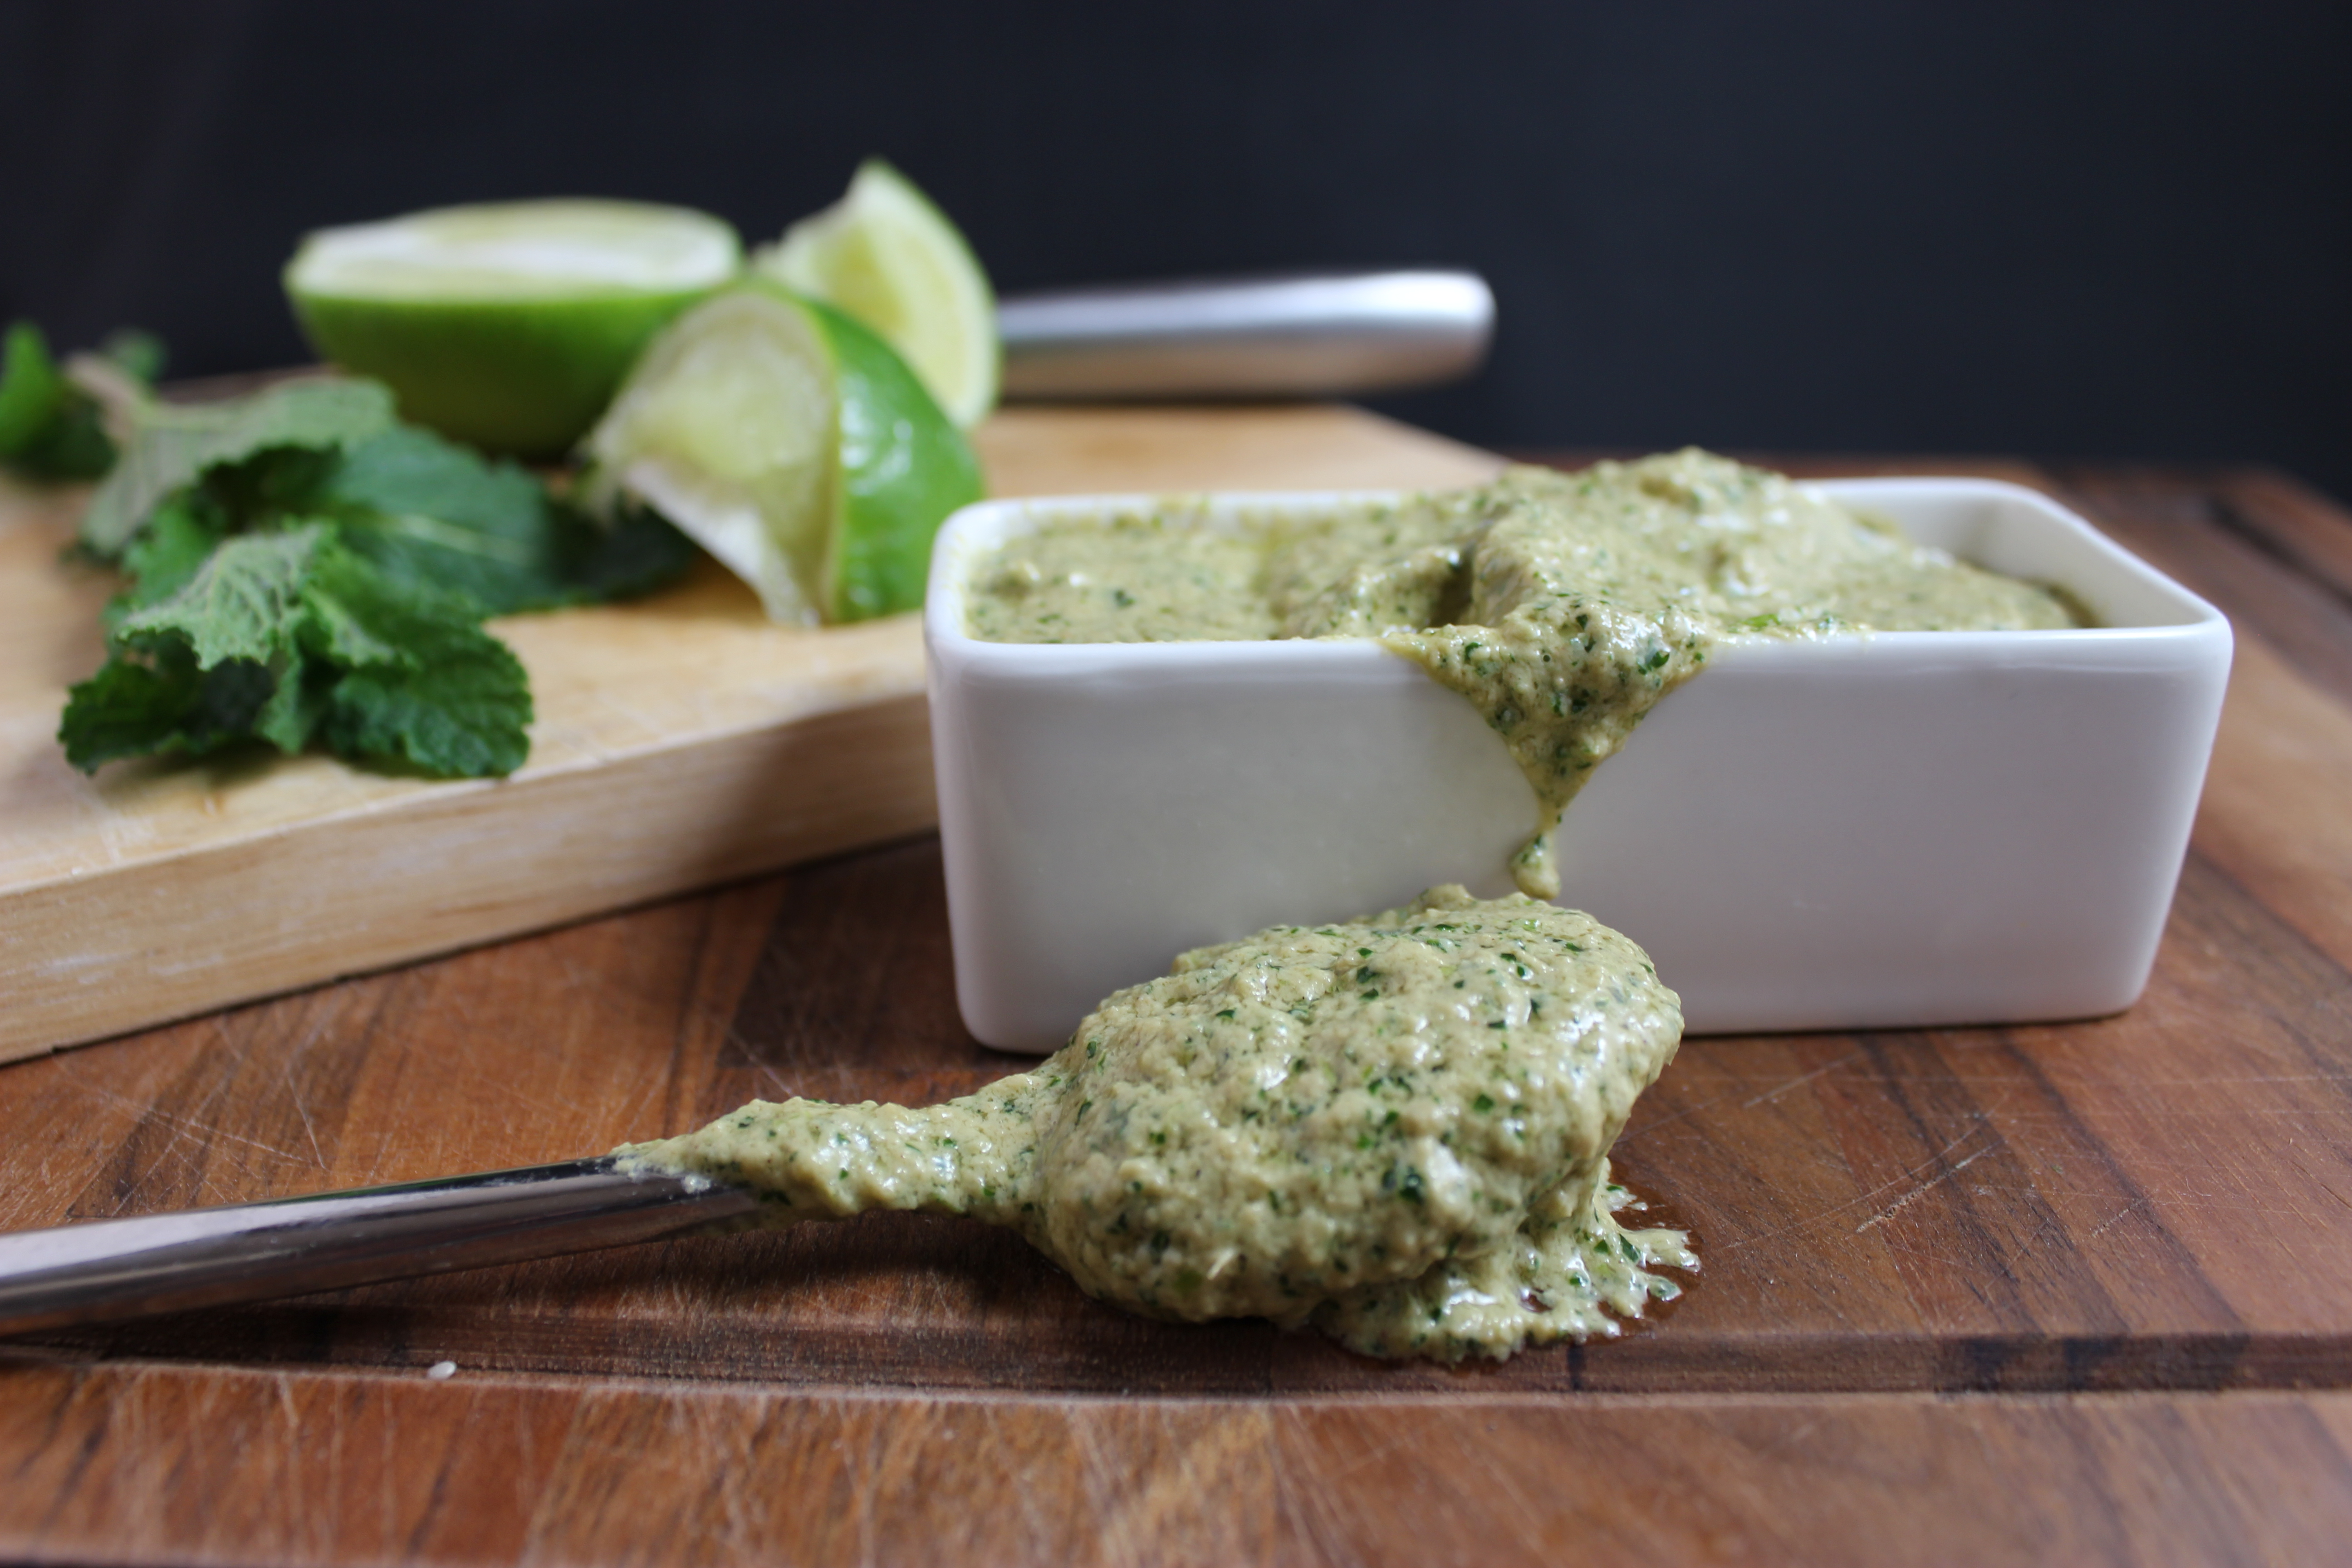
🥘 Ingredients
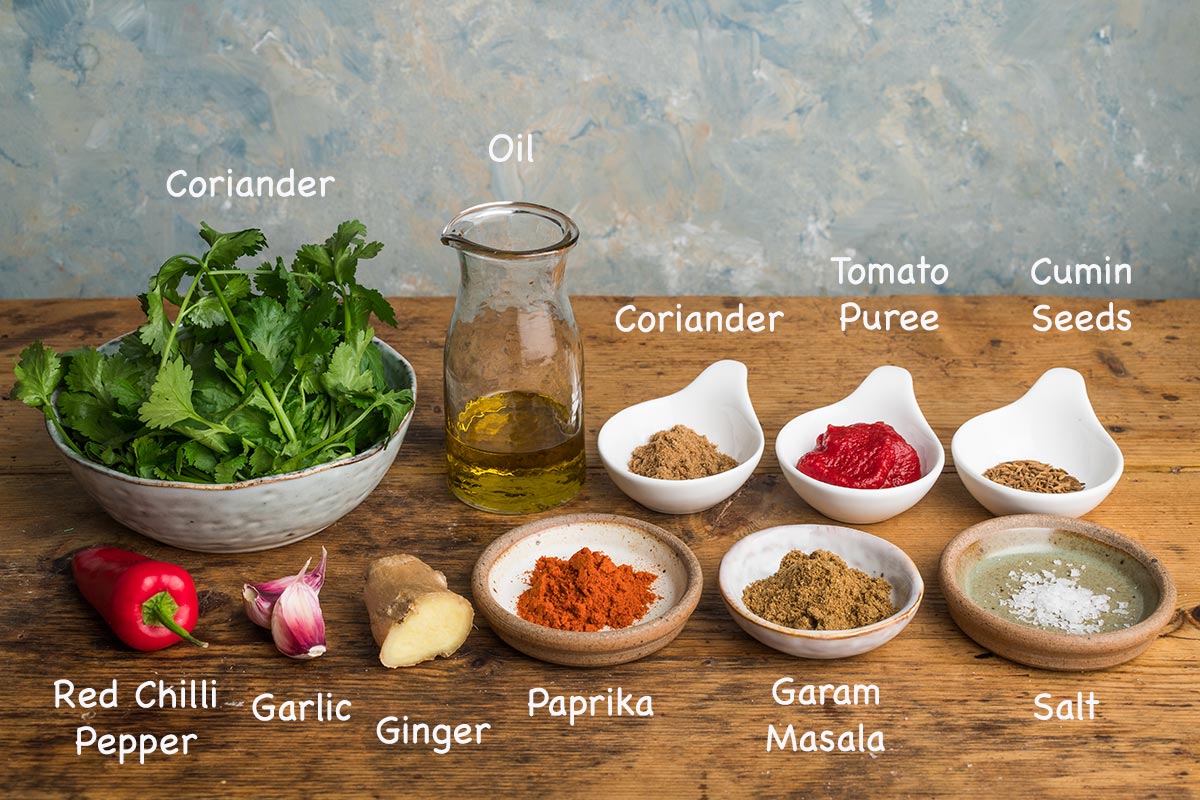
To make a small jar of tikka masala curry paste you will need:
Ingredient notes
Measurements: For the amounts required, see the recipe card below and use the toggle button to see the recipe in cups.
Fresh ginger: Use fresh ginger if you can get hold of it. If not, a teaspoon of ginger paste, jarred ginger or ground ginger will work just fine.
Fresh garlic: Fresh garlic cloves will give the best flavour for this tikka paste, but a teaspoon of jarred or granulated garlic could be used instead.
Red chilli pepper: The chillies used here will ultimately determine how hot your curry is. So if you like it spicy then use hotter chillies. Use the smaller, thinner finger chillies for extra heat or use the larger red chillies for a milder flavour. If you would prefer no spice at all then just replace the chillies with red bell pepper (capsicum).
Coriander: Coriander is a great flavour in tikka masala paste and so I don't recommend that you substitute or leave it out. This recipe uses both fresh and ground coriander for full flavour and a burst of colour.
Tikka masala spices: Cumin, garam masala and paprika are used in this recipe as the base for this tikka paste. I recommend using at least these spices and for a little extra flavour try adding a teaspoon of cinnamon and turmeric.
🔪 Step by step instructions
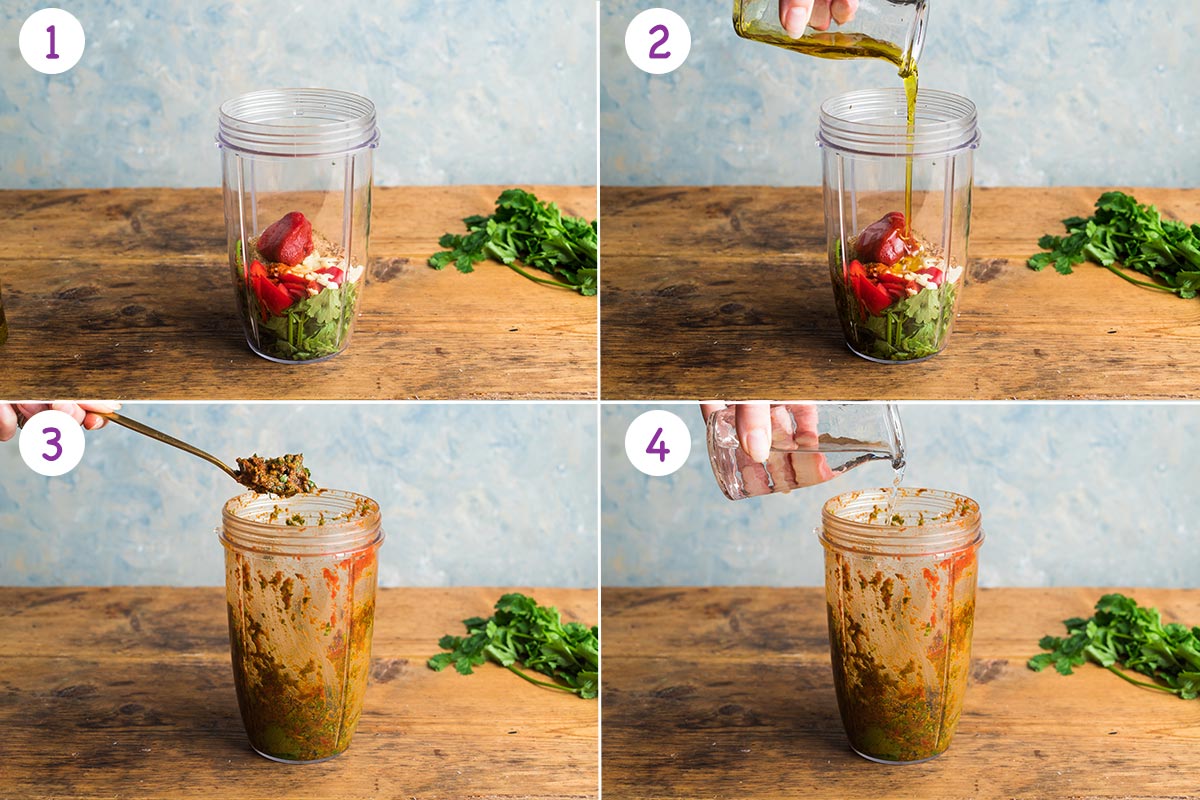
- Place all the ingredients into a small blender.
- Add just 1 tablespoon of oil to begin with, more can be added as required.
- Start the blender and blend until the ingredients start to come together into a paste.
- If the blender has trouble getting going add another half tablespoon of oil of tomato puree. then after this add small amounts of tap water in between blending, until you are happy with the consistency.
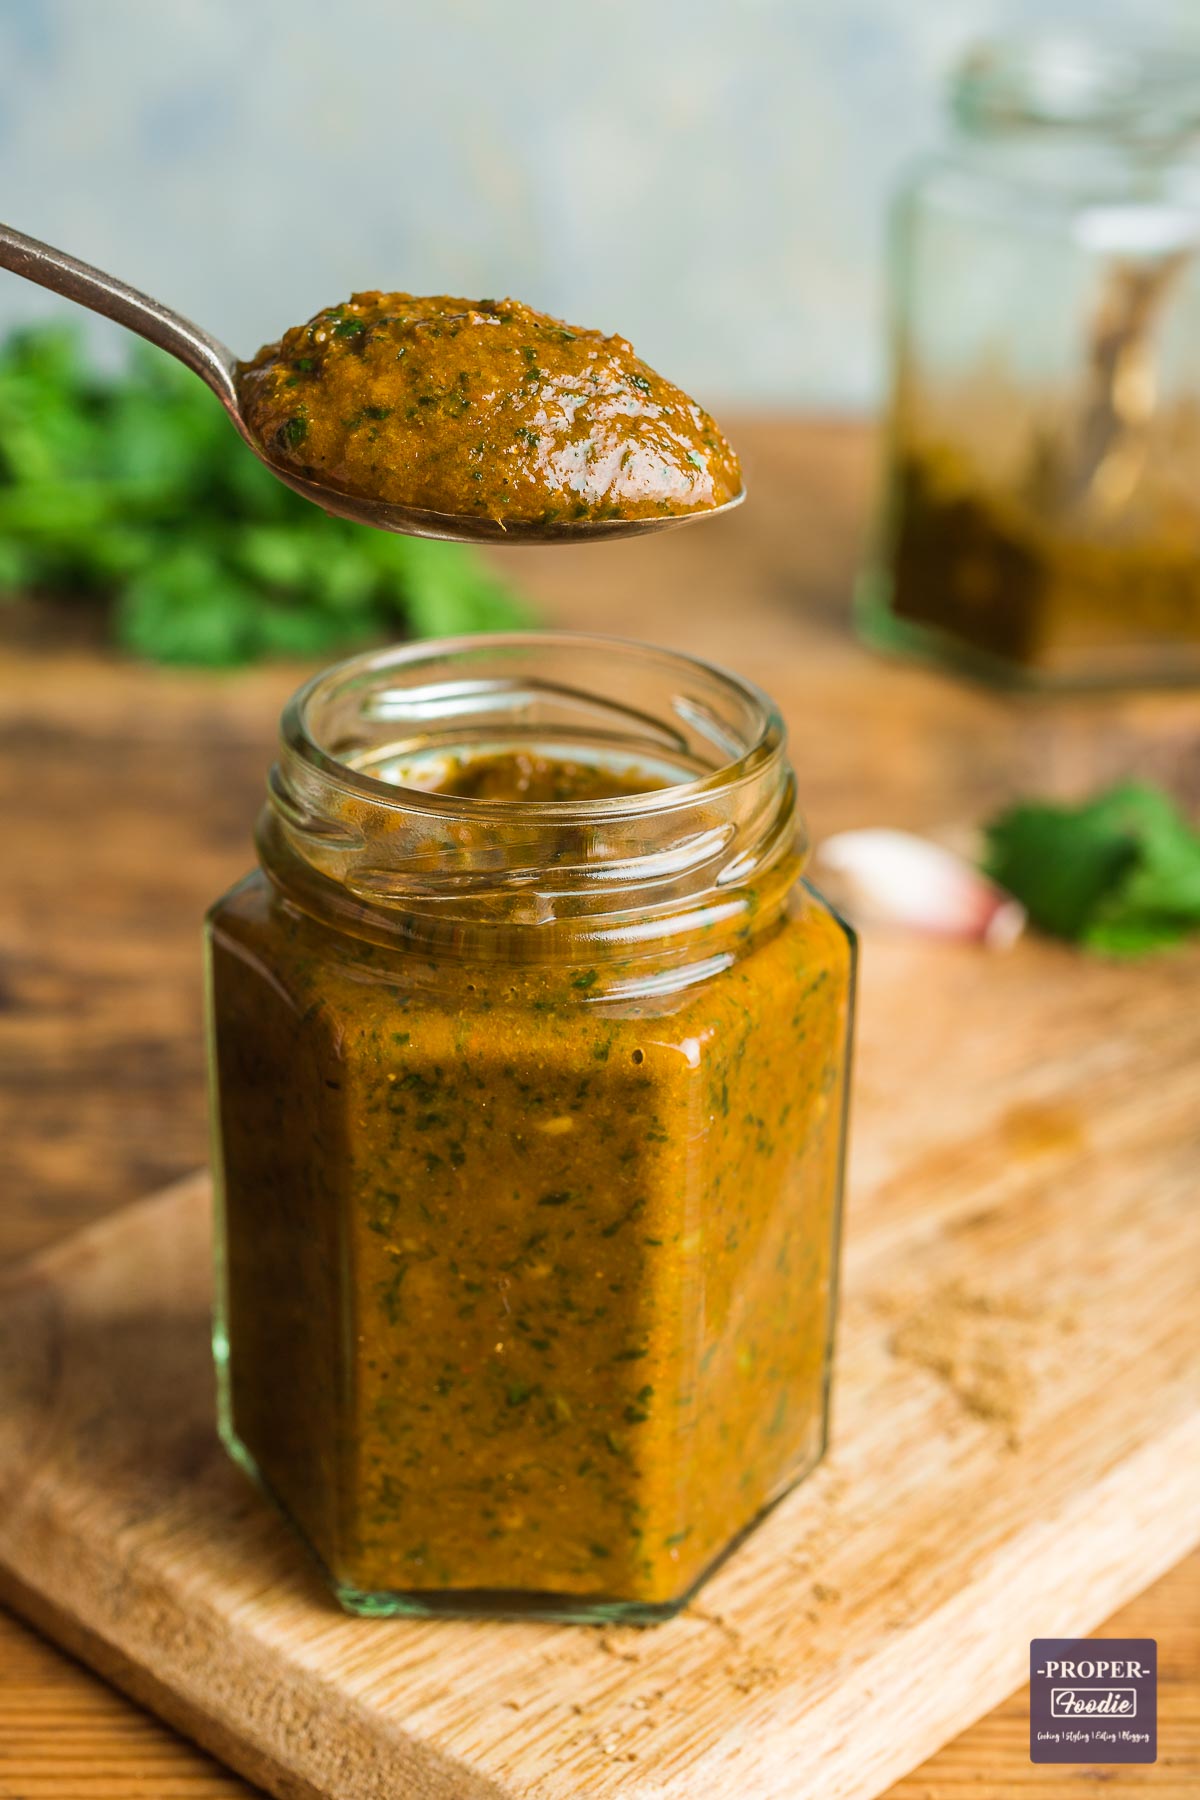
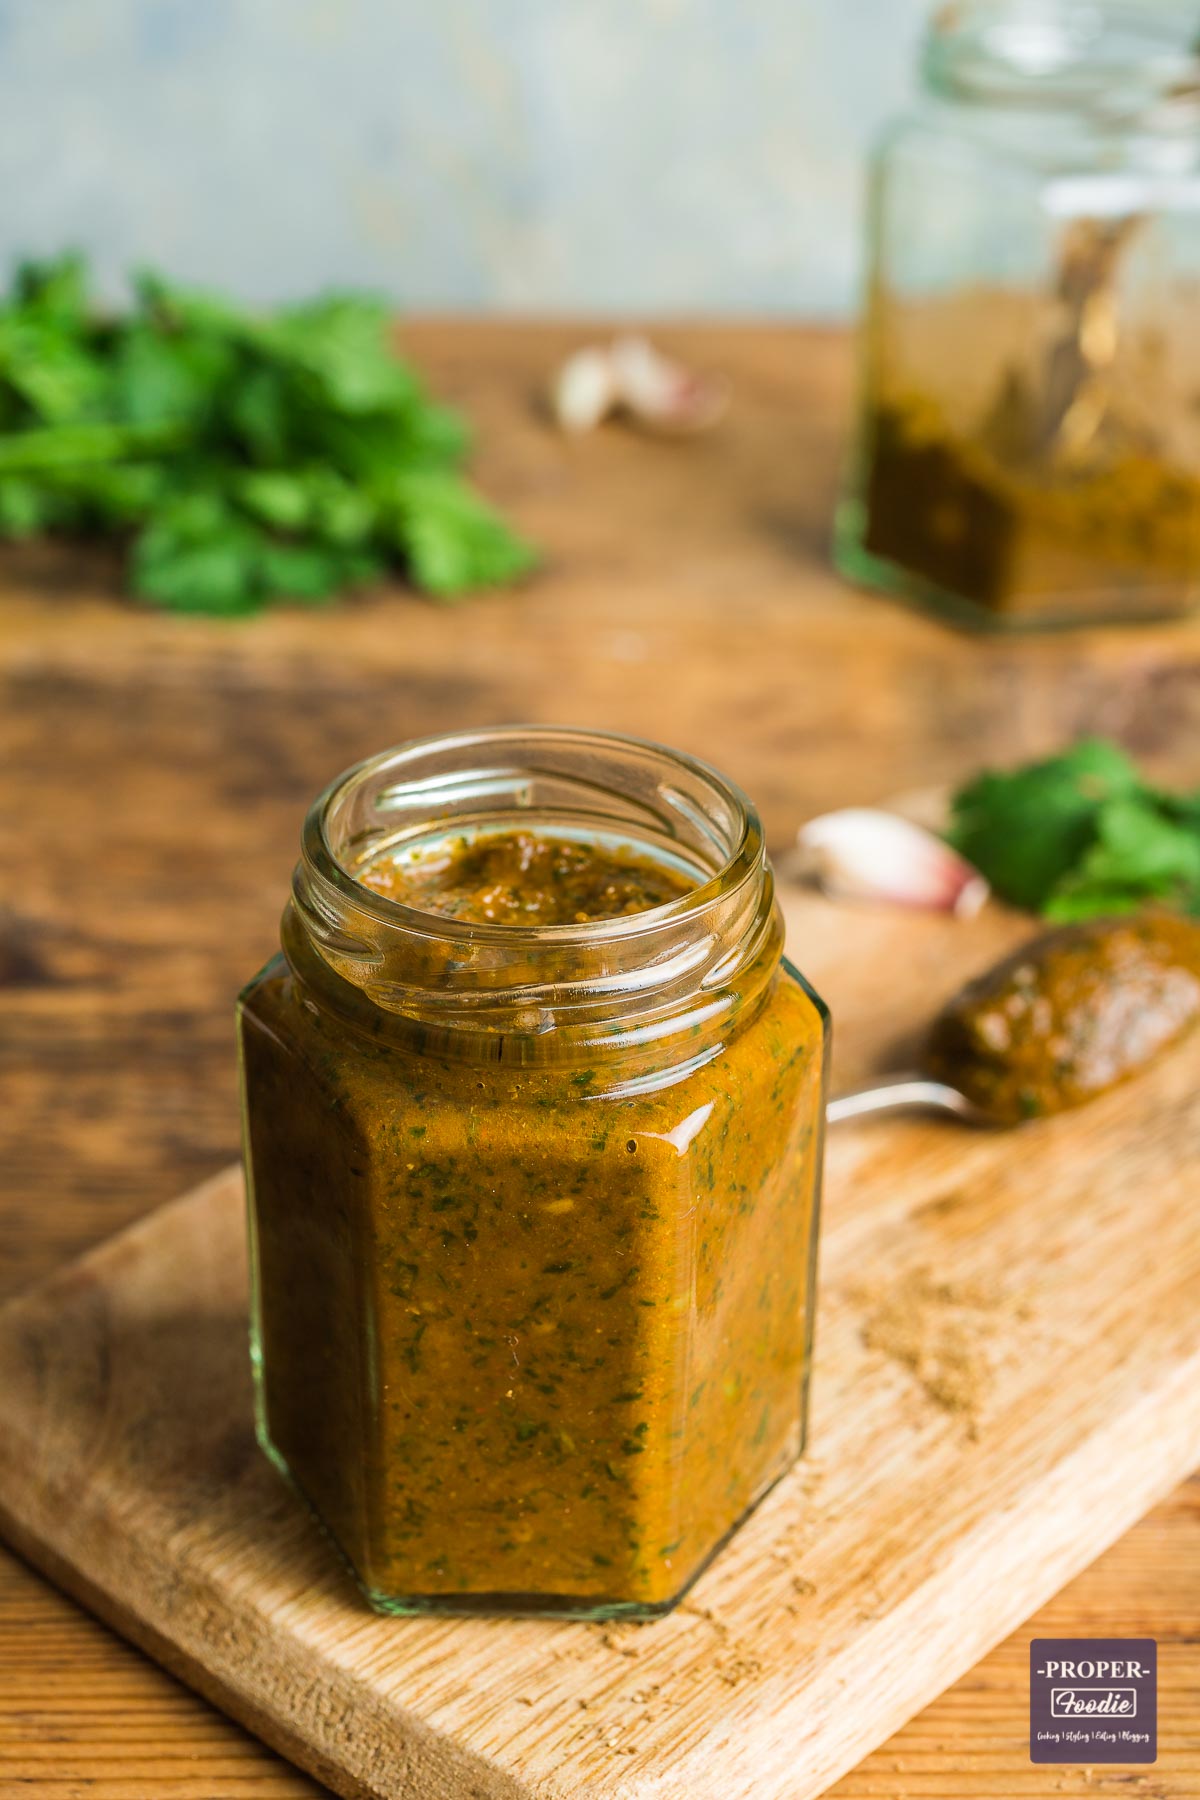
- Once completely blended the paste can be used immediately as a marinade. Mix 2 tablespoons of the tikka masala paste with 120ml of plain yogurt. Then cover raw or leftover cooked chicken with the marinade and leave in the fridge for at least 2 hours. Alternatively you can jar up the paste and keep in the fridge for up to a month.
💭 Expert tips
Scaling this recipe: The ingredients for this recipe will make around 6 tablespoons of tikka paste (one small 110ml jar). To make more just increase the amounts of ingredients.
Consistency of the tikka paste: Make sure to only add small amount of water in between blending (½ a tablespoon at a time) otherwise your paste will be too thin.
Spicy tikka paste: For an extra kick add a few drops of Tabasco or a teaspoon of hot chilli powder.
❓ Frequently asked questions
Once made, tikka masala paste can be transferred to a jar and kept in the fridge for up to a month or in the freezer for up to 3 months.
I like to mix this tikka paste with plain yogurt to create a beautiful marinade for sliced chicken breasts. The marinaded chicken can then be used in this tasty chicken tikka masala curry. But of course you could use any meat or fish. Also use as a marinade for vegetables to make a vegetarian curry. Or if you don't have time to make a paste, check out my quick chicken and almond curry.
If you prefer you can just buy a jar of paste from the supermarket. Sometimes a jar of paste and a packet of microwave rice are just the ticket on a busy weekday night. That said, if I have the time and where-with-all to get out my blender and chop up a few ingredients, then I most certainly will. Not only does homemade curry paste taste amazing but the fragrant aromas that fill the kitchen are just too good to miss.
Tikka usually means pieces of marinated meat cooked in a tandoor or grilled. Tikka masala uses the marinated meat in a curry sauce.
🍛 Other easy homemade curry pastes
If you've tried this recipe, let me know what you think by leaving a star rating in the recipe card or comment section below. I always appreciate your feedback! You can also follow me on Pinterest, Facebook or Instagram or Sign up to my email list!
📖 Recipe
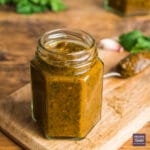
Homemade Tikka Masala Paste
Ingredients
- 2 garlic cloves roughly chopped
- 1 red chilli pepper seeds removed and roughly chopped
- 2 cm piece of fresh ginger peeled and minced
- 2 teaspoon garam masala
- 1 teaspoon hot paprika or paprika
- 1 teaspoon ground coriander
- ½ teaspoon cumin seeds or ground cumin
- 1 tablespoon oil
- 1 tablespoon tomato puree
- 30 g fresh coriander chopped including stems
- Pinch of sea salt
Instructions
- Place all the ingredients into a small blender.2 garlic cloves, 1 red chilli pepper, 2 cm piece of fresh ginger, 2 teaspoon garam masala, 1 teaspoon hot paprika, 1 teaspoon ground coriander, ½ teaspoon cumin seeds, 1 tablespoon tomato puree, 30 g fresh coriander, Pinch of sea salt
- Add just 1 tablespoon of oil to begin with, more can be added as required.1 tablespoon oil
- Start the blender and blend until the ingredients start to come together into a paste.
- If the blender has trouble getting going add another half tablespoon of oil of tomato puree. Then after this add small amounts of tap water in between blending, until you are happy with the consistency.
- Once completely blended the paste can be used immediately as a marinade. Mix 2 tablespoons of the tikka masala paste with 120ml of plain yogurt. Then cover raw or leftover cooked chicken with the marinade and leave in the fridge for at least 2 hours. Alternatively you can jar up the paste and keep in the fridge for up to a month.
Video
Notes
Nutrition
This post was first published in Aug 2016. Updated in Sept 2021 with an improved photos, and new step by step instructions and expert tips.
The post Homemade Tikka Masala Paste appeared first on ProperFoodie.
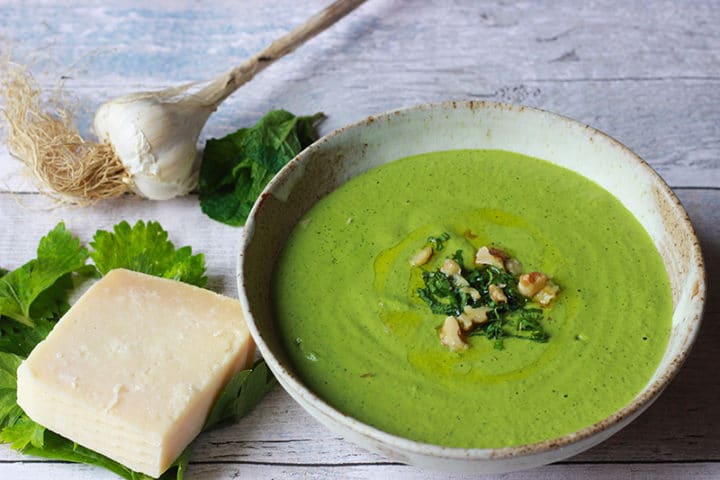
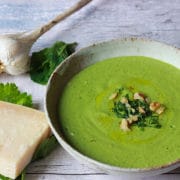
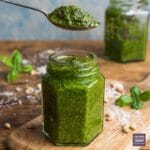
]]>The post Celery, Apple and Walnut Pesto appeared first on ProperFoodie.
]]>
👩🏻🍳 Why make this recipe
With autumn comes the changing of the weather and leaves and the need for more comforting and warming dishes comes about. So its out with the basil and in with the celery leaf, out with the pine nuts and in with the walnut to create this delicious autumnal pesto. Celery and walnut pesto is less aromatic than a basil pesto recipe, with more of an earthy flavour. Its perfectly balanced to go with autumnal dishes such as roasted root veggies, baked sweet potatoes, warming and creamy lasagnas and even plump, little ravioli parcels.....there's plenty of ideas to go at.
The celery leaf is also great to use up in soup recipes: celery, apple and blue cheese garden soup post
The autumnal vibe of this recipe was inspired by our latest trip to Italy. Did we eat a lot whilst we were there?.... Yes, of course, we ate a tonne. Did we care that we were meant to be there to plan our wedding and not eat all of Italy's pasta in one sitting? No, not one bit.

🥘 Ingredients
To make this walnut pesto recipe you will need:
- Celery leaves roughly chopped
- Walnut oil
- Garlic cloves roughly chopped
- Walnuts
- Green apples cored and diced
- Mint leaves
- Edamame beans
- Parmesan grated
- Salt
- Cider vinegar
Ingredient notes
Measurements: For the amounts required, see the recipe card below and use the toggle button to see the recipe in cups.
Celery leaves: can be replaced with celery stems but make sure to peel the outer edge to remove any stringy bits first.
Edamame beans: are optional but will add extra protein and give the pesto a more robust texture.
Walnuts: are the best option for this recipe but if you can't get hold of any a good substitute would be pecans.
Parmesan: For a vegetarian version replace parmesan with vegetarian cheese.
🔪 Step by step instructions
-
Place the celery leaves, garlic cloves, walnuts, chopped apples, mint leaves, beans, salt and cider vinegar into a blender or food processor. Add half of the water and half of the walnut oil.
-
Pulse into a paste adding more water or oil if needed.
- Grate the parmesan and stir in a bit at a time until you are happy with the taste and texture.
-
Taste and add more salt, parmesan or oil depending on the taste and consistency you are after.
⛪ Our wedding
But yes......our wedding!! Thats right - this massive thing that seems to be gobbling up my time at the moment, but something that I've failed to talk about on here. So next year, Ben and I will be married in the beautiful surroundings of the Italian countryside, following on from our engagement last year whilst we were in Pienza!

Of course the plans so far for the wedding are lots of pasta, risotto, wine and a good bunch of laughter and happy times. Excited doesn't even begin to describe where I am at with this right now. There's still lots of planning to be sorted, and I'm sure a great deal of stress to cope with but I can't wait to get back to Italy next year and become Mrs Jones :-O

🍹Autumn holiday
But back to the trip we've just had: A holiday abroad in autumn is just simply magical. All the trees are changing and brandishing fiery reds or warming oranges, the mornings have a slight chill which brings a mysterious mist and subtle sunrises. The birds are also aware of the changes and migrate above the skies or dance in pretty patterns through the trees.
Grapevines are usually harvested for their annual fruits at this time of year, but some vineyards have vines that flower a little later so are still flush with huge bunches of juicy grapes. A glorious site and I really do hope that next year we can get wedding pictures amongst grapevines with cascading bunches of grapes 🙂


The autumnal produce of Italy from peaches and beetroot to truffles and cabbage, meant that we had some stunning plates of food. Of course there was the usual mountain of cheese and cold cuts, but there was also plenty of inspiration for me with dishes like: sea bream baked with paprika and radicchio; suckling pig with apples, raisins and cabbage; shredded beetroot chutney; fresh pappardelle pasta with a creamy mushroom sauce and fresh truffle; the glorious and ubiquitous apricot breakfast tart; sea bream and lime tortelloni with burrata cheese; and of course walnut pesto. I just had to have a go at making my own version of this incredible pesto!
💭 Expert tips
- Only add half of the liquid ingredients (oil and water) to begin with. Blend and then check the consistency before adding more water or oil if needed.
- Grate the parmesan separately then stir in to the blended pesto. This improves the texture and gives more control over the taste and amount of parmesan
❓ Frequently asked questions
Transfer the pesto to a sealable jar or container. Store in the fridge for up to 2 weeks or freeze for up to 3 months. To defrost leave on the side overnight. If freezing I recommend freezing small amounts in small containers so you can defrost as much or as little as you need.
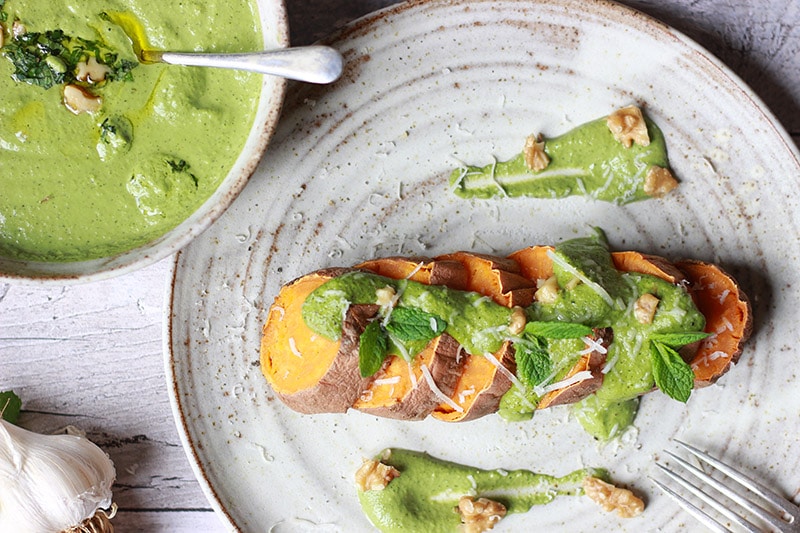
This pesto is great stirred through pasta, rice, couscous, quinoa or any other kind of grain. I also love to use it as a topping on roasted sweet potato, chargrilled veggies and pan fried chicken or fish.
If you've tried this recipe, let me know what you think by leaving a star rating in the recipe card or comment section below. I always appreciate your feedback! You can also follow me on Pinterest, Facebook or Instagram or Sign up to my email list!
📖 Recipe
Celery, Apple and Walnut Pesto
Equipment
- Grater
Ingredients
- 100 g Celery leaves roughly chopped
- 150 ml Walnut oil
- 100 ml water
- 2 Garlic cloves roughly chopped
- 50 g Walnuts
- 85 g Green apples cored and diced
- 10 g Mint leaves
- 50 g Edamame beans
- 75 g Parmesan grated
- Pinch of Salt
- Teaspoon Cider vinegar
Instructions
- Place the celery leaves, garlic cloves, walnuts, chopped apples, mint leaves, beans, salt and cider vinegar into a blender or food processor. Add half of the water and half of the walnut oil.100 g Celery leaves, 150 ml Walnut oil, 100 ml water, 2 Garlic cloves, 50 g Walnuts, 85 g Green apples, 10 g Mint leaves, 50 g Edamame beans, Pinch of Salt, Teaspoon Cider vinegar
- Pulse into a paste adding more water or oil if needed.
- Grate the parmesan and stir in a bit at a time until you are happy with the taste and texture.75 g Parmesan
- Taste and add more salt, parmesan or oil depending on the taste and consistency you are after.
Notes
Nutrition
The post Celery, Apple and Walnut Pesto appeared first on ProperFoodie.
]]>The post Basil Pesto Recipe appeared first on ProperFoodie.
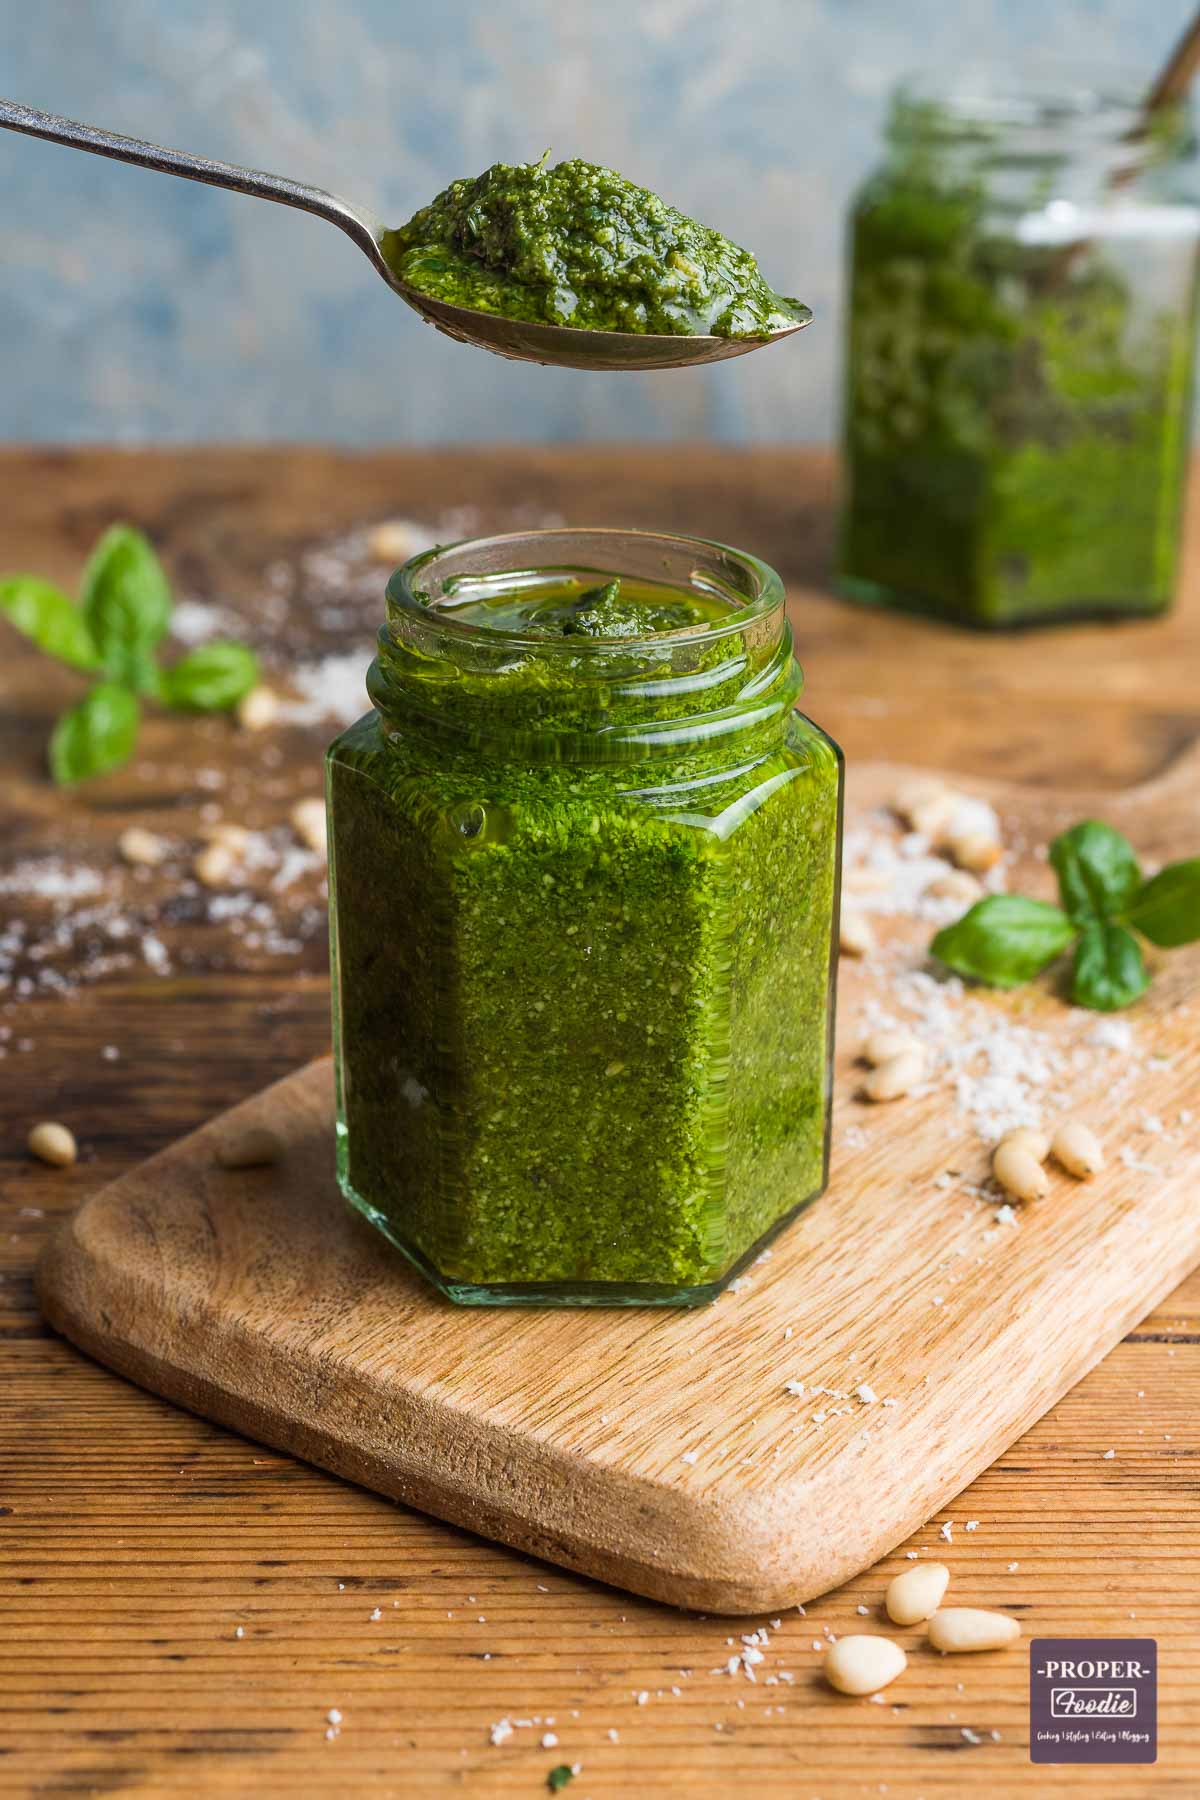
]]>Homemade pesto recipe made with fresh basil leaves, pine nuts and grated parmesan. Freshly made in just 5 minutes and bursting with aromatic flavours and an intense green colour. This is pesto at its best!
Find out how to make and store this vibrant pesto recipe so you always have a jar ready to go in the fridge.
👩🏻🍳 Why make this recipe
Basil pesto is great to have handy in the fridge. Especially if its homemade. You can't beat the intense, aromatic flavours that come from making pesto yourself at home. This recipe is nice and easy and super quick. So even if you have next to no time you can make the recipe in less than 10 minutes and be getting on with the rest of your day.
Pesto is the perfect partner to so many foods that it will always provide you with a great dinner at the drop of a hat. Mix it with some diced, pan fried chicken and serve with rice or in a wrap. Add it to some freshly cooked pasta or pour over some ravioli. Mix it into a couscous or quinoa salad or drizzle over baked fish.
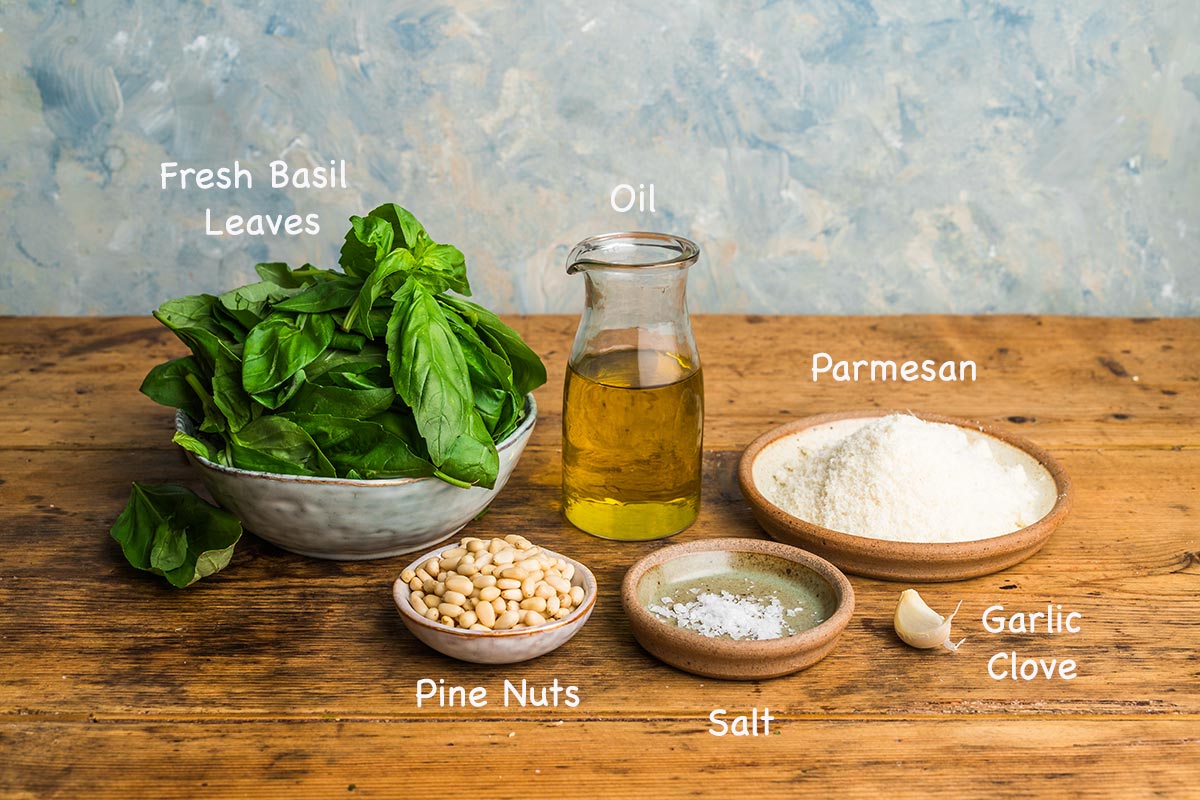
🥘 Ingredients
To make basil pesto at home you will need:
Ingredient notes
Measurements: For the amounts required, see the recipe card below and use the toggle button to see the recipe in cups.
Pine nuts: Pine nuts are the best option for this recipe but if you can't get hold of any a good substitute would be cashew nuts or pecans. Walnut pesto is also an option.
Parmesan: For a vegetarian version replace parmesan with vegetarian cheese.
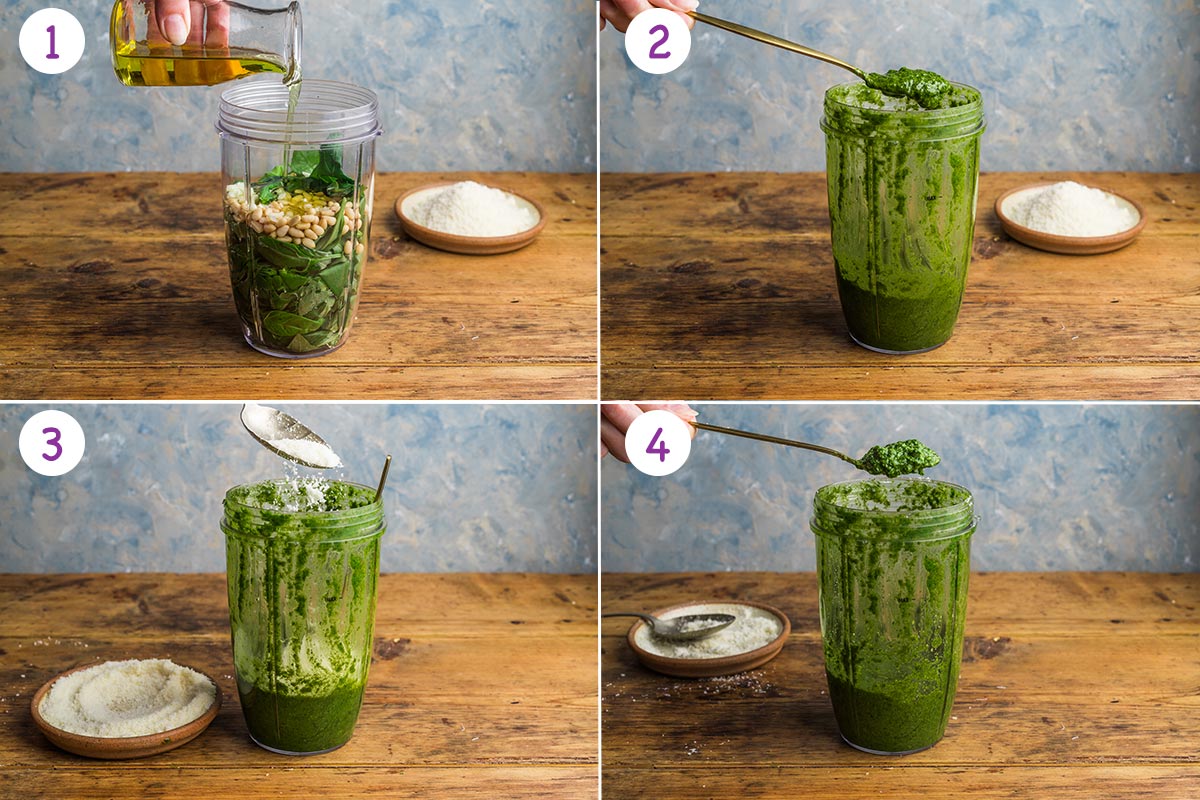
🔪 Step by step instructions
-
Place the basil leaves, garlic clove, pine nuts and salt into a blender or food processor. Add just half of the oil.
-
Pulse into a paste adding more oil if needed.
- Grate the parmesan and stir in a bit at a time until you are happy with the taste and texture.
-
Taste and add more salt, parmesan or oil depending on the taste and consistency you are after.
💭 Expert tips
- Only add half of the oil to begin with. Blend and then check the consistency before adding more oil if needed.
- Grate the parmesan separately then stir in to the blended pesto. This improves the texture and gives more control over the taste and amount of parmesan
❓ Frequently asked questions
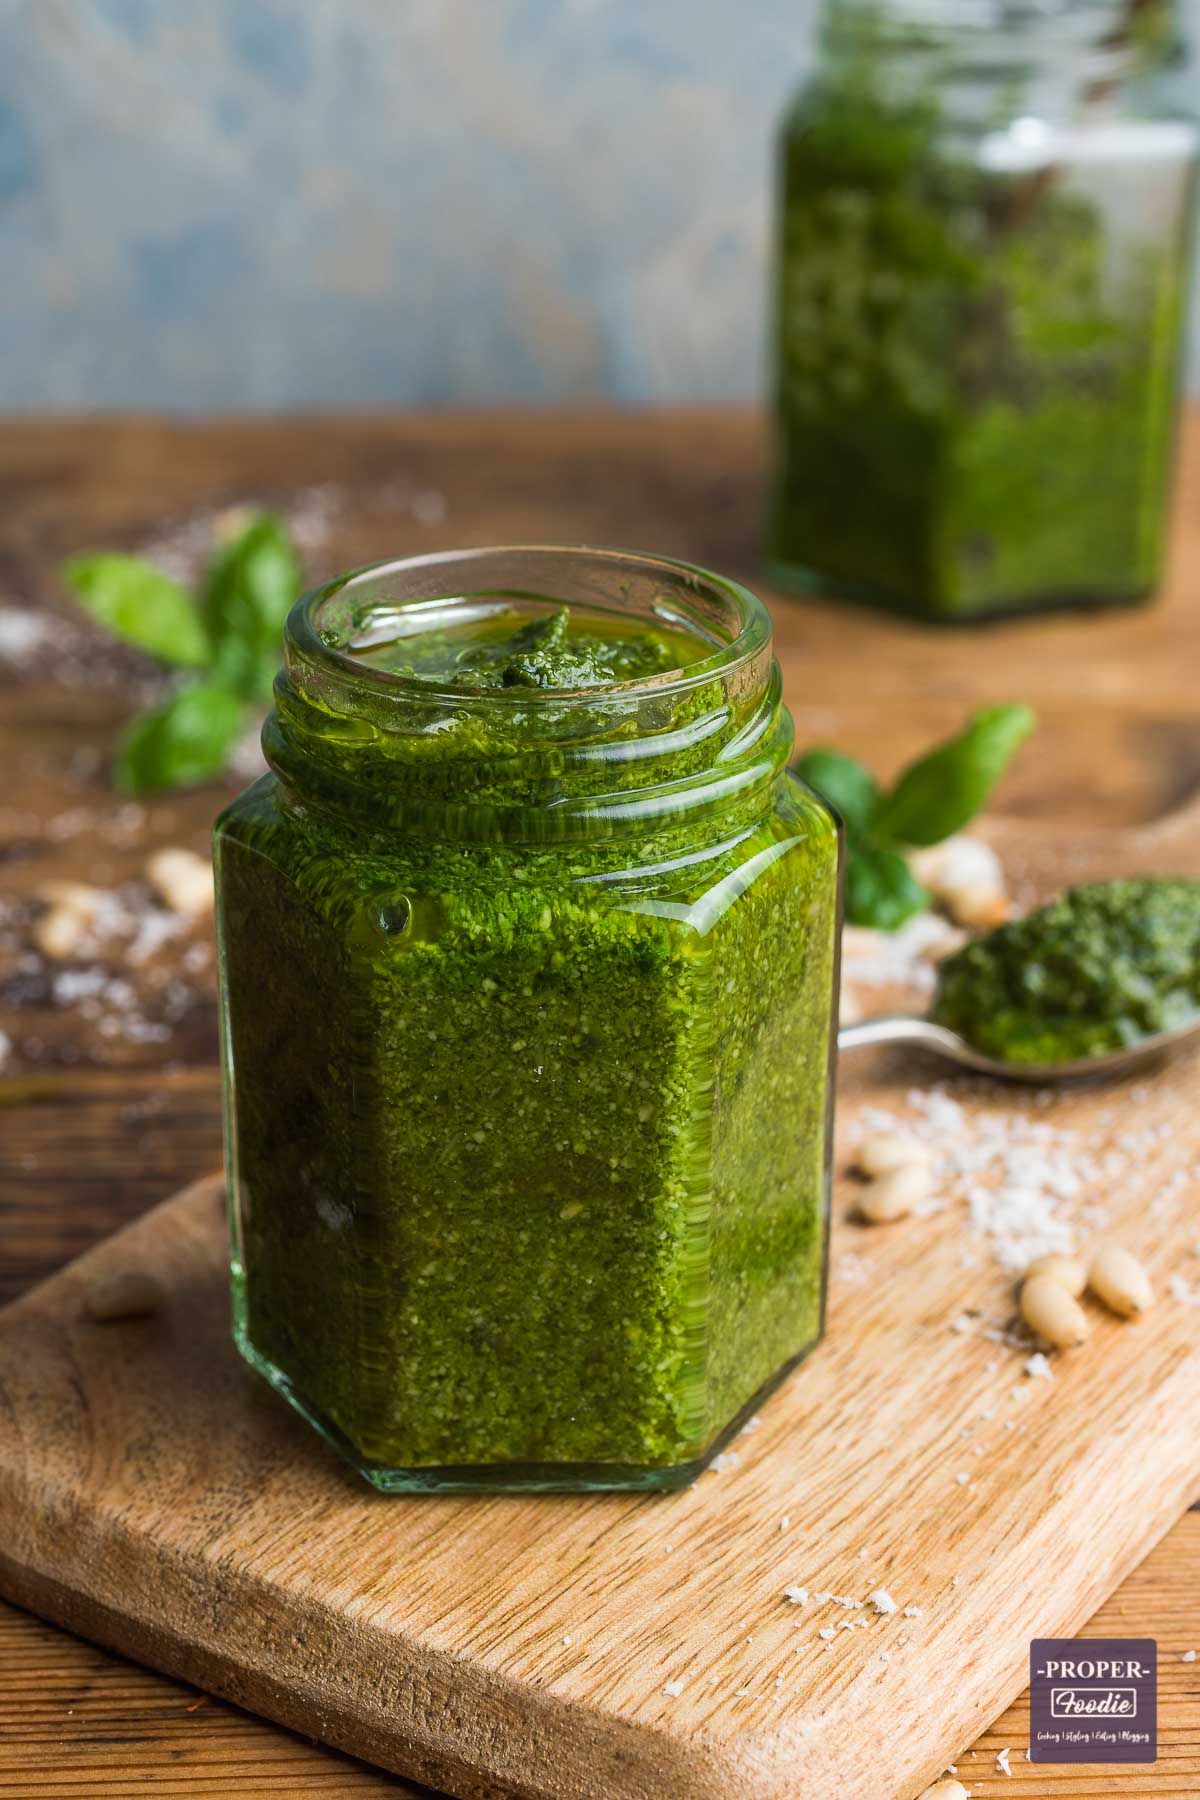
Transfer the pesto to a sealable jar or container. Store in the fridge for up to 2 weeks or freeze for up to 3 months. To defrost leave on the side overnight. If freezing I recommend freezing small amounts in small containers so you can defrost as much or as little as you need.
This pesto is great stirred through pasta, rice, couscous, quinoa or any other kind of grain. I also love to use it as a topping on ravioli, roasted sweet potato, chargrilled veggies and pan fried chicken or fish.
For something a little different try basil pesto on a pizza base, over tomato and mozzarella salad or layer into a vegetable lasagna or aubergine parmigiana.
🍯 Other homemade pestos and pastes
- Celery, Apple and Walnut Pesto
- Thai Green Curry Paste
- Tikka Masala Paste
- Thai Red Curry Paste
- Beetroot Hummus
- Simple Guacamole Recipe
If you've tried this recipe, let me know what you think by leaving a star rating in the recipe card or comment section below. I always appreciate your feedback! You can also follow me on Pinterest, Facebook or Instagram or Sign up to my email list!
📖 Recipe
Basil Pesto Recipe
Equipment
- Grater
Ingredients
- 1 garlic clove peeled and roughly chopped
- 75 g fresh basil leaves
- 30 g pine nuts
- Pinch sea salt
- 100 ml olive oil
- 50 g parmesan grated
Instructions
- Place the basil leaves, garlic clove, pine nuts and salt into a blender or food processor. Add just half of the oil.1 garlic clove, 75 g fresh basil leaves, 30 g pine nuts, Pinch sea salt, 100 ml olive oil
- Pulse into a paste adding more oil if needed.
- Grate the parmesan and stir in a bit at a time until you are happy with the taste and texture.50 g parmesan
- Taste and add more salt, parmesan or oil depending on the taste and consistency you are after.
Notes
- Only add half of the oil to begin with. Blend and then check the consistency before adding more oil if needed.
- Grate the parmesan separately then stir in to the blended pesto. This improves the texture and gives more control over the taste and amount of parmesan
Nutrition
This post was first published in Oct 2015. Updated in Aug 2021 with an improved recipe and photos, and new step by step instructions and expert tips.
The post Basil Pesto Recipe appeared first on ProperFoodie.
]]>The post Roasted Cauliflower Salad appeared first on ProperFoodie.
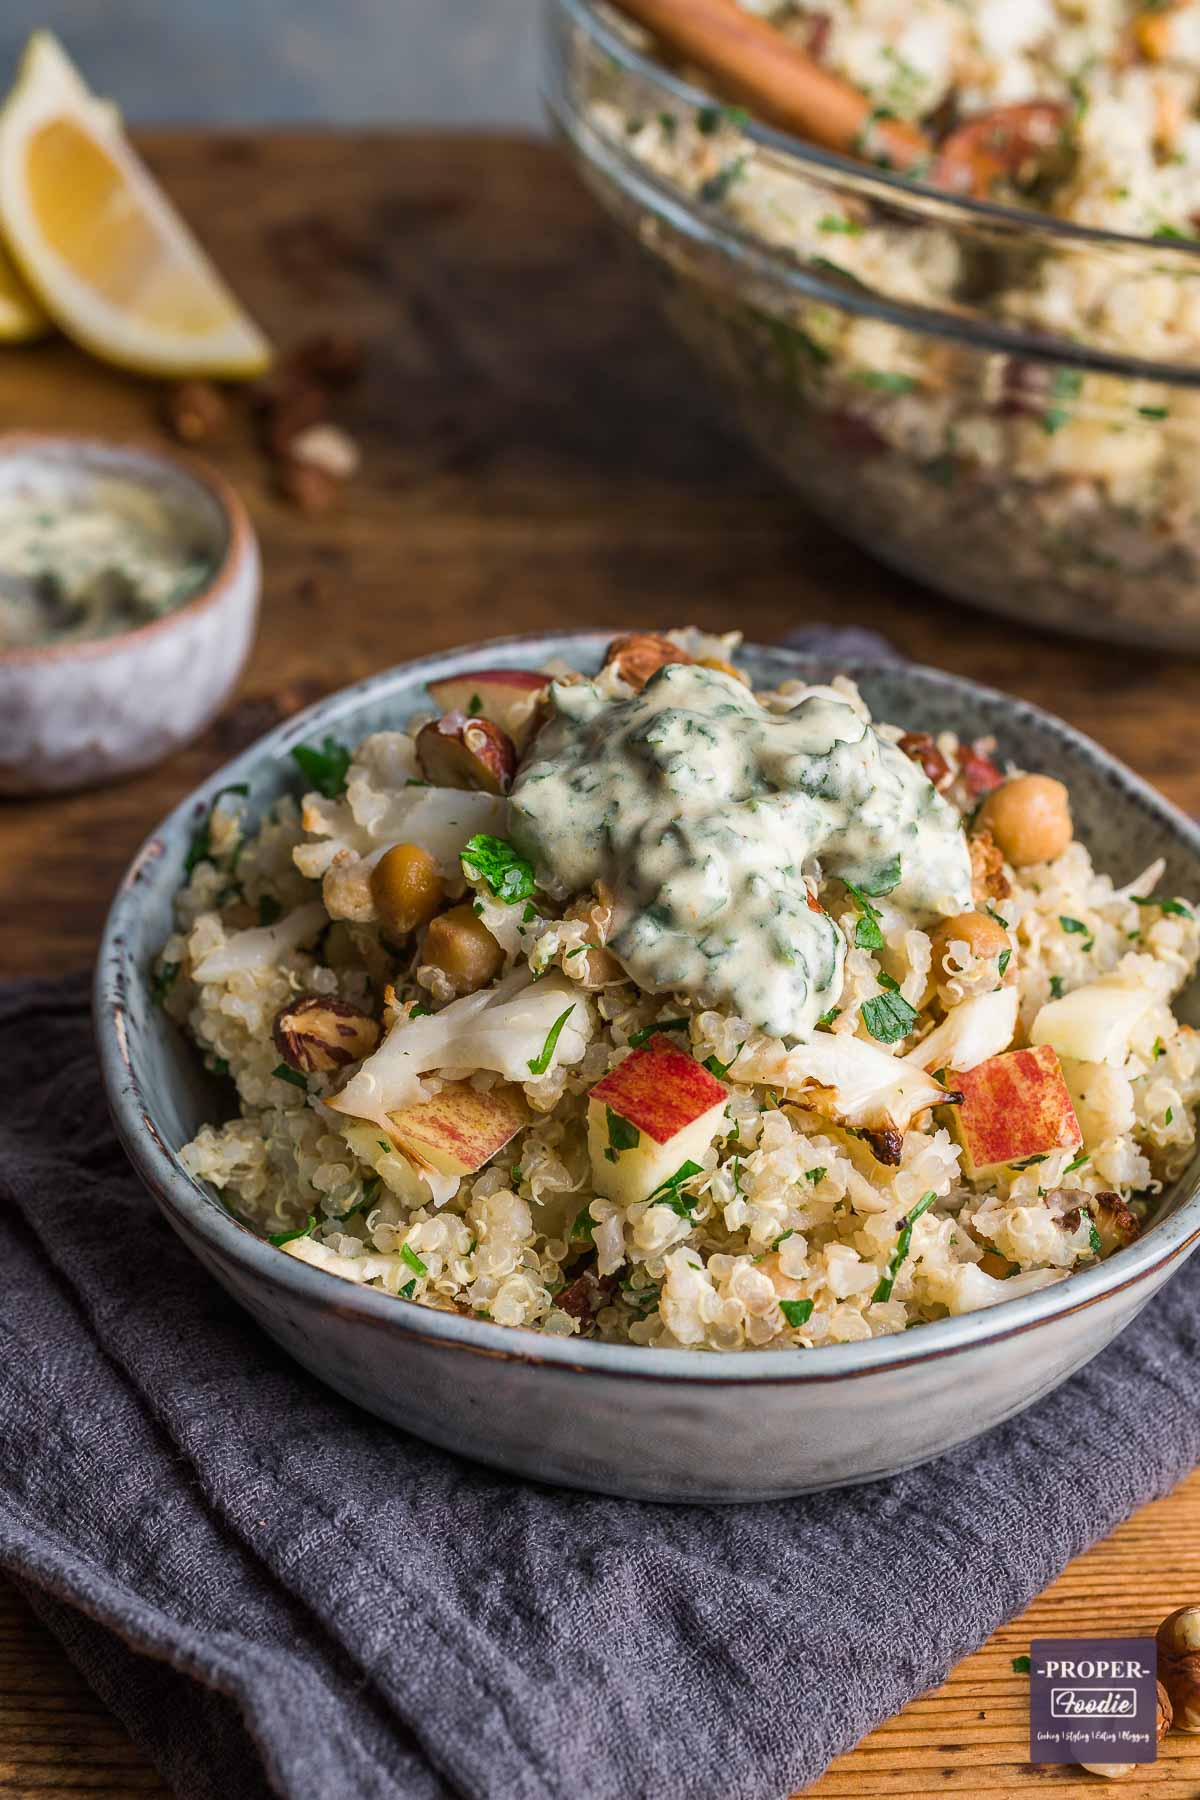
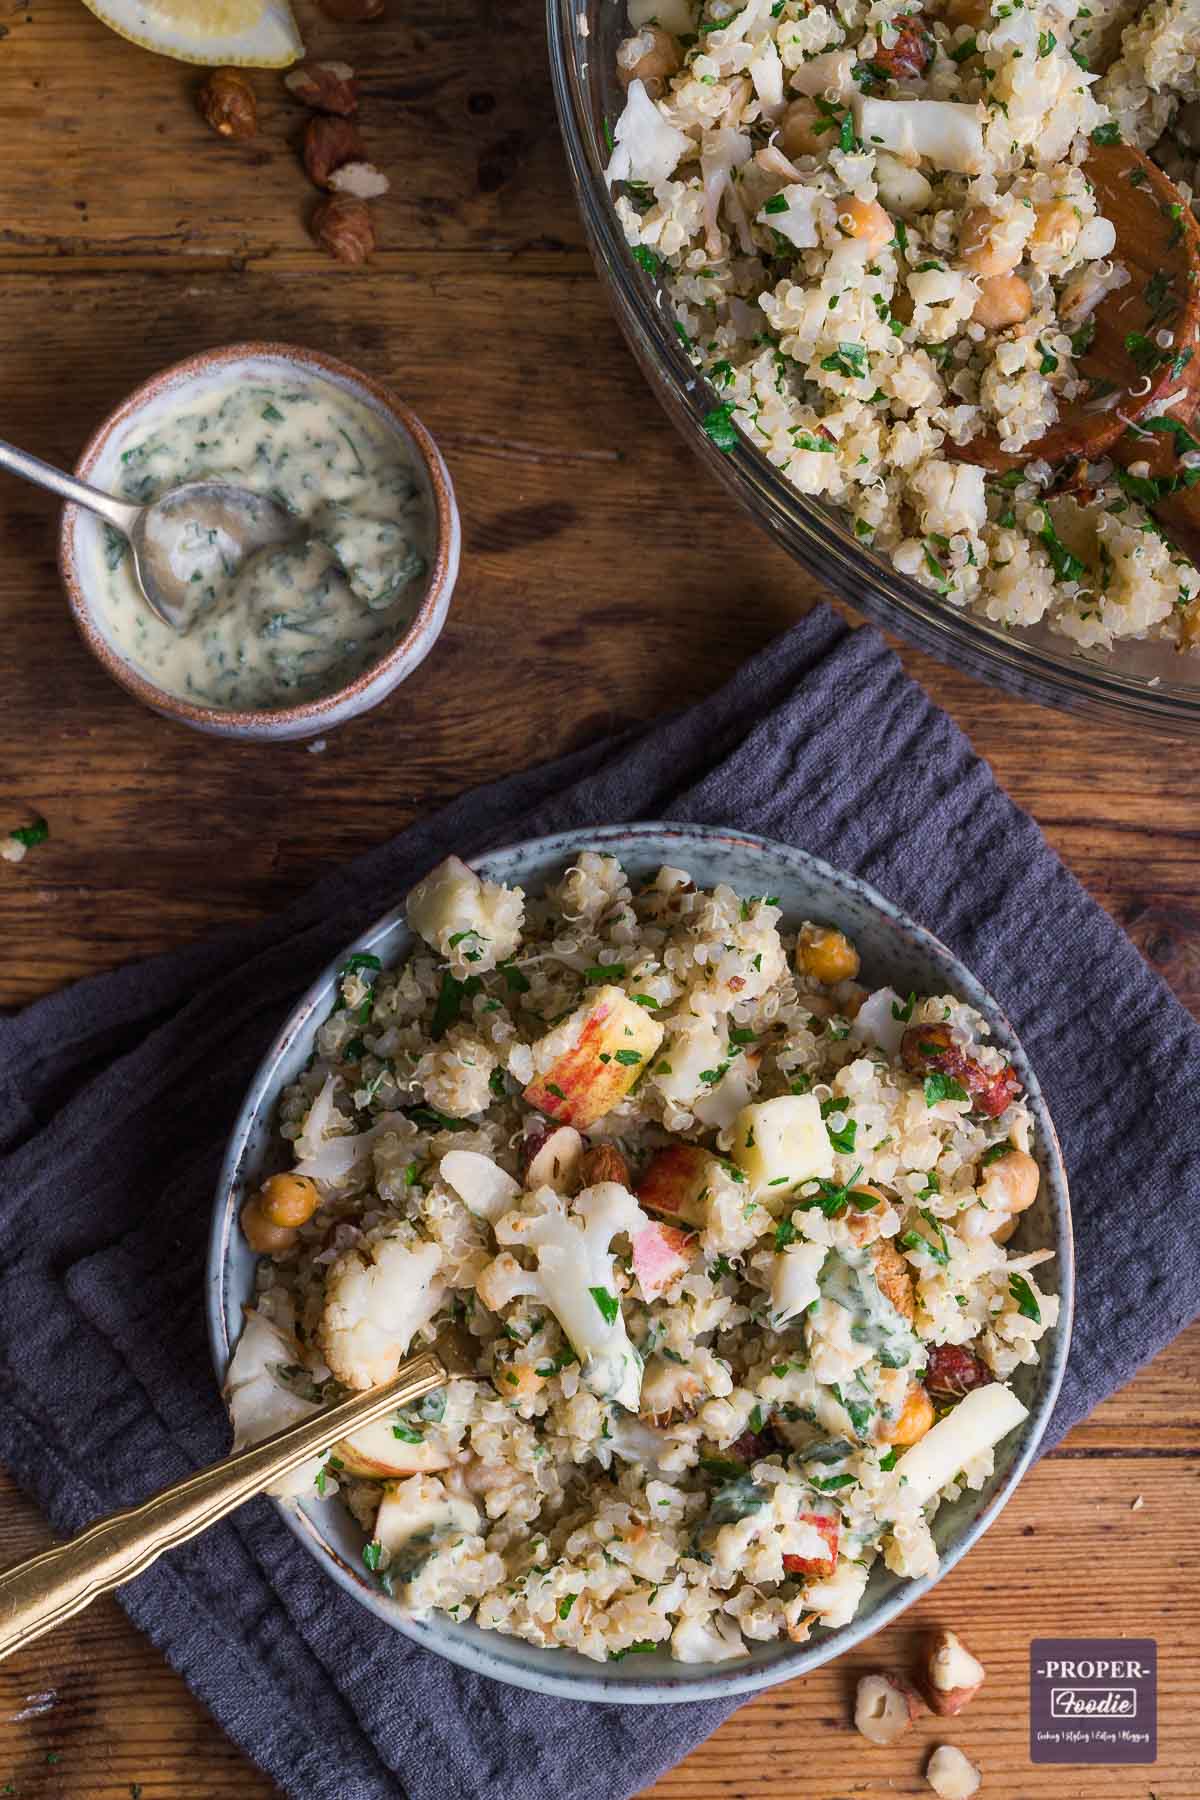
]]>Roasted cauliflower salad with a lemon herb dressing. Nutty quinoa mixed with roasted cauliflower and chickpeas. Great for batch cooking and making in advance. This cauliflower salad is packed full of nutrients and tasty ingredients, with everything you need to fill you up and keep you feeling satisfied for the rest of the day.
👩🏻🍳 Why make this recipe
This roasted cauliflower salad is all about making a few healthy ingredients taste good together. The charred cauliflower and lemon infused quinoa mix together to create the base for a nutritious and full flavoured salad. Its easy to prepare and once made it can be stored in the fridge and used over several days.
🥘 Ingredients
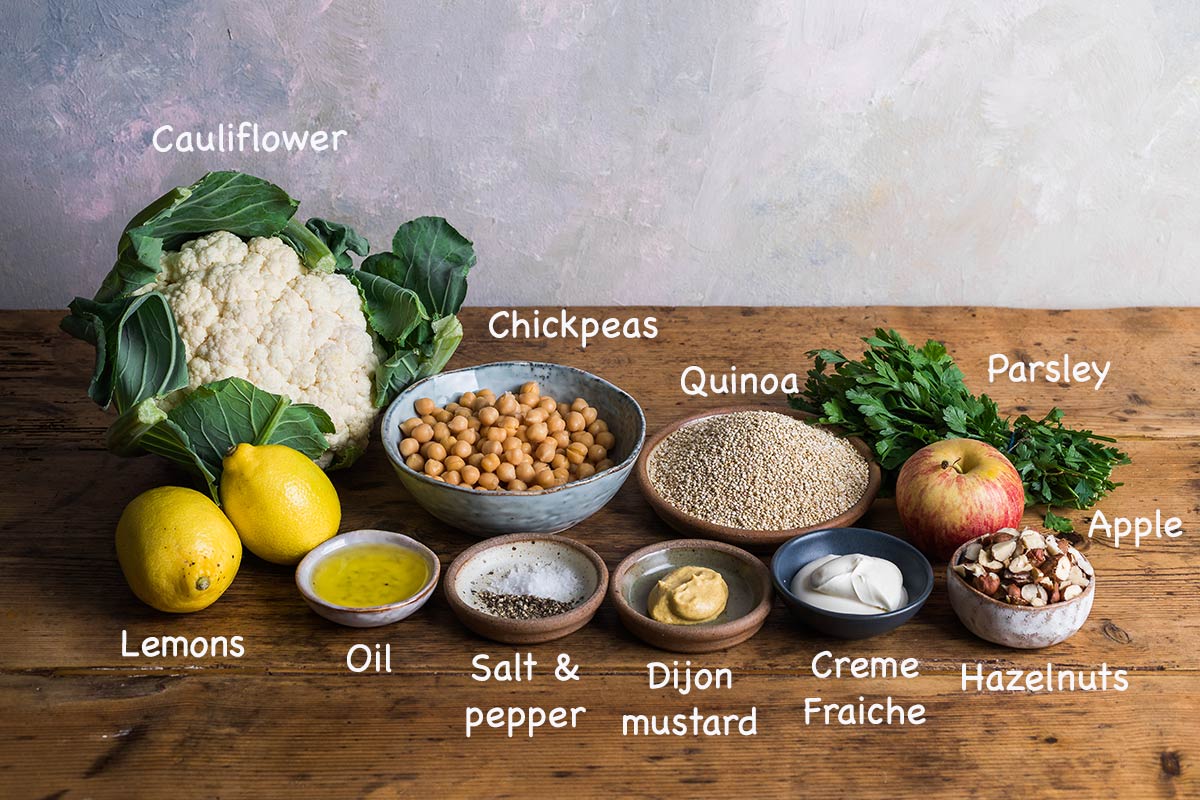
To make this cauliflower salad recipe you will need:
Ingredient notes
See recipe card at the bottom for full recipe and ingredients quantities.
Quinoa: Can be with your preferred grain. For a similar favour and nutrient content replace with brown rice. Or try with white rice, wild rice, couscous, barley buckwheat or bulgur wheat.
Chickpeas: Optional. Can be substituted for another pulse or bean.
Apple: Apple adds a sweet flavour to this citruses salad, which pairs perfectly with the crunchy hazelnuts and earthy quinoa. Can be substituted for your preferred fruit, try with dried cranberries, chopped mango or halved grapes.
Parsley: Optional but helps to brighten up the flavour and appearance of the salad
Hazelnuts: optional, leave out if your prefer or replace with another type of nut such as cashews, walnuts, almonds or peanuts.
Lemon, oil, dijon and creme fraishe: all of these are needed to make the salad dressing. If you prefer, swap for a salad dressing of your choosing.
🔪 Step by step instructions
- Pre heat oven to 200 degrees C. Chop the florets off the main stem of the cauliflower then chop into smaller bitesized pieces.
- Place chopped cauliflower florets in a bowl along with the drained chickpeas, oil, salt and pepper and lemon juice.
- Toss together well with your hands then transfer to a baking tray and bake in the preheated oven for 30 minutes, shuffling the mixture half way through.
- Whilst the cauliflower is cooking place the quinoa in small saucepan with a wedge of lemon and covered with double the amount water. Simmer on medium heat for 15 minutes.
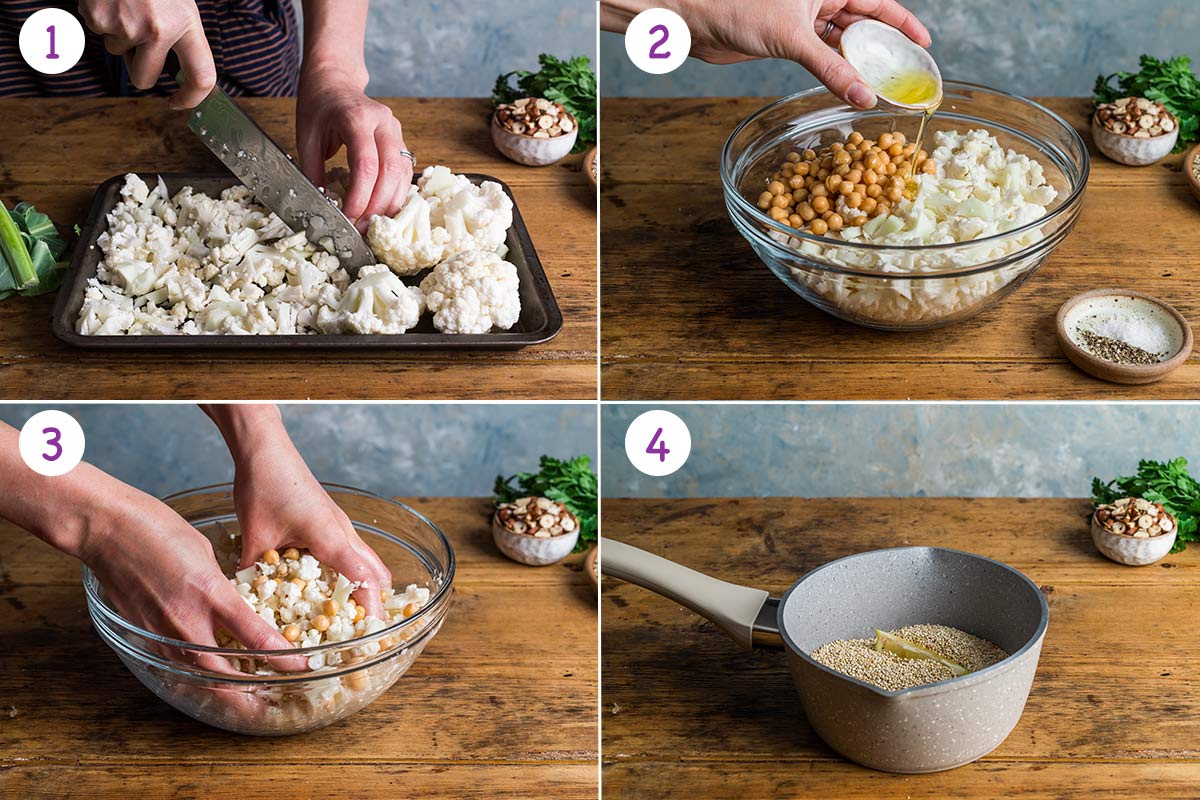
- With the cauliflower in the oven and the quinoa cooking in the pan, the dressing can be prepared. In a small bowl or container mix together the oil, mustard, creme fraiche, parsley, salt and lemon juice. Chill in the fridge until ready to serve.
- After the quinoa has been simmering for 15 minutes, take off the heat but do not remove the lid. Set to one side and leave with the lid on for 10 minutes.
- When the cauliflower is cooked remove from the oven and transfer to a large bowl. Remove the lid from the quinoa and discard the wedge of lemon. Fluff up the quinoa with a fork and then add to the bowl alongside the cauliflower. Next add the chopped apple, hazelnuts, fresh parsley and half of the dressing.
- Mix together well then serve with the remaining dressing.

💭 Expert tips
- Cut cauliflower up on the tray that you intend to roast it on so that the bits of cauliflower are caught on the tray (makes it quicker and easier when cleaning up).
- Roughly chop the cauliflower into bit size chunks. Try not to chop into tiny pieces as these can become mushy upon cooking.
- Chop the apple up just before mixing into the salad to keep it fresh and prevent any browning.
- The dressing for this recipe takes seconds to put together and really does transform the salad. The more you make - the better!! Place all the dressing ingredients into a small dish and mix together with a spoon...... Super easy and very tasty. I like to mix half of the dressing directly into the salad and leave the other half to drizzle on top.
❓ Frequently asked questions
Yes you can eat cauliflower raw if you prefer. However, its not always advised as our digestives systems aren't able to breakdown the sugars as well as when its cooked. - You can read more about eating raw vegetables here.
This recipe makes the most of the roasted flavour of cauliflower. Boiling cauliflower will cook it, but it won't have the same flavour as roasted cauliflower. Roasting cauliflower not only locks in flavour but also lock in its nutrients.
This roasted cauliflower salad is excellent for a bit of meal prep. Once made, place in one large bowl and cover or divide up into sealable containers. Keep in the fridge for up to 3 days. Great for making up on a Sunday and having ready for weekday lunches or as a side for your evening meals.
🍲 Other salad recipes
If you've tried this recipe, let me know what you think by leaving a star rating in the recipe card or comment section below. I always appreciate your feedback! You can also follow me on Pinterest, Facebook or Instagram or Sign up to my email list!
📖 Recipe

Roasted Cauliflower Salad
Ingredients
For the roasted Cauliflower:
- 1 large cauliflower 700g
- 1 Small tin of chickpeas 210g tin, 130g drained
- 1 tablespoon Olive oil
- Salt and pepper
- ½ a lemon juiced
For the Quinoa:
- 160 g dried Quinoa
- ¼ of a lemon
For the Dressing:
- 1 tablespoon Olive oil
- 2 teaspoon Dijon mustard
- 2 tablespoon Creme Fraiche
- 15 g Freshly chopped parsley
- Pinch of salt
- ½ a lemon juiced
For the salad:
- 1 red apple chopped into cm cubes
- 50 g chopped hazelnuts
- 15 g freshly chopped parsley
- Extra lemon wedges to serve
Instructions
- Pre heat oven to 200 degrees C. Remove the outer green leaves from the cauliflower and use a large knife to chop the florets off the main stem and then chop into smaller bitesized pieces.
- Place chopped cauliflower florets in a bowl along with the drained chickpeas, oil, salt and pepper and lemon juice.
- Toss together well with your hands then transfer to a baking tray and bake in the preheated oven for 30 minutes, shuffling the mixture half way through.
- Whilst the cauliflower is cooking place the quinoa in small saucepan with a wedge of lemon and covered with double the amount water. Place the pan on a medium heat and bring to the boil, then place on a lid and simmer for 15 minutes.
- With the cauliflower in the oven and the quinoa cooking in the pan, the dressing can be prepared. In a small bowl or container mix together the oil, mustard, creme fraiche, parsley, salt and lemon juice. Chill in the fridge until ready to serve.
- After the quinoa has been simmering for 15 minutes, take off the heat but do not remove the lid. Set to one side and leave with the lid on for 10 minutes.
- When the cauliflower is cooked remove from the oven and transfer to a large bowl. Once the quinoa has been sitting for 10 minutes, remove the lid and discard the wedge of lemon. Fluff up the quinoa with a fork and then add to the bowl alongside the cauliflower. Next add the chopped apple, hazelnuts, fresh parsley and half of the dressing.
- Mix together well then serve with the remaining dressing.
Video
Notes
- Cut cauliflower up on the tray that you intend to roast it on so that the bits of cauliflower are caught on the tray (makes it quicker and easier when cleaning up).
- Roughly chop the cauliflower into bit size chunks. Try not to chop into tiny pieces as these can become mushy upon cooking.
- Chop the apple up just before mixing into the salad to keep it fresh and prevent any browning.
- The dressing for this recipe takes seconds to put together and really does transform the salad. The more you make - the better!! Place all the dressing ingredients into a small dish and mix together with a spoon...... Super easy and very tasty. I like to mix half of the dressing directly into the salad and leave the other half to drizzle on top.
Nutrition
This post was first published in Jan 2019. Updated in July 2021 with improved recipe and photos, and new step by step instructions and expert tips.
The post Roasted Cauliflower Salad appeared first on ProperFoodie.
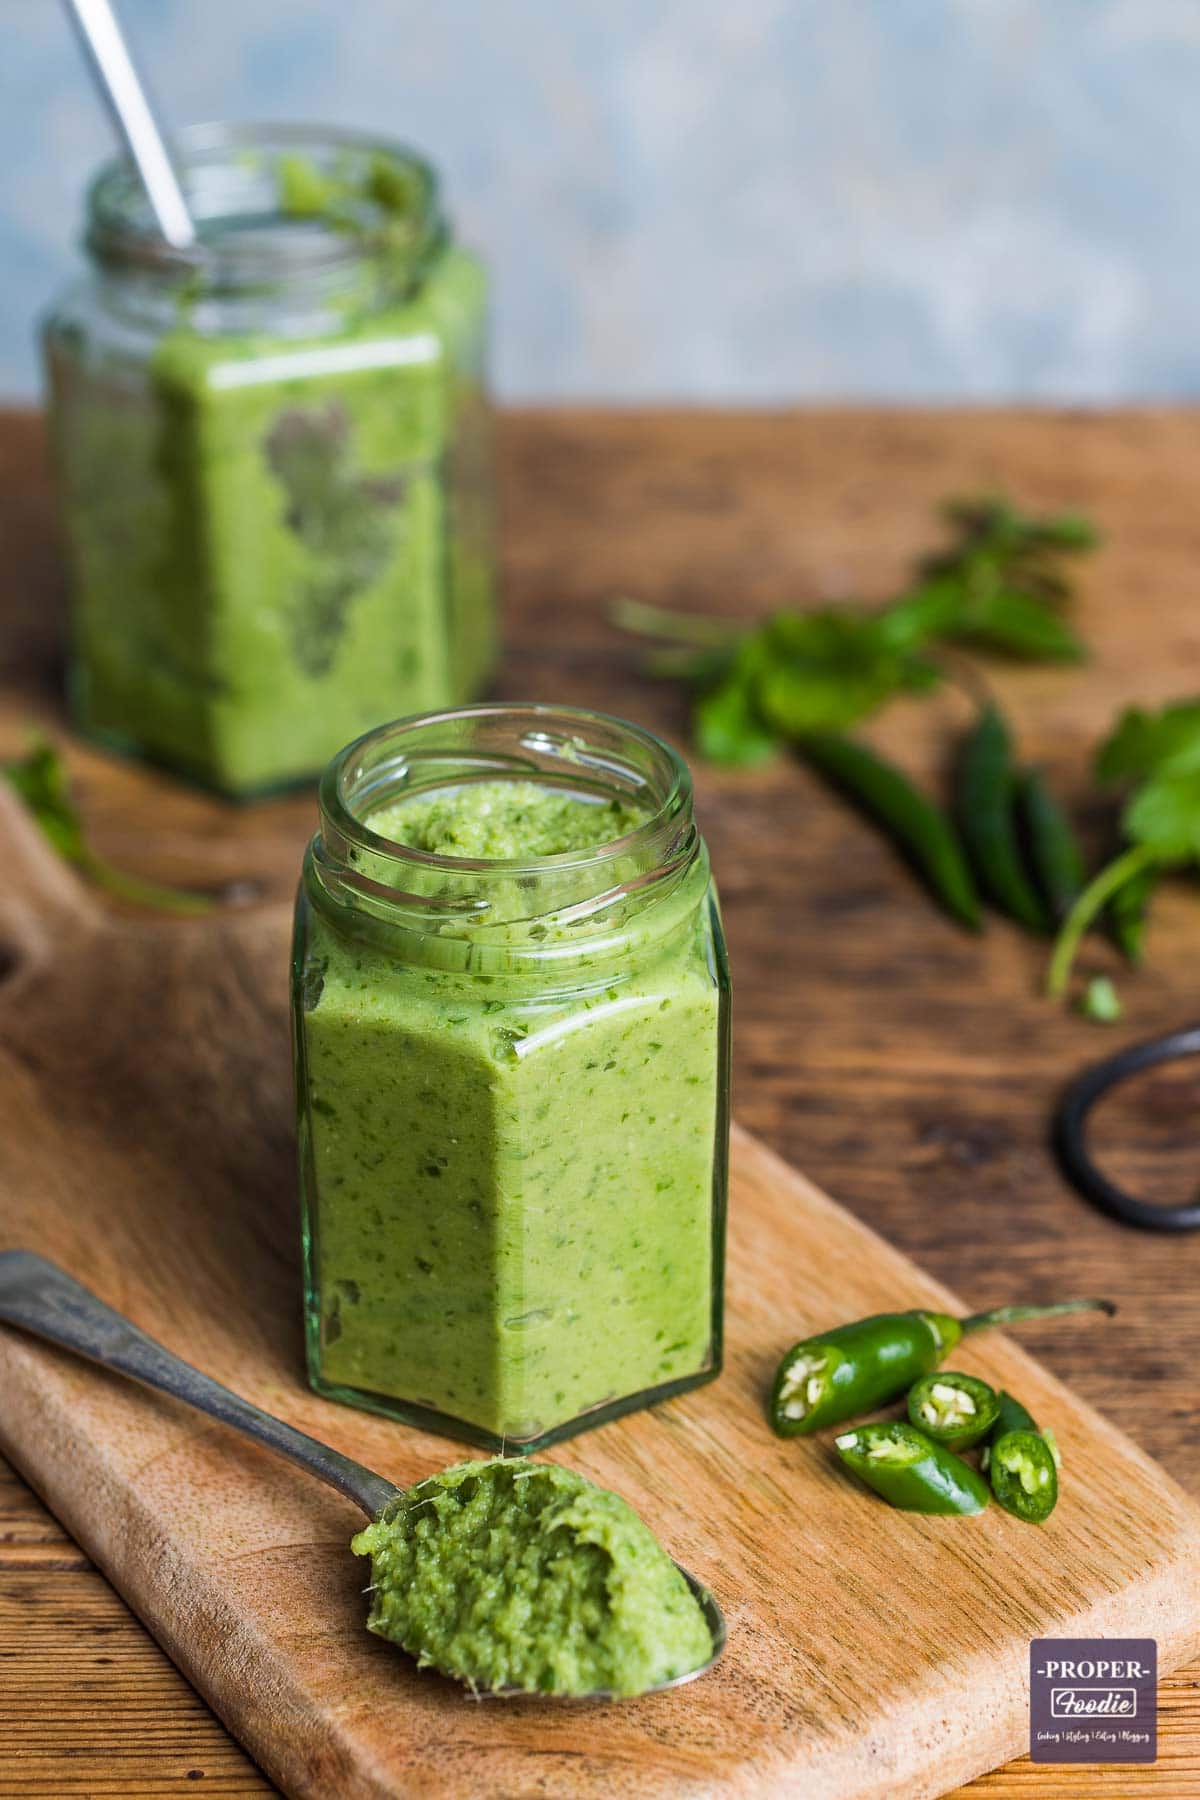
]]>The post Thai Green Curry Paste appeared first on ProperFoodie.
]]>A fragrant and spicy Thai green curry paste. Make your own Thai green paste at home with this simple and quick recipe that can be whipped up in 10 minutes. Use this Thai paste as a base for a fragrant, homemade Thai green curry recipe or jar it up and save for later.
[feast_advanced_jump_to]
👩🏻🍳 Why make this recipe
Most curry recipes will call for some kind of curry paste, whether thats homemade or out of a jar grabbed off the supermarket shelf. Theres nothing wrong with the latter. Sometimes a jar of paste and a packet of microwave rice are just the ticket on a busy weekday night. That said, if I have the time and where-with-all to get out my blender and chop up a few ingredients, then I most certainly will. Not only does homemade curry paste taste amazing but the fragrant aromas that fill the kitchen are just too good to miss.
This recipe is adapted from the Thai recipes I made in 2012 in Thailand when attending the Siam Rice cookery school in Chang Mai, Northern Thailand.
🥘 Ingredients
To make this easy Thai green curry paste recipe you will need:

Ingredient notes
Green chillies: The chillies used here will ultimately determine how hot your curry is. So if you like it spicy then use hotter chillies. For Thai green Curry paste, green chillies are required. Use the smaller, thinner finger chillies for extra heat or use the larger green chillies for a milder flavour. If you would prefer no spice at all then just replace the chillies with green bell pepper (capsicum).
Ginger: If you can get hold of galangal (Thai ginger) then definitely use that here. If not, standard fresh ginger is just fine. If you can't get hold of any type of fresh ginger than you can substitute for jarred ginger.
Coriander: Coriander is a great flavour in Thai paste and so I don't recommend that you substitute or leave it out. This recipe uses both fresh and ground coriander for full flavour and a burst of colour.
Garlic: You can substitute for 2 teaspoon of garlic paste, instead of cloves, if preferred.
Lime: this paste recipe uses both the juice and the zest
Lemongrass: You can substitute this for jarred lemongrass if preferred.
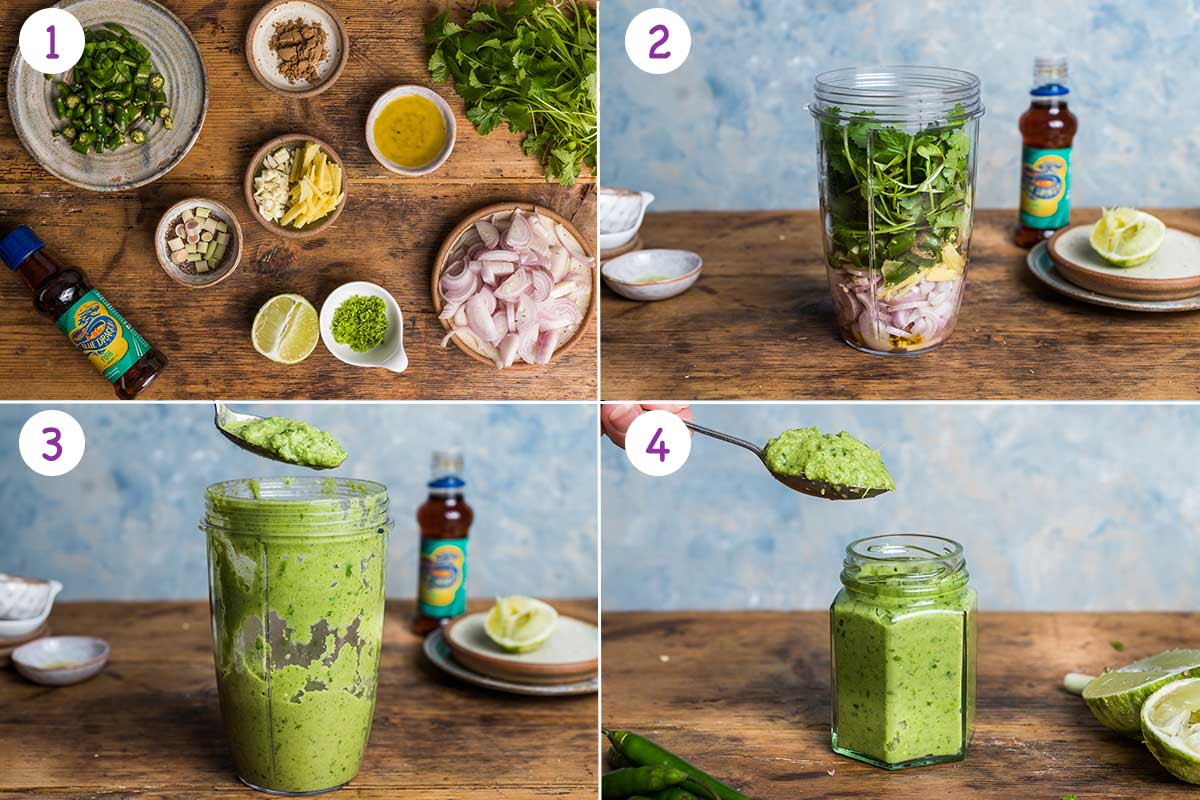
🔪 Step by step instructions
- Start by preparing the ingredients: Roughly chop the shallots, lemongrass and green chillies, peel and slice the garlic and ginger, and zest the whole lime and juice half of it.
- Set up a small blender or smoothie maker. Then add all of the ingredients plus 1 tablespoon of water.
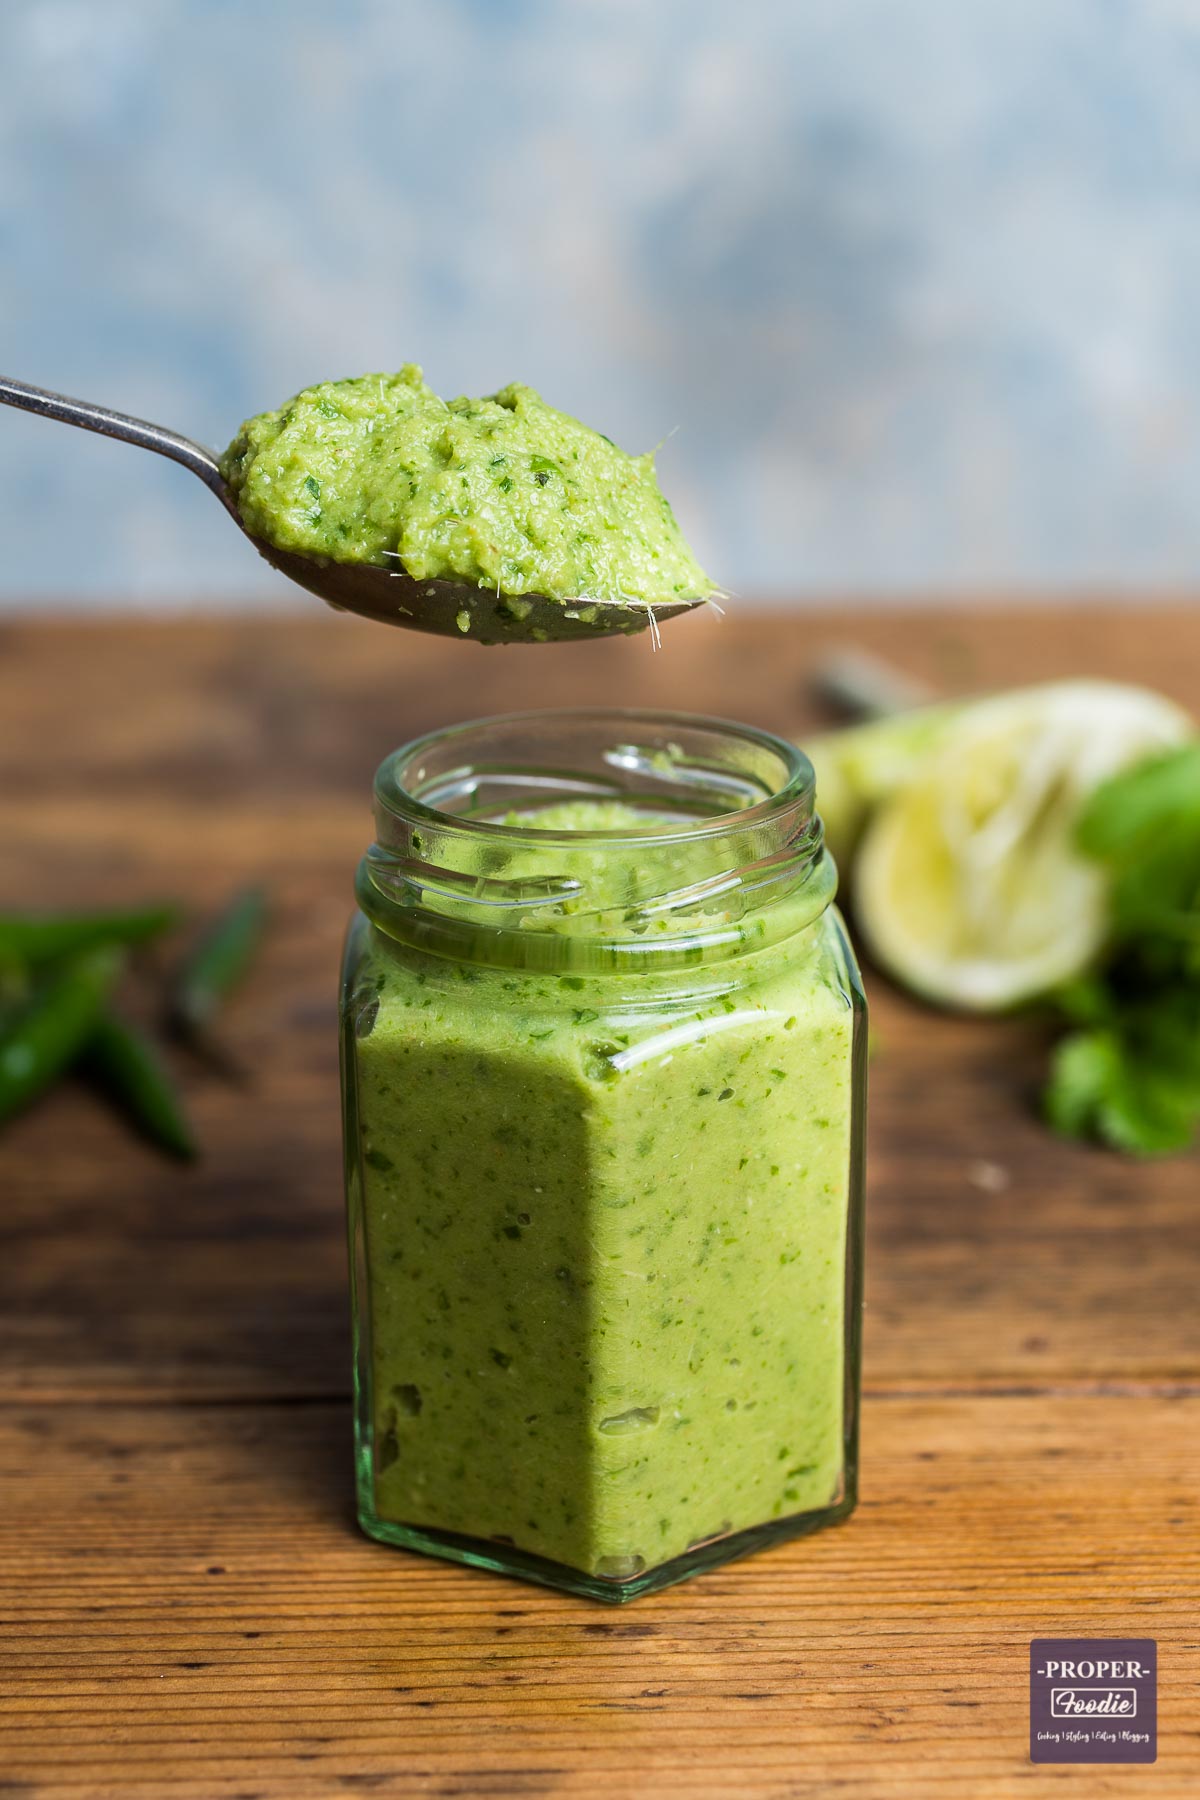
- Start the blender and blend until a thick, smooth paste has formed. If the blender has trouble getting going add another tablespoon of water. Make sure to only add small amount of water (1 tablespoon at a time) otherwise your paste will be too thin.
- Use the paste to make a Thai green Curry or transfer to a jar or sealable containers and refrigerate for 1 week or freeze for up to 3 months.
💭 Expert tips
- Blending the paste: Use a small blender to make the Thai green paste. If the ingredients don't blend together easily then add a bit of water or olive oil to help get it going. Only add small amounts (1 tbsp) of water or oil each time. Too much and the paste will become thin and runny.
- Make in advance: Curry pastes are great to make in advance as they store easily and can be used directly in whatever curry you are making as soon as you are ready to make it. I like to batch make my curry pastes and then split into small containers. Each container has enough to make one curry for 2-4 people (3-4 tbsp). These can be stored in the fridge or freezer and then called upon when needed. Frozen paste can be microwaved for a minute or two and can then be used right away.
- Scaling this recipe: The ingredients for this recipe will make around 6 tablespoons of Thai green paste. To make more just increase the amounts of ingredients. Doubling the ingredients will produce 12 tablespoons.
❓ Frequently asked questions
Out of all the Thai currys, Thai green curry is the hottest, despite the belief that Thai red curry is the hotter of the two. This is mainly down to the chillies used. Green chillies (particularly green birds eye chilli peppers) tend to be hotter than red. So whether the paste is hot or too spicy for you, is dependent on the ingredients used and the amounts. If you like it spicy add plenty of small green chillies. If not, add less and go for a bigger sized chilli pepper. If a milder curry is much more your thing then try Panang curry, or Massaman curry, or even a thai yellow curry.
The main difference between Thai green and Thai red curry paste is the colour and the heat, both of which come from the type of chillies used. Substituting one paste for other will ultimately dictate the type of curry you end up making.
2-3 tablespoon of paste is usually enough when making a curry for 2-4 people.
Once made, Thai green curry paste can be transferred to a jar and kept in the fridge for up to a week or in the freezer for up to 3 months.
🍛 Other curry paste recipes:
If you've tried this recipe, let me know what you think by leaving a star rating in the recipe card or comment section below. I always appreciate your feedback! You can also follow me on Pinterest, Facebook or Instagram or Sign up to my email list!
📖 Recipe
Thai green curry paste
Equipment
Ingredients
- 100 g Shallots roughly chopped
- 2 garlic cloves roughly chopped
- 10 g piece of fresh ginger peeled and sliced
- 8 green finger small chillies
- 1 large green chilli pepper
- 1 stalk lemongrass
- 20 g fresh coriander stems and leaves
- 1 teaspoon ground coriander
- ½ lime juiced
- 1 lime zested
- 1 tablespoon olive oil
- 1 teaspoon fish sauce
- 1 or 2 tablespoon of water if needed for blending
Instructions
- Start by preparing the ingredients: Roughly chop the shallots, lemongrass and green chillies, peel and slice the garlic and ginger, and zest the whole lime and juice half of it.
- Set up a small blender or smoothie maker. Then add all of the ingredients plus 1 tablespoon of water.
- Start the blender and blend until a thick, smooth paste has formed. If the blender has trouble getting going add another tablespoon of water. Make sure to only add small amounts of water (1 tablespoon at a time) otherwise your paste will be too thin.
- Use the paste to make a Thai green Curry or transfer to a jar or sealable containers and refrigerate for 1 week or freeze for 1 month.
Video
Notes
Nutrition
This post was first published in May 2018. Updated in March 2021 with an improved recipe, new images, step by step photos and expert tips.
The post Thai Green Curry Paste appeared first on ProperFoodie.
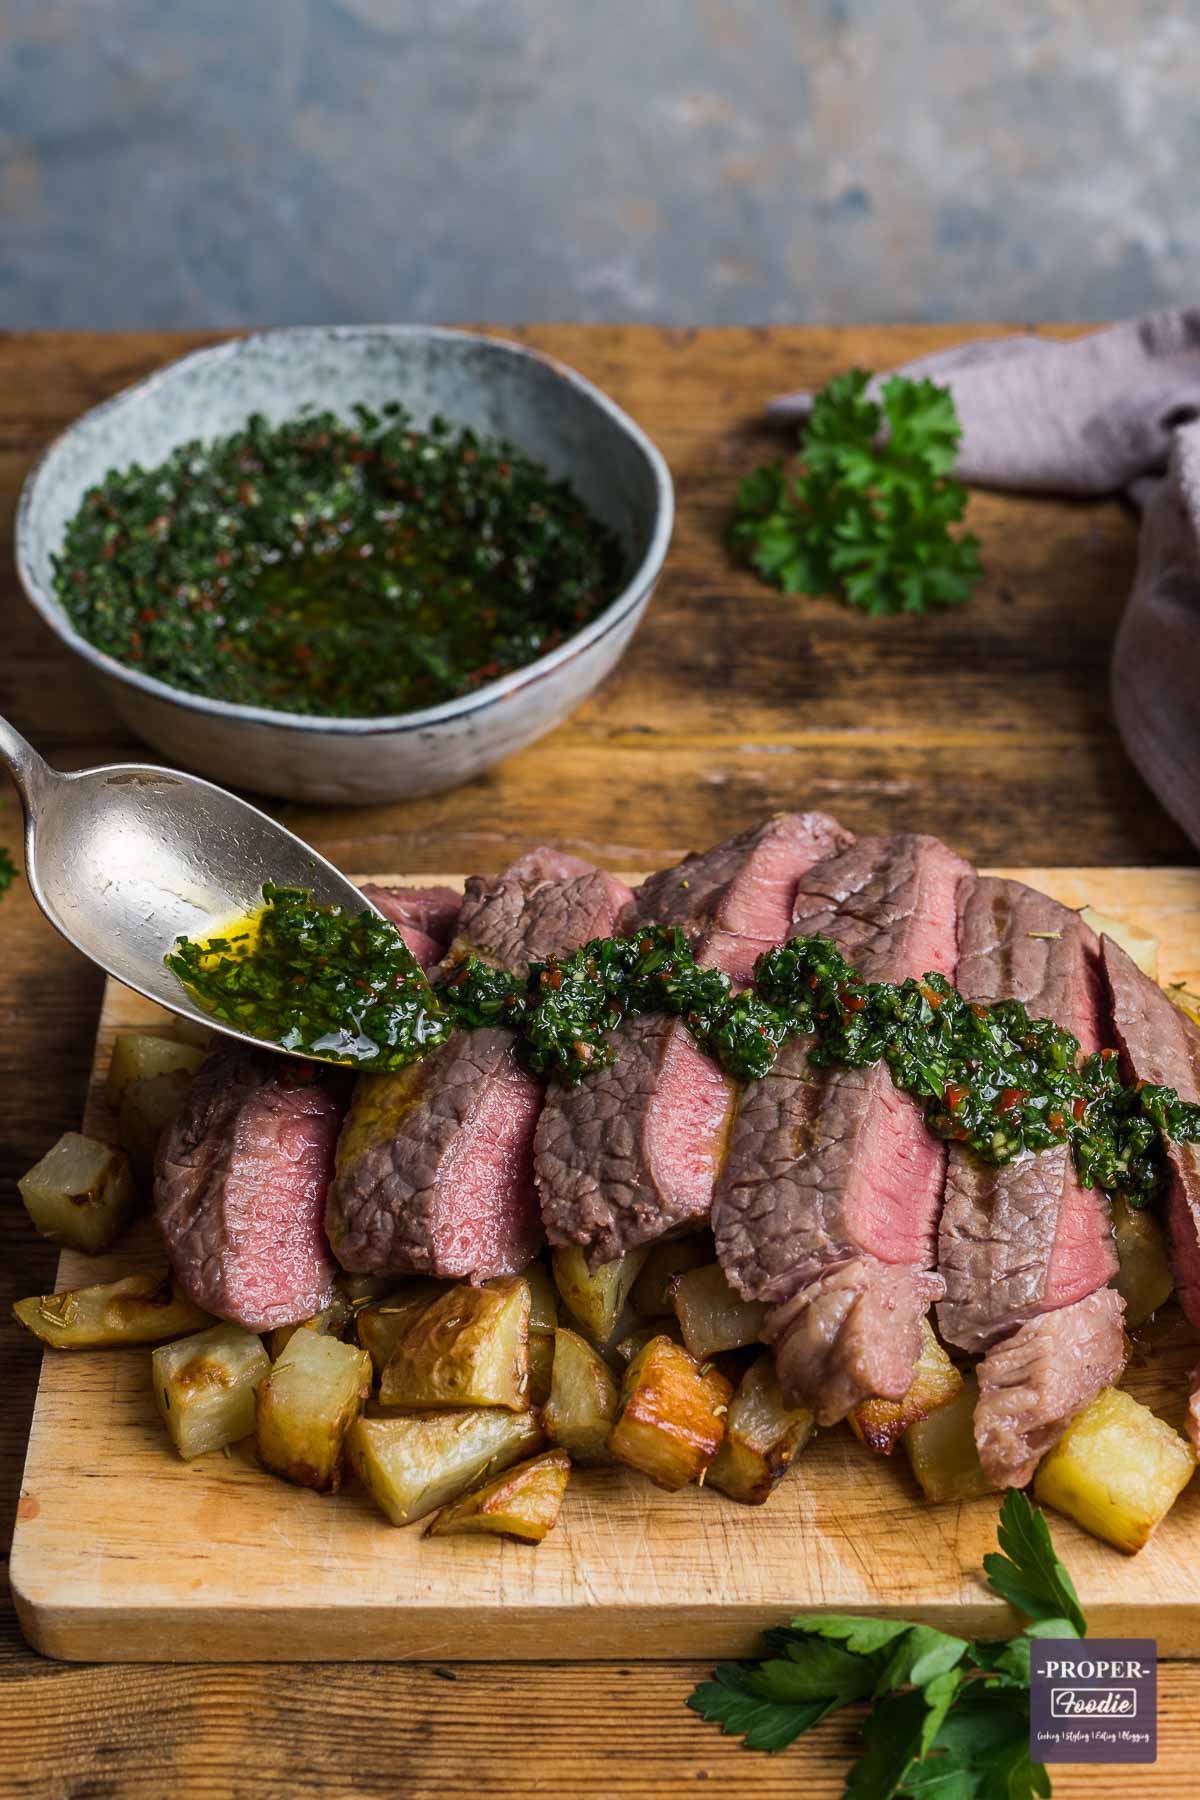
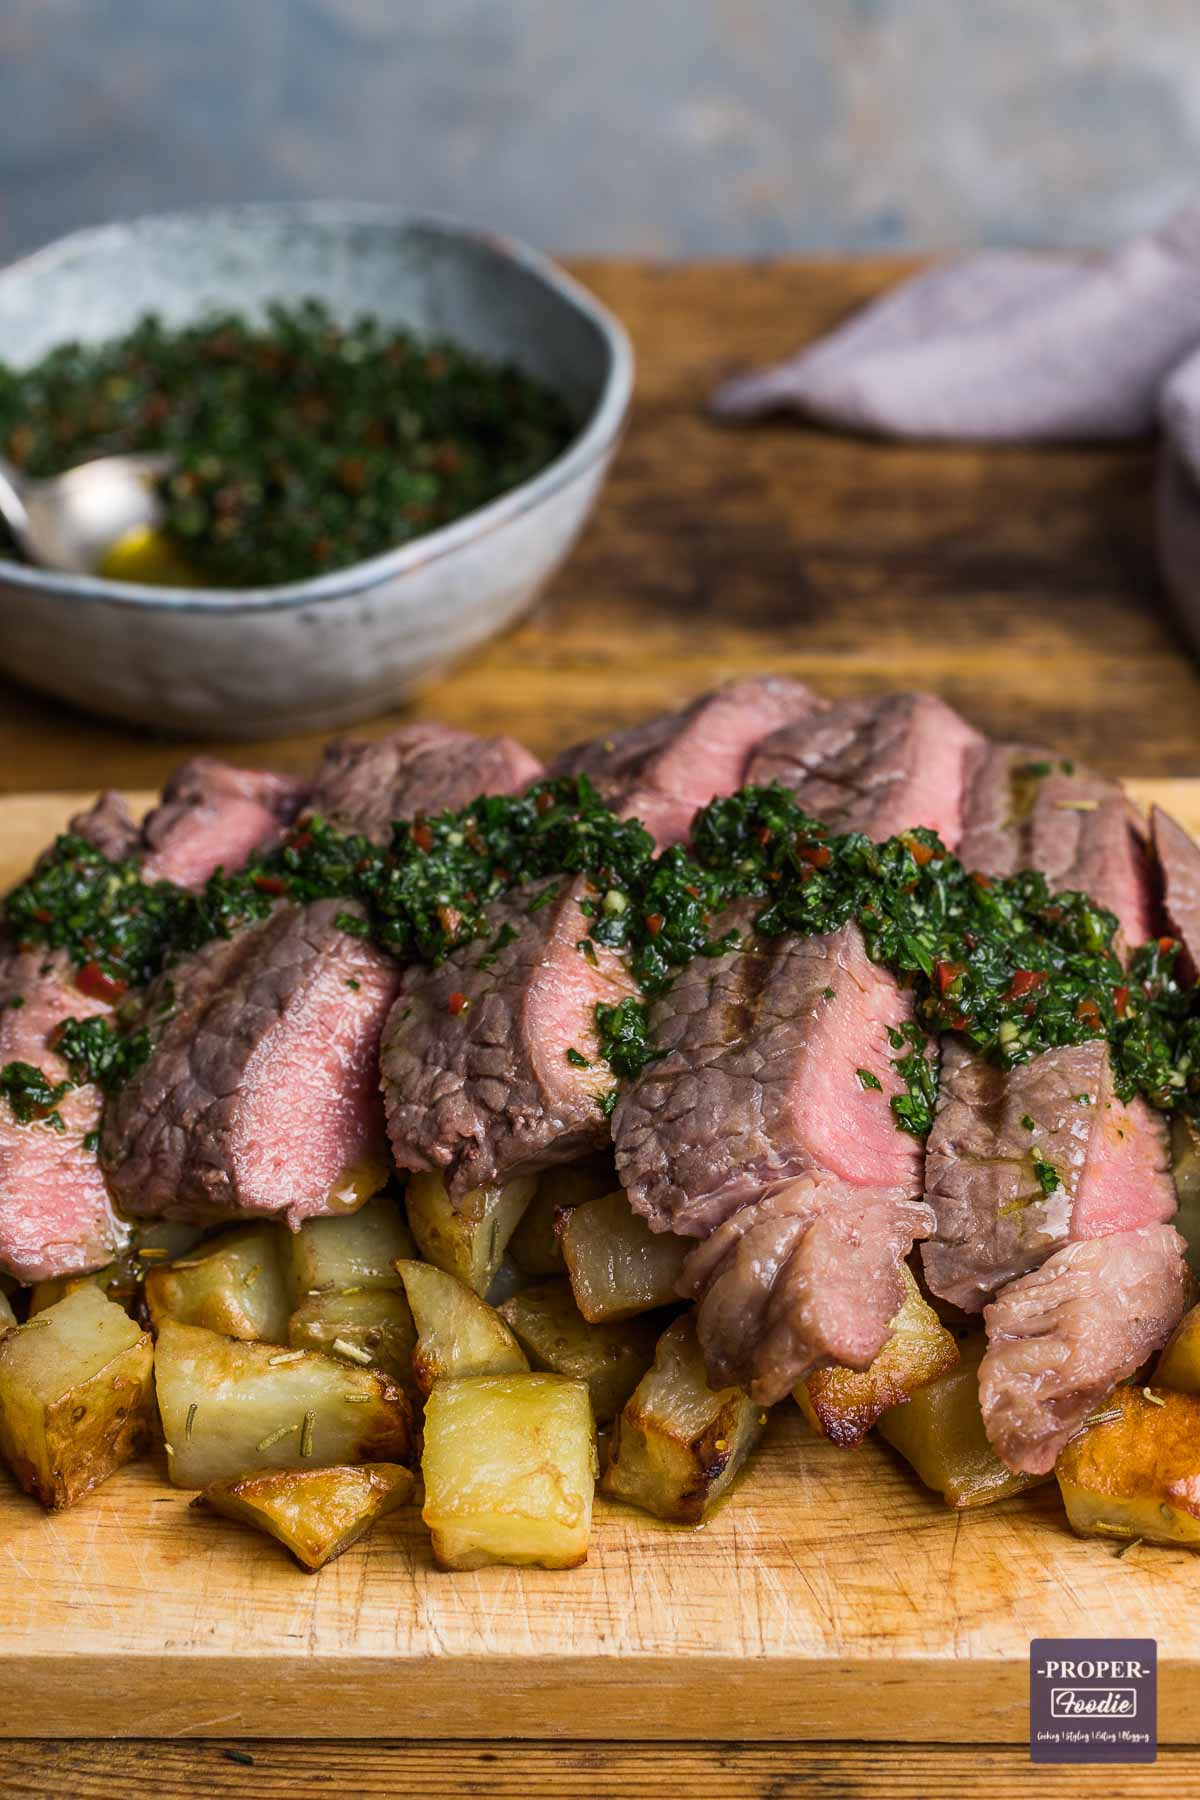
]]>The post Chimichurri Steak Platter appeared first on ProperFoodie.
]]>Chimichurri steak platter recipe! Pan fried steak sliced into tender, juicy strips and served with fragrant chimichurri sauce. Make this steak platter and fabulous Argentinian dressing in just over 30 minutes. Perfect for a Saturday night in with a posh steak dinner.
[feast_advanced_jump_to]
👩🏻🍳 Why make this recipe
This easy meal is great for a Saturday night in with a bottle of red and a good film. I love to have this dish with a good helping of rosemary potatoes and an avocado salad on the side. Its a lot of food, but sometimes a massive feast on a weekend is just what I need. If I'm going to eat big this is the way I like to do it - plenty of protein and lots of interesting flavours.
No need to peel the potatoes, just roughly chop, season and pop in the oven. The herby chimichurri dressing takes just 5 minutes to make. Throw all the ingredients into a blender or grab a knife and get chopping! It also keeps really well in the fridge, so its no problem to make ahead of time. The juicy steak is cooked simply in a pan and just 10 minutes before you're ready to eat.
This is also a great dish if you're cooking for a few people. Just pile everything on to a board to create a steak sharing platter and let people help themselves!
🥘 Ingredients
To make this chimichurri steak platter recipe you will need:

Ingredient notes
Steak: This recipe uses rump steak but you could also use sirloin, ribeye, fillet or flat iron. Fillet is very lean and tender and so tends to be the most expensive. - Great for a special occasion. For more details on different steak cuts have a look at this page on choosing the right steak or this guide to different beef cuts.
Herbs: Always use fresh herbs in chimichurri sauce for full flavours and bold colours.
Chilli: Always taste the chilli to test the level of heat before adding. For more heat add in smaller green chillies.
🔪 Step by step instructions
- Preheat the oven to 200°C (400°F) and make sure steaks are out of the fridge and coming up to room temperature. Prepare the potatoes by slicing into 2cm cubes (skins can be left on). Place cubed potatoes in a bowl and add 1 tablespoon oil and 1 teaspoon dried rosemary. Toss together and mix well then transfer onto a baking tray. Bake in the oven for 30-35 minutes until golden brown. Check and turn half way through cooking.
- While the rosemary potatoes are cooking, prepare the chimichurri dressing. Finely chop the fresh parsley, fresh coriander, basil leaves, red chilli and garlic. Place all the chopped ingredients on the same chopping board.
- Use the knife blade to start to bring together all the chopped ingredients. Continue to chop whilst mixing the herbs until everything is well minced together.
- Transfer the chopped herbs, chilli and garlic to a small bowl and add 4 tablespoon olive oil and 2 tablespoon red wine vinegar.
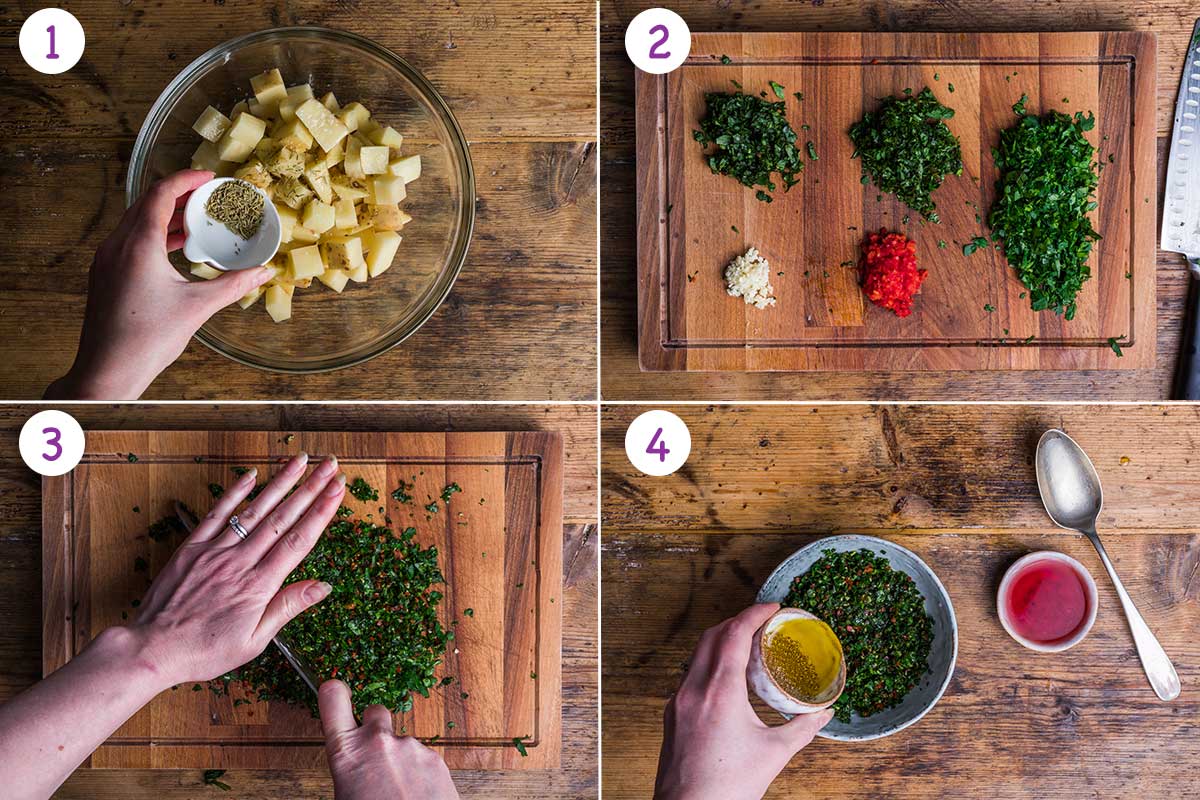
- Mix the oil and vinegar into the herbs. Add more oil to loosen the sauce further if necessary. Cover and chill in the fridge until ready to serve.
- Start to prepare the rump steaks when there is 15 minutes left on the timer for the rosemary potatoes. Place a large griddle pan or frying pan on a high heat. Prep the steak by drizzling both sides with olive oil and seasoning well. Then use your fingers to rub the oil and seasoning into the meat.
- Once the pan is hot place the rump steaks in the pan, they should sizzle immediately. Leave to cook on the first side for 3-4 minutes.
- Turn over and cook for 2 minutes on the other side (rare – medium), adjust the time according to your preferences). Once cooked transfer to a chopping board and cover with foil. Allow to rest for 5 minutes.
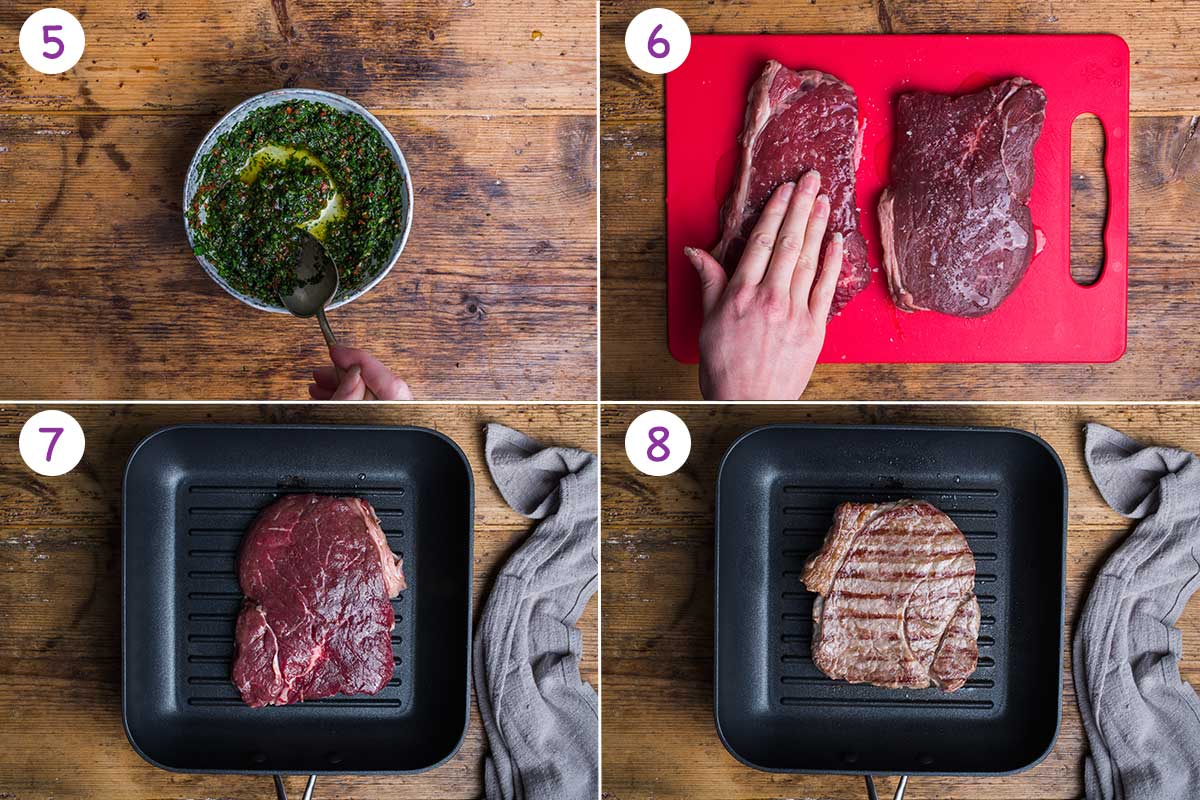
- Slice the cooked steak and serve alongside the rosemary potatoes and chimichurri dressing.
💭 Expert tips
- Remove steaks from the fridge at least an hour before you cook them so that they are at room temperature.
- Use fresh herbs for the chimichurri sauce to make sure the dressing is full of flavour and colour
- To save time whiz up the chimichurri ingredients in a small food processor or blender rather than chopping. However, chopping is the best way to really experience all the fantastic aromas!
❓ Frequently asked questions
When pan frying a steak I always opt for rump steak. Rump tends to be marbled with more fat so resulting in a rich and full flavoured steak. Rump steaks are also bigger and better value (and better for feeding hungry mouths!).
Steak should to be cooked when you want to eat it and not before. It should also be given all the time and attention it needs. But really it doesn't need that long, 15 minutes max and you have yourself a beautiful steak. The recipe below gives the times for a rare-medium steak. You can adjust this depending on how well done you like your meat. (2 mins on each side for rare and 6 mins on each side for well done).
For a perfect steak make sure the pan is hot and that the the rump steaks are seasoned and rubbed with oil. Once in the pan try not to touch the steaks or move around until you are ready to turn. Check how well-done they are by pushing on the meat with your finger, the firmer the meat the more cooked in the middle. Always remember to rest the steaks for at least 5 minutes before slicing and serving.
Its quite straight forward to make this chimichurri steak, which makes it a great dish for a lazy weekend. Most of this recipe can be prepped in the morning leaving you with a couple of things to do later on when you're ready to eat.
The chimichurri sauce can be made in advance and refrigerated. The potatoes can be chopped and seasoned ready for the oven. The steak can be brought out of the fridge an hour or two before cooking in order to bring up to room temperature. If you really want to save time later you could bake the cubed potatoes, cool and refrigerate, and then just reheat in the oven for 5 minutes or so when you're ready for them.
As well as serving this steak platter with some delicious rosemary potatoes or Foil Pack Potatoes, I also love to serve a massive bowl of Mango Avocado Salad on the side. The creamy avocado flesh goes so well with the meat and spicy chimichurri dip. If you decide to have the avocado salad make you cut the avocado just before you serve the meal. This will keep the avocado nice and fresh and stop it turning brown. Or use another one of my easy avocado recipes as an accompaniment.
🍖 Other steak recipes
- Steak and Ale Pie
- Steak and Chips
- Steak and veggie BBQ skewers
- Tuna Steak Recipe
- Vietnamese Style Beef Salad
If you've tried this recipe, let me know what you think by leaving a star rating in the recipe card or comment section below. I always appreciate your feedback! You can also follow me on Pinterest, Facebook or Instagram or Sign up to my email list!
📖 Recipe

Chimichurri Steak Platter
Equipment
- Mixing bowl
- Knife
- chopping board
- Griddle pan
Ingredients
For the steaks
- 2 Rump steaks
- 1 tablespoon oil
- Pinch salt
For the potatoes
- 2 large potatoes
- 1 tablespoon olive oil
- 1 teaspoon dried rosemary
- Pinch salt
For the chimichirri dressing
- 20 g fresh parsley
- 10 g fresh coriander
- 10 g basil leaves
- 1 garlic clove
- 1 red chilli
- 4 tablespoon oil
- 2 tablespoon red wine vinegar
Instructions
- Preheat the oven to 200°C (400°F) and make sure steaks are out of the fridge and coming up to room temperature. Prepare the potatoes by slicing into 2cm cubes (skins can be left on). Place the cubed potatoes in a bowl and add 1 tablespoon oil and 1 teaspoon dried rosemary. Toss together and mix well then transfer onto a baking tray. Bake in the oven for 30-35 minutes until golden brown. Check and turn half way through cooking.
- While the rosemary potatoes are cooking, prepare the chimichurri dressing. Finely chop the fresh parsley, fresh coriander, basil leaves, red chilli and garlic. Place all the chopped ingredients on the same chopping board.
- Use the knife blade to start to bring together all the chopped ingredients. Continue to chop whilst mixing the herbs until everything is well minced together.
- Transfer the chopped herbs, chilli and garlic to a small bowl and add 4 tablespoon olive oil and 2 tablespoon red wine vinegar.
- Mix the oil and vinegar into the herbs. Add more oil to loosen the sauce further if necessary. Cover and chill in the fridge until ready to serve.
- Start to prepare steak when there is 15 minutes left on the timer for the rosemary potatoes. Place a large griddle pan or frying pan on a high heat. Prep the rump steak by drizzling both sides with olive oil and seasoning well. Then use your fingers to rub the oil and seasoning into the meat.
- Once the pan is hot place the rump steaks in the pan, they should sizzle immediately. Leave to cook on the first side for 3-4 minutes.
- Turn over and cook for 2 minutes on the other side (rare – medium), adjust the time according to your preferences. Once cooked transfer to a chopping board and cover with foil. Allow to rest for 5 minutes.
- Slice the steak and serve alongside the rosemary potatoes and chimichurri dressing.
Notes
- Remove steaks from fridge at least an hour before you cook them so that they are at room temperature.
- Use fresh herbs for the chimichurri sauce to make sure the dressing is full of flavour and colour.
- To save time whiz up the chimichurri ingredients in a small food processor or blender rather than chopping. However, chopping is a best way to really experience all the fantastic aromas!
For a perfect steak make sure the pan is hot and that the the rump steaks are seasoned and rubbed with oil. Once in the pan try not to touch the steaks or move around until you are ready to turn. Check how well-done they are by pushing on the meat with your finger, the firmer the meat the more cooked in the middle. Always remember to rest the steaks for at least 5 minutes before slicing and serving. Can this recipe be made in advance? The chimichurri sauce can be made in advance and refrigerated. The potatoes can be chopped and seasoned ready for the oven. The steak can be brought out of the fridge an hour or two before cooking in order to bring up to room temperature. If you really want to save time later you could bake the cubed potatoes, cool and refrigerate, and then just reheat in the oven for 5 minutes or so when you're ready for them. What to serve with Chimichurri steak? As well as serving this steak platter with some delicious rosemary potatoes or Foil Pack Potatoes, I also love to serve a massive bowl of Mango Avocado Salad on the side. The creamy avocado flesh goes so well with the steak and spicy chimichurri dip. If you decide to have the avocado salad make you cut the avocado just before you serve the meal. This will keep the avocado nice and fresh and stop it turning brown. Or use another one of my easy avocado recipes as an accompaniment.
Nutrition
This post was first published in August 2016. Updated in February 2021 with an improved recipe, new images, step-by-step photos and recipe tips.
If you would like to access the original recipe you can do so here: Original Steak and Chimichurri recipe 2016
The post Chimichurri Steak Platter appeared first on ProperFoodie.
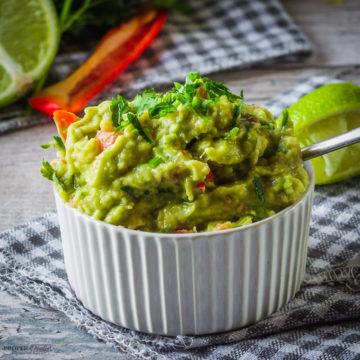
]]>The post Simple Guacamole Recipe appeared first on ProperFoodie.
]]>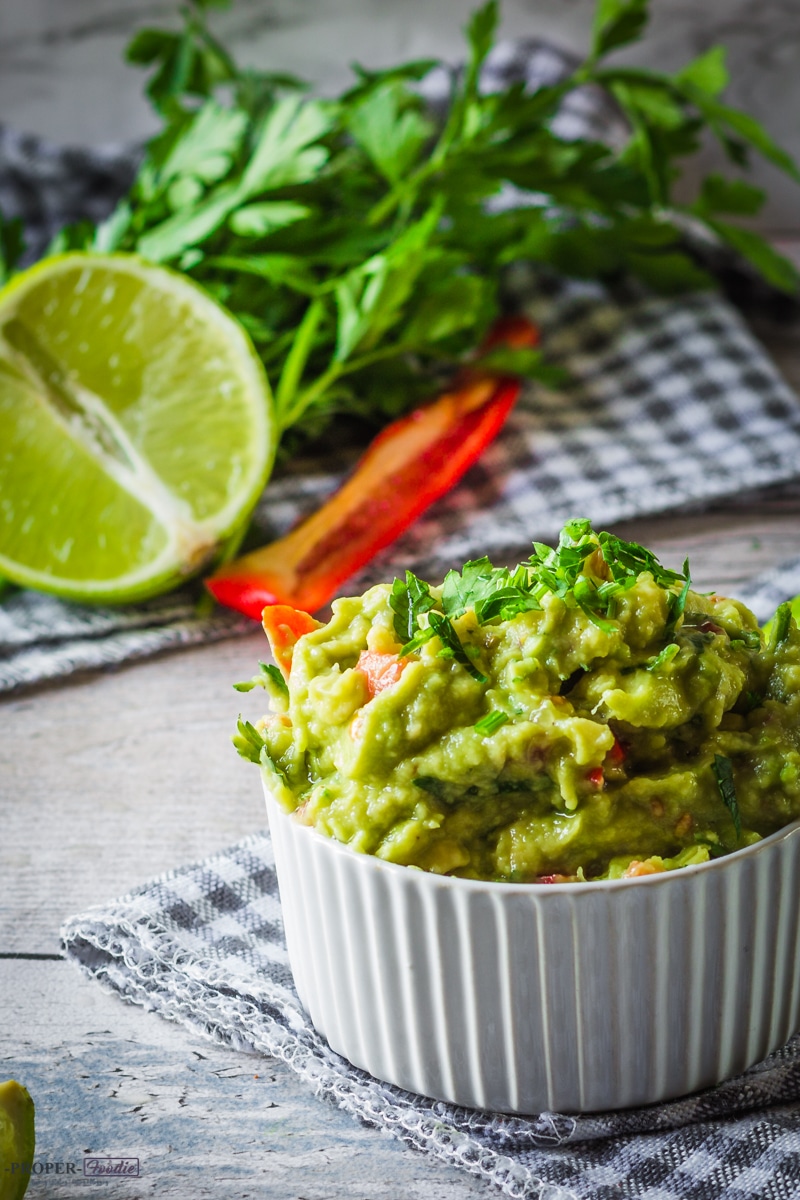
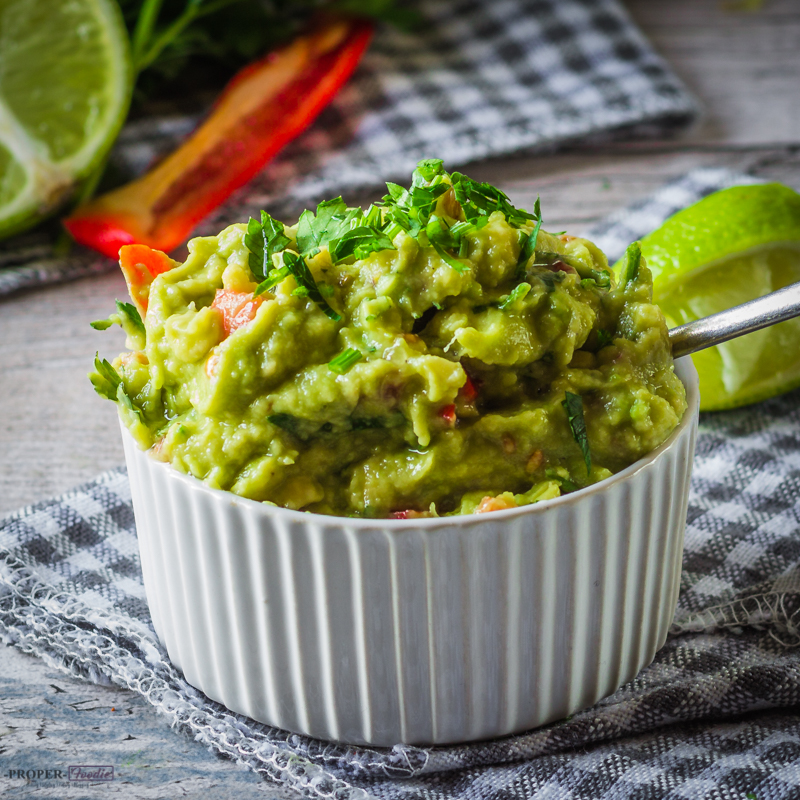
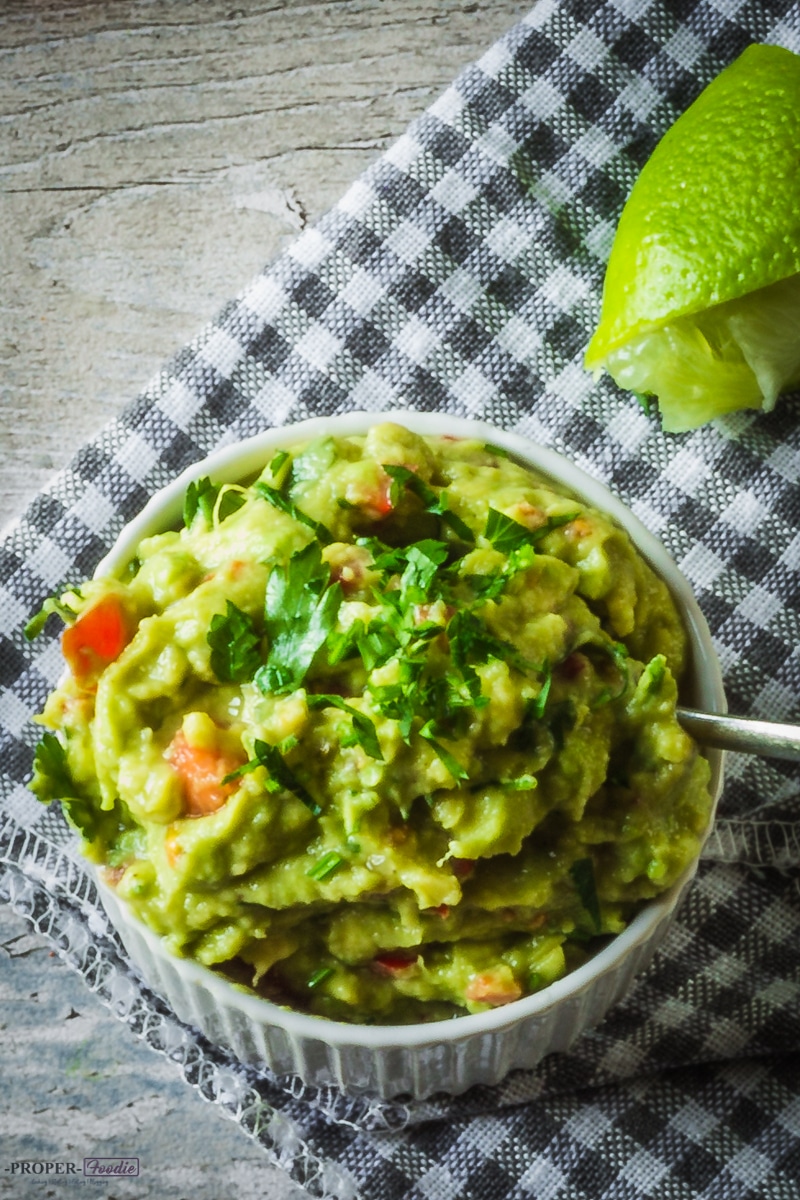
Simple guacamole recipe
Homemade guacamole is a really easy and tasty dip made with avocado, chillies and lime juice. Perfect for nibbles at get togethers and partys along with other tasty dips such as beetroot hummus, celery, apple and walnut pesto or roasted red pepper dip. It takes just 5 minute to make this guacamole recipe and its so much better than a shop bought version. Surprisingly, shop bought guacamole tends to include cream, but as avocado has quite a creamy texture already I find its not necessary to add any cream. So lets get to making a homemade, healthy guacamole recipe. For a proper Mexican guacamole recipe I always add chopped chilli, cubed tomato, lime juice and fresh coriander.
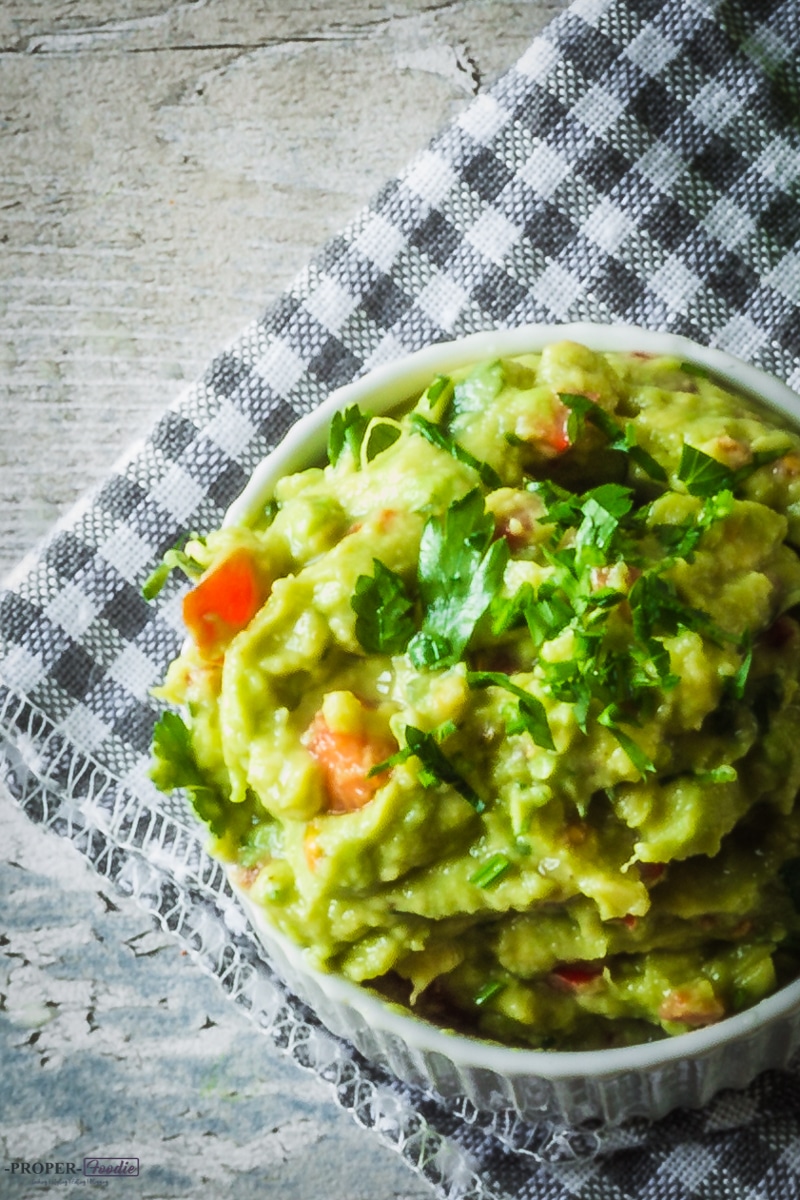
What is guacamole made of?
- Avocado flesh
- Lime juice
- Fresh red chilli
- Cubed and deseeded tomatoes
- freshly chopped coriander
- Pinch of salt to taste
The main ingredient in a simple guacamole recipe is of course avocado, which is what gives guacamole its recognisable light green colour and creamy texture. The other usual ingredients in a guacamole are tomatoes, lime juice, salt and coriander. Fresh chilli can also be added for a spicy guacamole recipe. A little bit of chopping is required and of course the avocado needs to be cut, de-stoned and the skin removed. For this simple guacamole recipe I tend to mash the avocado flesh with a fork whilst its still in its skin. This just needs the avocado to be cut in half and the stone removed, then mash each half. This is so simple to do and means much less mess.

Can you eat guacamole by itself?
Guacamole is usually used as a dip or topping and not usually eaten on its own. However, whole avocado can often be eaten by itself or in a salad.
How do you make guacamole? (Step-by-Step Guide)
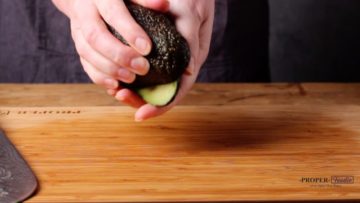
- Start by cutting the avocado in half. Move the knife around the stone and then twist the two halves apart with your hands

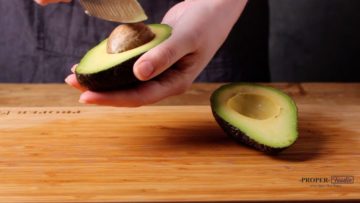
- To remove the avocado stone carefully hit the stone with the blade of the knife then twist and pull out.

- With the skin still on, use a fork to mash up the avocado flesh. The avocado skin acts as a sort of bowl. Then scoop the mashed flesh out and into a bowl.

- Immediately squeeze lime juice over the flesh to prevent it from going brown.

- Next add the chopped chilli, cubed tomatoes and most of the chopped coriander to the avocado and mix well. Transfer to a serving bowl and top with the remaining coriander or fresh parsley if you prefer.
Serving suggestion: serve with crisps and dips, chicken tacos, fajita chicken salad or on top of a smokey chilli con carne.
Can you make guacamole in advance?
Yes guacamole can be made in advance; up to a maximum of 2 days before you will need it. The tricky part is making sure the dip doesn't go brown. I have found the best way to keep guacamole fresh and green is to add the juice of 1 lime for every avocado used. Mix the juice directly into the dip and then place the dip in the fridge in a sealed container or dish wrapped well with cling film. A few more tips and tricks with avocados can be found here.
Do avocado pits keep guacamole from going brown?
No the avocado pit or stone has no use in stopping guacamole from going brown. - so don't be tempted to pop a stone in the middle of your dip - it really won't do anything. In my experience the lime juice and a sealed container method is the best.
Is guacamole vegan?
Yes, when made with just avocado, tomato and chilli, guacamole is suitable for vegans. This simple guacamole recipe and homemade recipes in general are all vegan. However, watch out for shop bought varieties which tend to have cream added to guacamole!!!
Is guacamole dip fattening?
If consumed in huge quantities, yes guacamole is fattening. The fat in guacamole is from the avocado, which is mainly good fats. So half an avocado everyday is a great way to maintain a healthy balanced diet and get in some of those healthy fatty acids. However, the calories and fat are high in avocados so over doing the guacamole isn't advised.
Avocado recipes
For more ideas on how to use avocados have a look at my easy avocado recipes post. Or why not make some paprika chicken wraps, which are great with guacamole added. If you fancy a guacamole dip with a twist why not try pumpkin guacamole?


📖 Recipe

Simple Guacamole Recipe
Ingredients
- 1 large avocado (120g flesh)
- 1 Juice of a lime
- ½ fresh red chilli (7g finely chopped)
- 2 baby tomatoes (35g diced small)
- Handful of fresh coriander (roughly chopped)
Instructions
- Half the avocado by slicing the knife into the fruit and move around the stone. Then twist each half in opposite directions and pull apart.
- To remove the stone carefully hit the blade of the knife into the stone, then twist and pull.
- Leave the avocado flesh in the skin and use a fork to carefully mash the flesh and then scoop out.
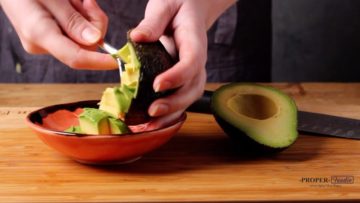
- Add the lime juice to the avocado and mix well. (Lime helps to prevent browning). Then add the chopped chilli, diced tomato and most of the coriander. Mix together well then transfer to a serving bowl and sprinkle over any remaining parsley.
Nutrition
The post Simple Guacamole Recipe appeared first on ProperFoodie.
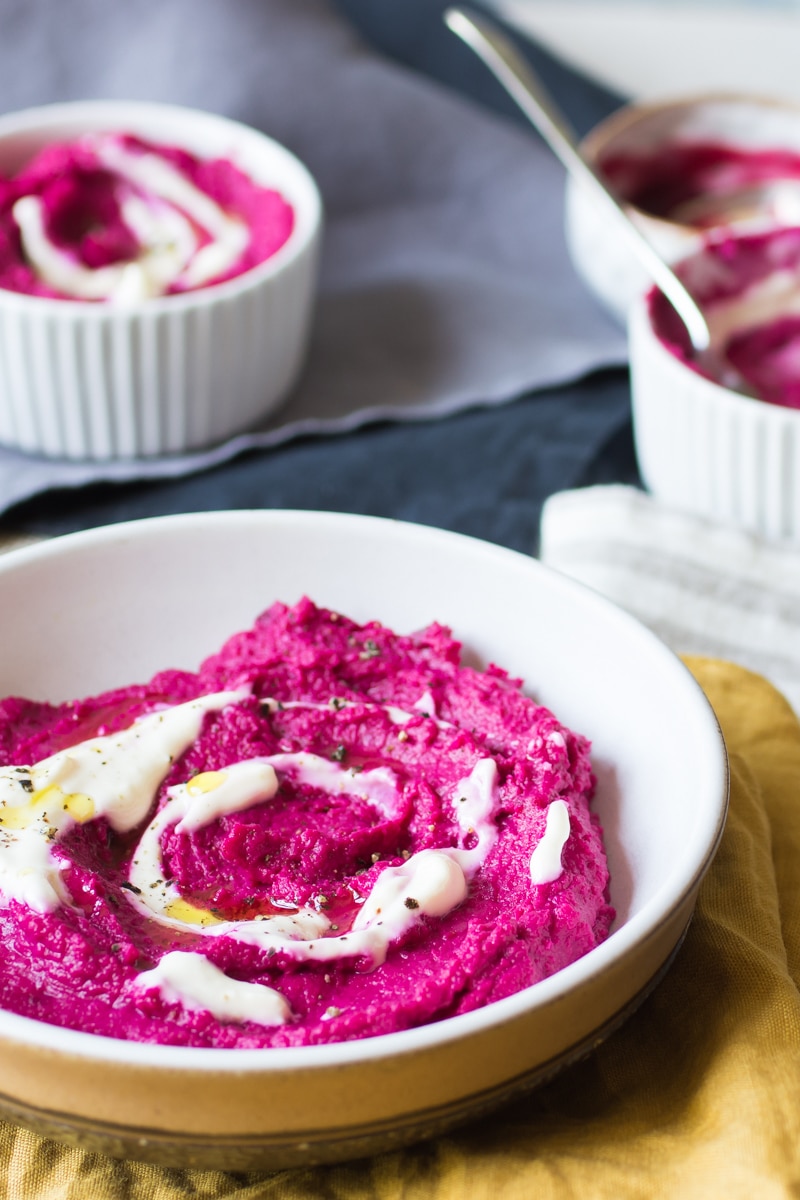
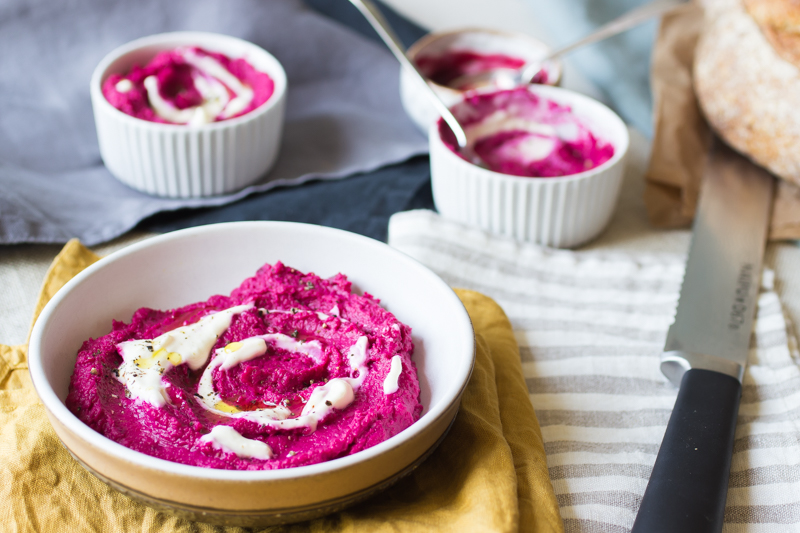
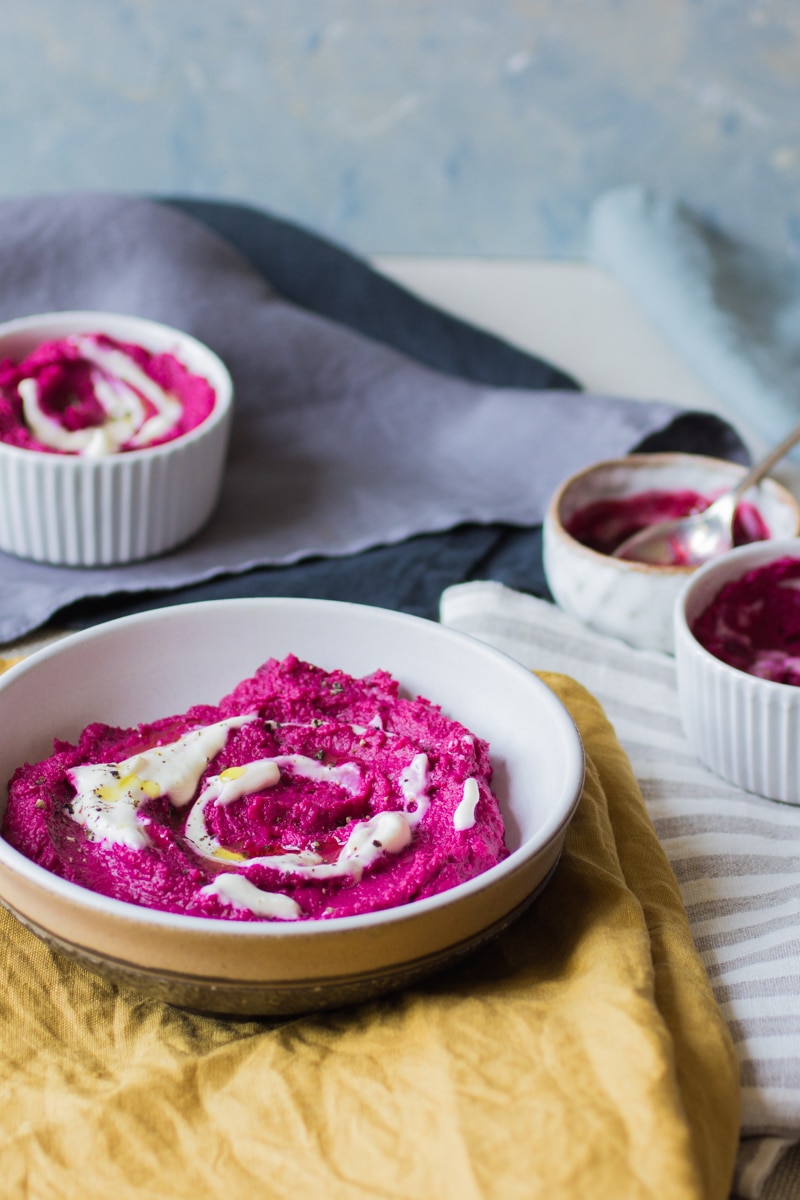
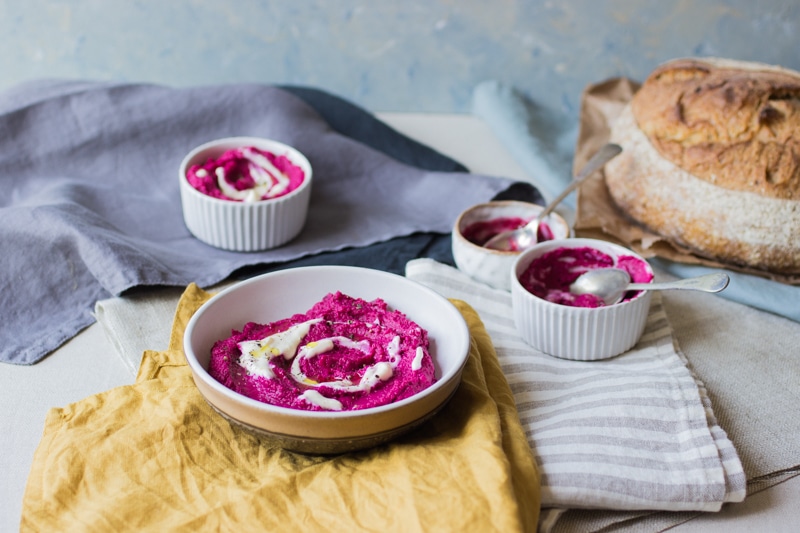
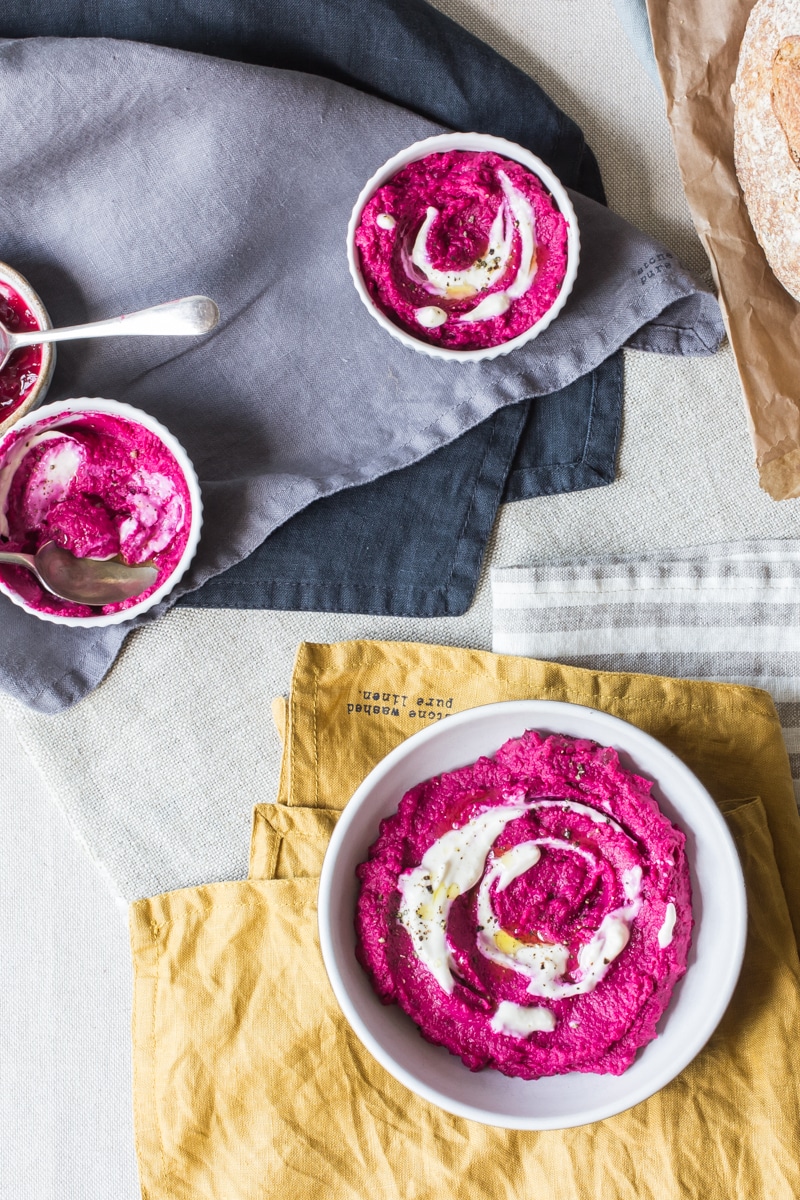
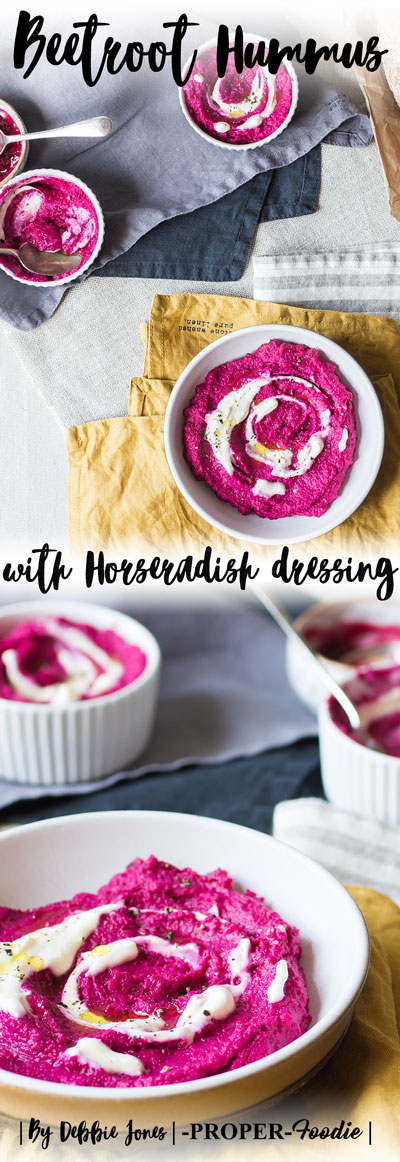
]]>The post Beetroot Hummus appeared first on ProperFoodie.
]]>Delightfully pink, creamy hummus made using baby beets and pickled beetroot, along with a super easy trick to ensure the softest and most smoothest homemade hummus ever.
Its been a good while since I've posted on here - mainly due to sunning myself in Sardinia (more about that soon), but also because we've been busy finishing off our pizza oven build - and ......its nearly ready!! So exciting - I can't wait to get cooking in our little outdoor oven (named Alberto by the way, after the owner of our B&B in Verona, where we got married last year 🙂
Outdoor cooking
In preparation for some downright, awesome, alfresco cooking I have been stock piling recipes that are perfect for any kind of outdoor feast, including steak and veggie BBQ skewers, roasted stuffed peppers with cous cous in cheese sauce and some lovely homemade mint ice cream lollies. This sweet and earthy beetroot hummus is another one of these recipes and will go with anything - in fact I have a little idea bubbling away involving beetroot hummus on a pizza - I really think it will work and I'm definitely doing this before the end of Summer.
Hummus
Hummus? Houmous? Tesco Hummus? Waitrose Hummus? Whatever you call it or where you buy it, hummus is the dip that really knows how to please all tastes a preferences. There are so many flavours now-a-days that its hard to keep up. I do love a nice harrissa-flavoured, Moroccan style hummus, but I also love hummus with peas and mint. Or just plain hummus - its all great.
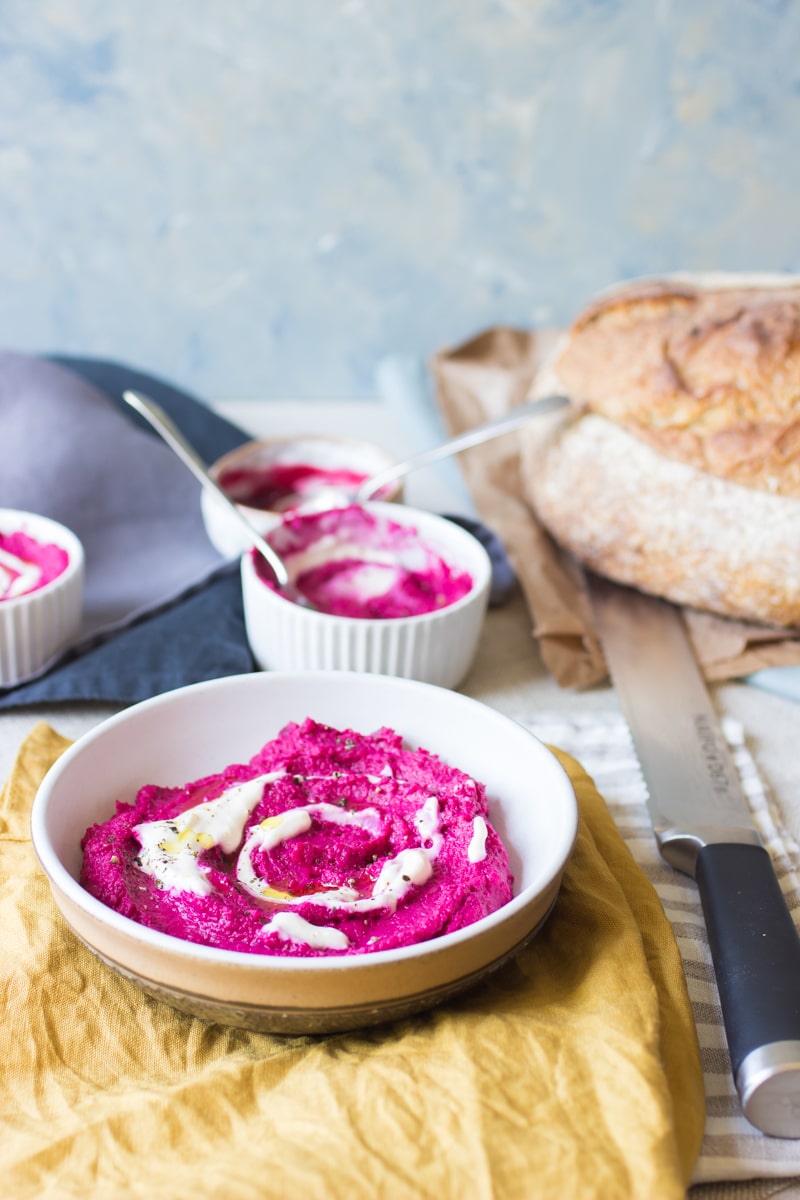
Beetroot hummus
This being said, beetroot hummus (especially with some creamy horseradish) is by far my most favourite kind of hummus. But I do feel that making it from scratch is the only way to really appreciate this colourful little dip. And heres my top tip for the bestest, most smoothest homemade hummus ever . . .
Shelled Chickpeas
. . .shell your chickpeas!! And this isn't really that hard at all. It might be a little time consuming, but oh so worth it. If you haven't shelled chickpeas before all you need to do is drain the tinned chickpeas into a sieve and rinse under tap water. Then take each chickpea and gently rub your fingertips over the surface and loosen the outer skin. The inner pea should then pop out of the skin. Discard the skin and place the chickpea in a bowl. Continue until all your chickpeas are shelled. Easy.
These little chickpeas are the star of the show, so it really is worth the extra effort.
The rest of the recipe is super easy - all the ingredient go into a blender and are blitz until smooth.
Happy dipping!


📖 Recipe
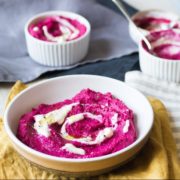
Beetroot Hummus
Ingredients
For the Beetroot Hummus
- 400 g tin of Chickpeas 120g drained
- 1 tablespoon Olive oil
- 1 Garlic clove finely chopped or ½ tablespoon Very Lazy Chopped Smoked Garlic
- Pinch sea salt
- .5 Juice of a lemon
- 2 cooked baby beetroots
- 2 tablespoon beetroot pickle I used English Provender beetroot pickle
- 1 tablespoon tahini paste sesame seed paste
For the dressing
- 1 tablespoon creme fraiche
- 1 teaspoon horseradish sauce
Optional
- Extra oil and black pepper for serving
Instructions
To make the Beetroot Hummus
- Drain the chickpeas into a sieve and rinse well under the tap. Peel off the outer shell of the chickpeas by rubbing with your finger tips until the inner pea pops out. Discard the shell and place the chickpea in a bowl. Continue until all chickpeas are shelled.
- Shelled chickpeas produces and smoother and more flavoursome hummus.
- In a blender blitz together all the hummus ingredients until smooth: shelled chickpeas, oil, garlic, salt, lemon juice, 2 cooked baby beets, 2 tablespoon beetroot pickle, and 1 tablespoon tahini paste.
- Transfer the hummus into a bowl and chill in the fridge.
For the horseradish dressing
- In a small bowl mix together the creme fraiche and horseradish sauce - season if desired.
Serve
- Spoon the horseradish dressing over the bowl of chilled hummus. Drizzle over oil and grind on some black pepper if desired, then serve.
Nutrition
PIN FOR LATER
The post Beetroot Hummus appeared first on ProperFoodie.
]]>The post Healthy Chicken Wraps appeared first on ProperFoodie.
]]>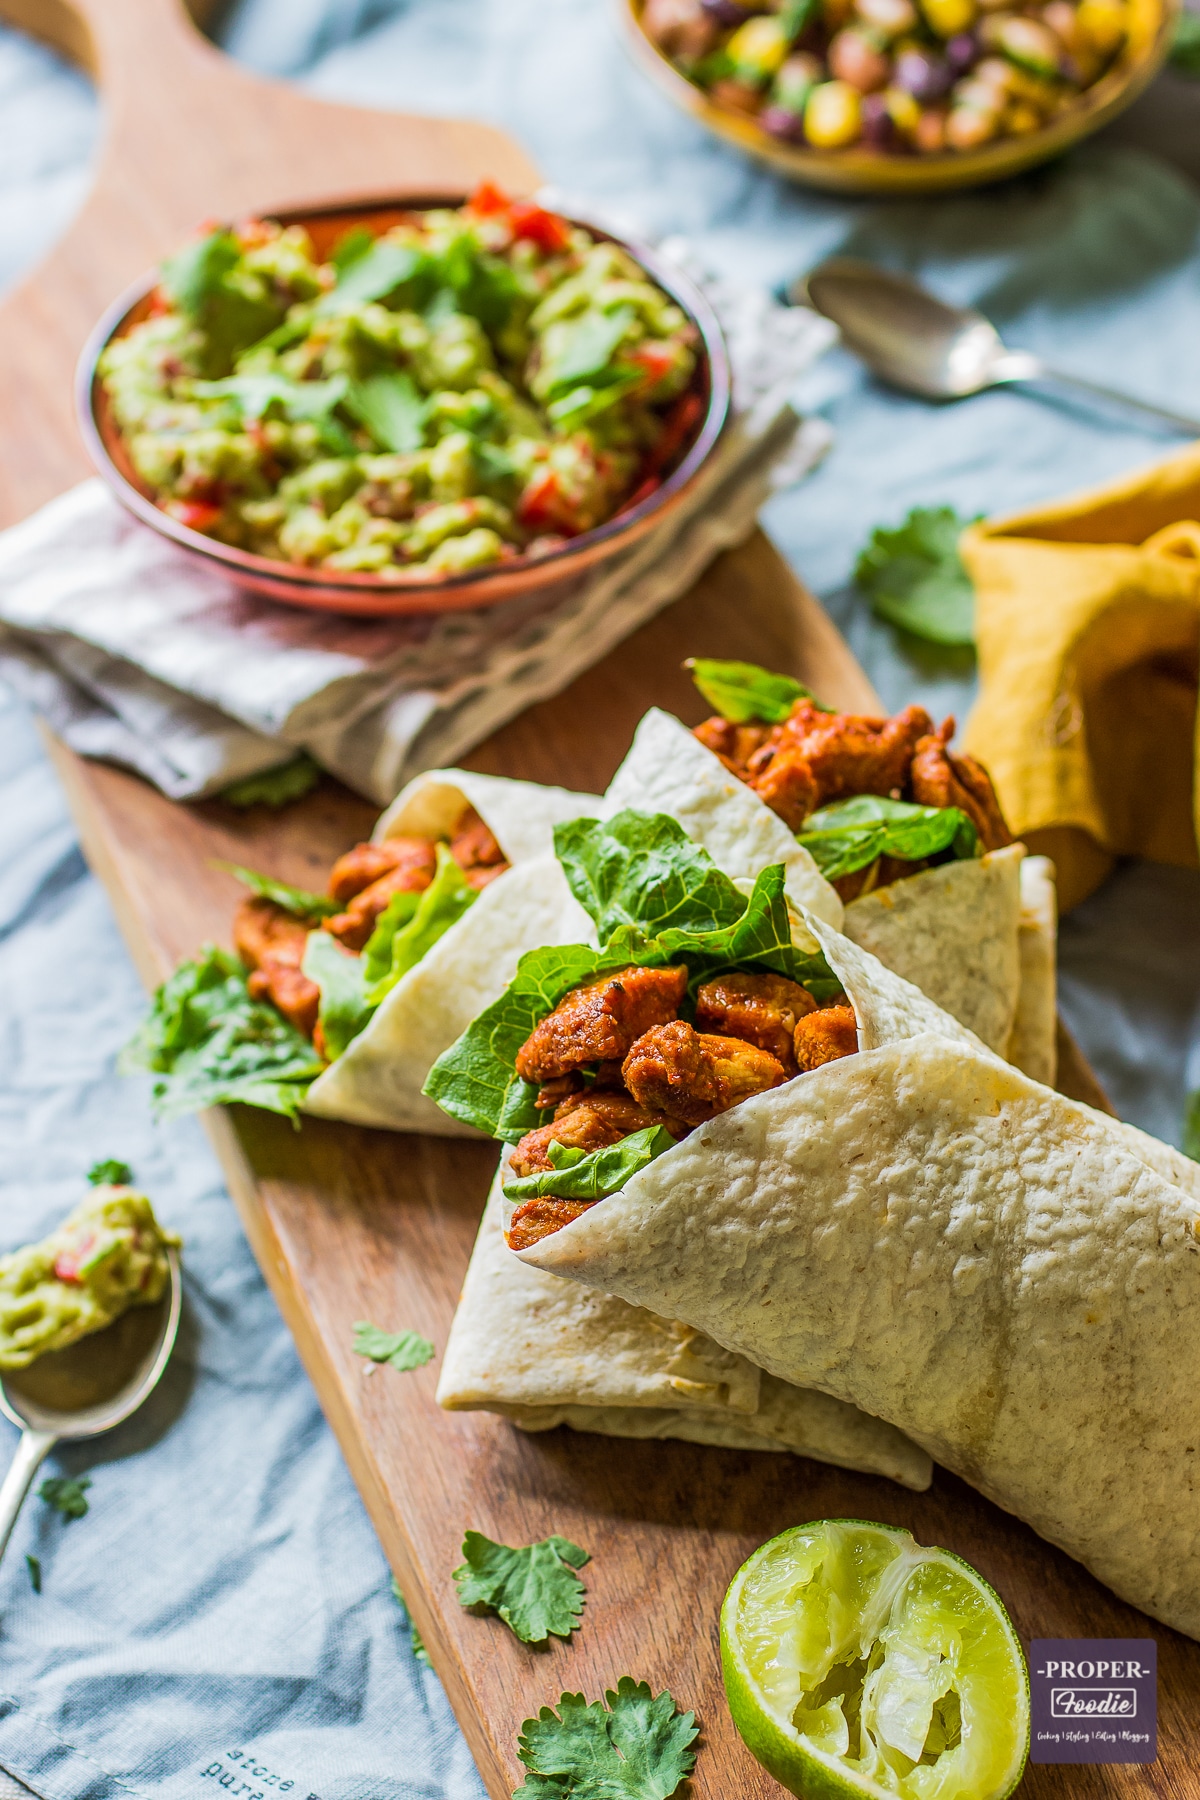
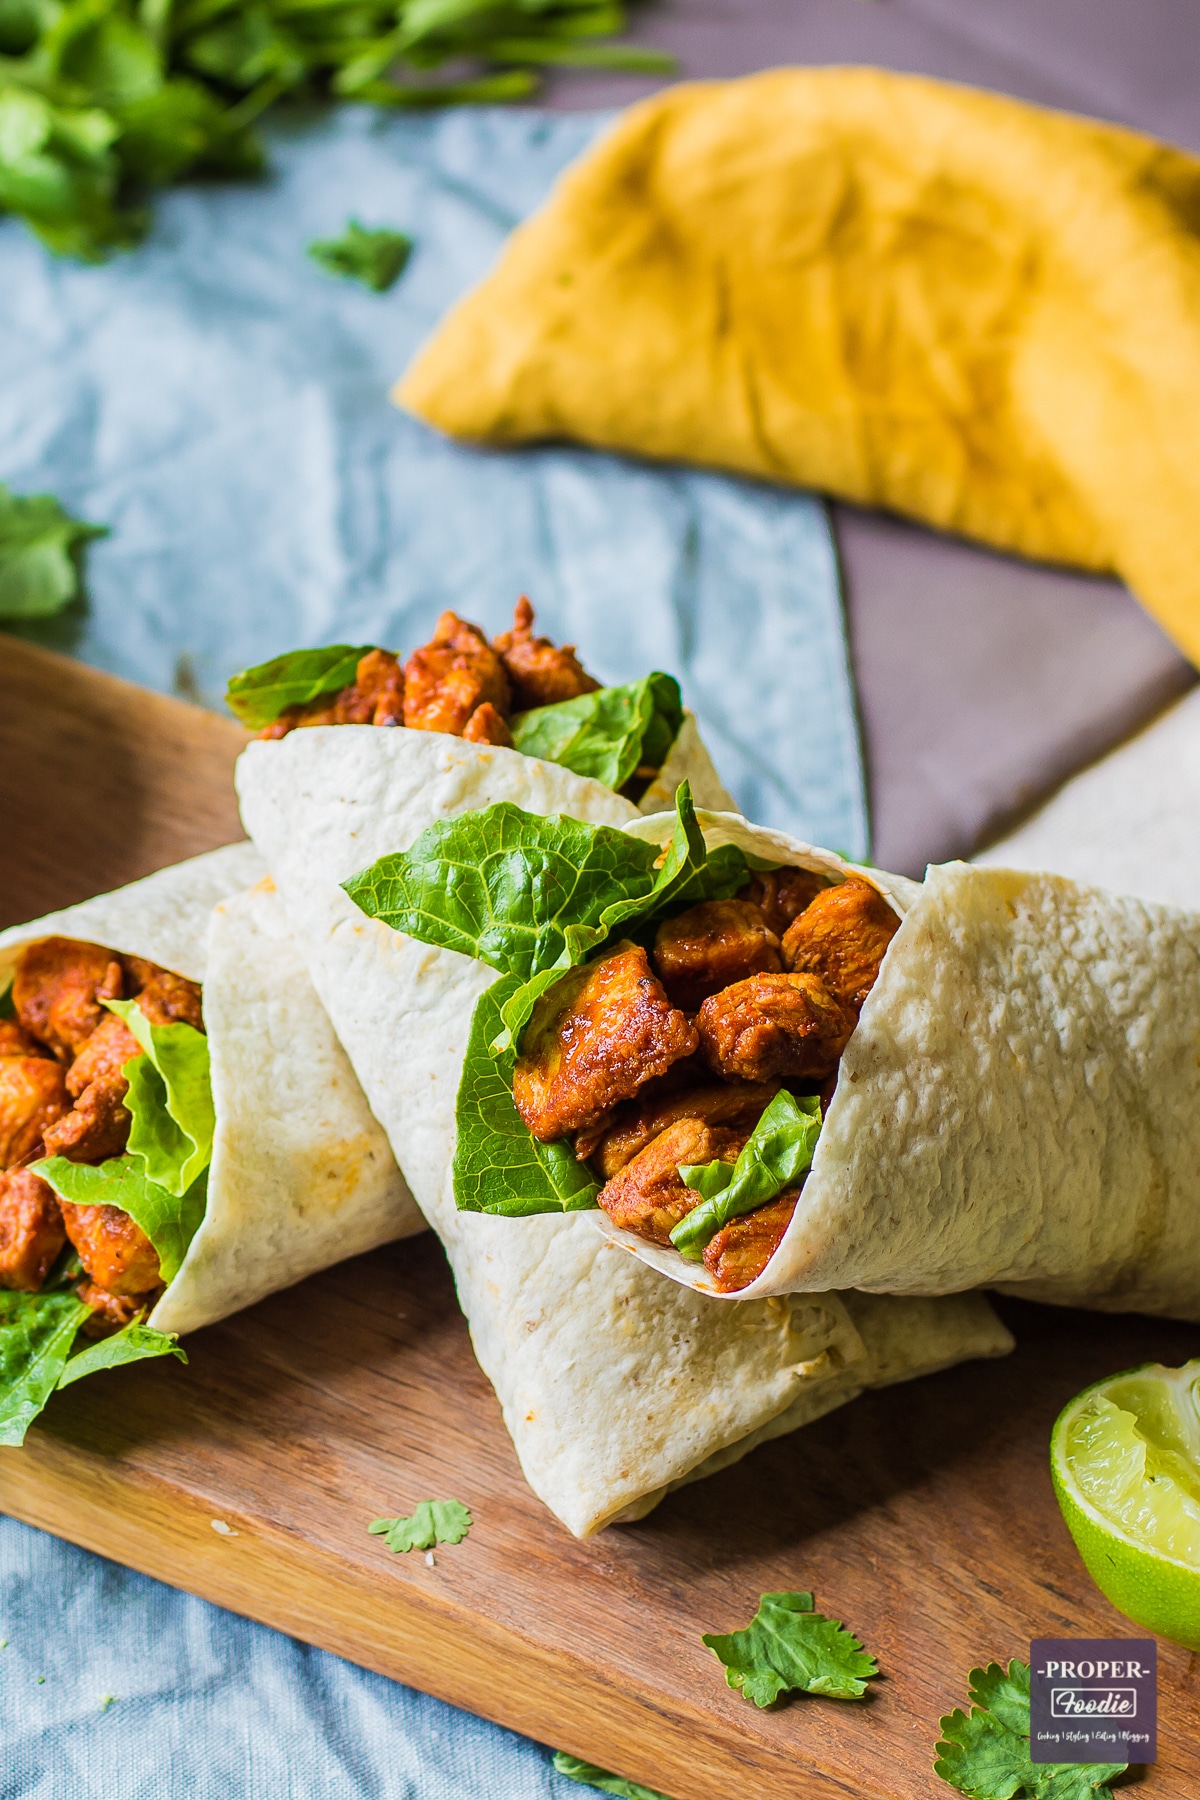
These easy chicken wraps with Mexican style side dishes are great for a healthy mid week meal. They are quick to make and full of flavour. The wraps are filled with lightly seasoned paprika chicken and lettuce, with the option to add in a delicious three bean salad and simple guacamole recipe. You don't even have to make up the chicken wraps until you're sat at the table. Just serve up the paprika chicken in a big bowl with all the extras at the side, then let everyone fill and make their own.
Ingredients
Full ingredients & instructions in recipe card below: Jump to Recipe CardTo make these wraps for four people you will need the following:
- 4 Chicken breasts cubed (800g)
- 2 tsp Paprika
- 1 tsp Cayenne pepper
- 1 tsp Ground coriander
- 2 tsp Honey
- Pinch of sea salt and pepper
- 1 tbsp Olive oil
- Pack of shop bought wraps
- Lettuce leaves optional
- Extra lime wedges and fresh coriander leaves to serve
- Guacamole (homemade or shop bought)
Instructions
To make the paprika chicken
- Place the cubed chicken into a mixing bowl. Add the paprika, cayenne pepper, ground coriander, honey, salt and pepper then mix until the chicken is fully coated.
- Heat oil in a frying pan or wok. Add the seasoned chicken and stir fry for 5-7 minutes or until cooked through.
- Place the wraps in the microwave for 30 seconds or low oven for 5 minute to slightly warm.
- Then either make up the wraps or serve the chicken in a bowl in the centre of the table along with the wraps, lettuce, lime, coriander and guacamole. Then let everyone make up their own wraps.
How to wrap the chicken wraps
- Lay out the wraps. Dollop on a couple of spoonfuls of guacamole and spread down the middle of each wrap. Leave a 2 inch gap at the bottom for folding over.
- Place a few torn lettuce leaves over the top of the guacamole.
- Next divide the cooked paprika chicken between the wraps, placing the chicken directly on top of the lettuce.
- Then roll up the chicken wraps by folding up the bottom edge of the wrap, then bring the right side, then left side over. Secure with a cocktail stick if necessary.
Mixed bean salad
If you want to add some extra Mexican flare to your wraps then how about serving up with a delicious mixed bean salad. Add the bean salad to your wrap or serve up as a light and healthy side dish. For the three bean salad you will need the following:
Ingredients:
- 2 tins of your choice of beans (Borlotti, kidney, black bean, haricot, mixed beans)
- 1 tin of sweetcorn
- 2 tsp cider vinegar
- 2 tbsp Olive Oil
- Juice of 1 lime
- 2 tsp Dijon mustard
- Pinch of sea salt and pepper
- 30g freshly chopped coriander leaves
Instructions:
- Drain the tinned beans and sweetcorn into a sieve then rinse well with tap water. Transfer the beans and sweetcorn to a mixing bowl.
- In a small mug or bowl mix together the cider vinegar, oil, lime juice, Dijon mustard, salt and pepper.
- Pour the dressing over the beans and add the coriander leaves. Mix well. Cover and refrigerate until ready to serve.

Homemade guacamole
A bit of guacamole really adds to the flavour of these healthy chicken wraps. You can either use shop bought guacamole or if you have the time make up your own. Refreshing but creamy, this simple guacamole recipe is the perfect Mexican partner to this recipe. Made with creamy avocado, tomato and chilli. And it really does just take 5 minutes and theres no need for getting out a blender or anything like that.
For more recipes that use avocado have a look at my easy avocado recipes collection.
How to serve
My favourite thing about this recipe is that you can serve it up however you want. All the little extra can be served at the side or added to the wraps. Get your wraps fully loaded with guacamole, three bean salad, lettuce, fresh coriander and any other extras you fancy (fresh chillies, grated cheese, sour cream, red onions etc).
If you're extra hungry why not make burritos by adding rice! For burrito making inspiration have a look at Chicken tinga burritos and beef brisket burritos.

Frequently asked questions
The wraps can be made and constructed the day before. Once made wrap each wrap tightly in cling film and store in the fridge. Alternatively you can can make up each component (paprika chicken, three bean salad, guacamole) and store separately in the fridge. The wraps can then be freshly put together when you're ready.
Paprika chicken is just one of many seasoned chicken options. If you prefer just stir fry the chicken as it is for a plain option. Or other seasoning options: lemon juice and tarragon, garlic and rosemary, cumin and caraway, coriander and lime. Or why not try chicken with a jerk seasoning like in this jerk chicken tacos recipe
Other ingredients or side dishes that go well with this recipe include: rice, cheese, refried beans, black bean rice, tortilla chips, soured cream, hot sauce, jalapenos, salsa, bell peppers, red onions, beetroot hummus, satay sauce.
This recipe is very mild in terms of spice. However if you would like to add more heat you could add a teaspoon of chilli powder when stir frying the paprika chicken. Alternatively add, chilli peppers, jalapeños, hot sauce or tabasco to the wraps.
Let me know what you think of this recipe by leaving a comment and star rating below. You can also pin the recipe on pinterest!


📖 Recipe

Healthy Chicken Wraps
Ingredients
For the paprika chicken
- 4 Chicken breasts cubed
- 2 teaspoon Paprika
- 1 teaspoon Cayenne pepper
- 1 teaspoon Ground coriander
- 2 teaspoon Honey
- Pinch of sea salt and pepper
- 1 tablespoon Olive oil
- Pack of shop bought wraps
- Lettuce leaves optional
- Extra lime wedges and fresh coriander leaves to serve
For the bean salad
- 2 tins of your choice of beans (Borlotti, kidney, black bean, haricot, mixed beans)
- 1 tin of sweetcorn
- 2 teaspoon cider vinegar
- 2 tablespoon Olive Oil
- 1 lime juiced
- 2 teaspoon dijon mustard
- Pinch of sea salt and pepper
- 30 g freshly chopped coriander leaves
Instructions
To make the paprika chicken
- Place the cubed chicken into a mixing bowl. Add 2 teaspoon paprika, 1 teaspoon cayenne pepper, 1 teaspoon ground coriander, 2 teaspoon honey, salt and pepper then mix until the chicken is fully coated.
- Place a frying pan or wok on a medium heat and add the oil. Place the seasoned chicken into the frying pan and stir fry for 5-7 minutes or until cooked through.
- Whilst the chicken is cooking place the wraps in the microwave for 30 seconds or low oven for 5 minute to slightly warm.
- Then either make up the wraps or serve the chicken in a bowl in the centre of the table along with the wraps, lettuce, guacamole, 3 bean salad, coriander and lime. Then let everyone dig in and make up their own chicken wraps.
How to wrap healthy chicken wraps
- Lay out the wraps. Dollop on a couple of spoonfuls of guacamole and spread down the middle of each wrap. Leave a 2 inch gap at the bottom for folding over.
- Place a few torn lettuce leaves over the top of the guacamole.
- Next divide the cooked paprika chicken between the wraps, placing the chicken directly on top of the lettuce.
- Then roll up the chicken wraps by folding up the bottom edge of the wrap, then bring the right side, then left side over. Secure with a cocktail stick if necessary.
How to make bean salad
- Drain the tinned beans and sweetcorn into a sieve then rinse well with tap water. Transfer the beans and sweetcorn to a mixing bowl.
- In a small mug or bowl mix together 2 teaspoon cider vinegar, 2 tablespoon oil, 1 lime juiced, 2 teaspoon dijon mustard, salt and pepper.
- Pour the dressing over the beans and add the coriander leaves. Mix well. Cover and refrigerate until ready to serve.
Notes
Nutrition
The post Healthy Chicken Wraps appeared first on ProperFoodie.
]]>The post 5 minute Satay Sauce appeared first on ProperFoodie.
]]>
Whats not to love with that delicious tahini and peanut butter going on.
Its even freezer friendly, so get a few batches made and frozen, ready for those last minute dinner parties or BBQs.
For a couple of ideas of how to use this great sauce check out my satay skewers and chicken satay platter with quinoa salad
How to make satay sauce
📖 Recipe

5 minute Satay Sauce
Ingredients
- 2 tablespoon crunchy peanut butter
- 2 tablespoon brown tahini sauce
- 1 green chilli deseeded and roughly chopped
- 1 garlic clove peeled and roughly chopped
- 2 cm piece of fresh ginger peeled and roughly chopped
- 15 g fresh coriander roughly chopped
- 10 g of fresh mint leaves roughly chopped
- 1 teaspoon light soy sauce
- Juice of 1 lime
- 2 tablespoon cold water
Instructions
- Place all the satay sauce ingredients into a food processor and blitz together. Gradually add small amounts of cold water until a smooth consistency is reached.
The post 5 minute Satay Sauce appeared first on ProperFoodie.
]]>The post Chicken Tinga burritos with homemade chipotle sauce appeared first on ProperFoodie.
]]> I am completely and totally, one hundred percent, head-over-heels in love with these chicken tinga burritos.
They are the perfect meal for lunch, tea, snacking, feeding a few, feeding just you, feeding kids, feeding anyone for that matter. They fit in with everything and everyone and are so much fun to make.
The best way to serve these is on a platter, they can be fully wrapped and made or each element can be laid out separately so everyone can help themselves and build their own chicken burritos.

Chicken tinga and chipotle
My version of Chicken tinga is baked and shredded chicken mixed with my homemade chipotle sauce.
This chipotle sauce really packs a punch and also goes amazing well with pasta. If you're after something not so spicy, have a look at my beef brisket burritos. Or for something slightly different my jerk chicken tacos or paprika chicken wraps.
I love to load my chicken tinga on a burrito with plenty of rice and freshly cut avocado. Avocado actually ends up in quite a few of my recipes
Chipotle
I’m referring to this sauce as chipotle, mainly because of its smoky and spicy flavours. However, I have to confess that there aren’t actually any chipotle chillies in this sauce. Firstly because I didn’t have any when I first made the sauce and secondly because I decided after that it was pretty bloody good the way it was. This probably means that its not a chipotle sauce at all but I decided to keep the “chipotle” in the title as it’s the best way to describe all the lovely flavours that are going on here. Lots of lovely chipotle-ness.
You can tell how much I love this recipe based on the amount of pictures I have – I went a bit over board. But to be fair there is a lot going on and now I can demonstrate each stage of this dish with a lovely, colourful piccie 🙂
So the first step on the stairway to chicken tinga burrito greatness is the sauce/marinade.
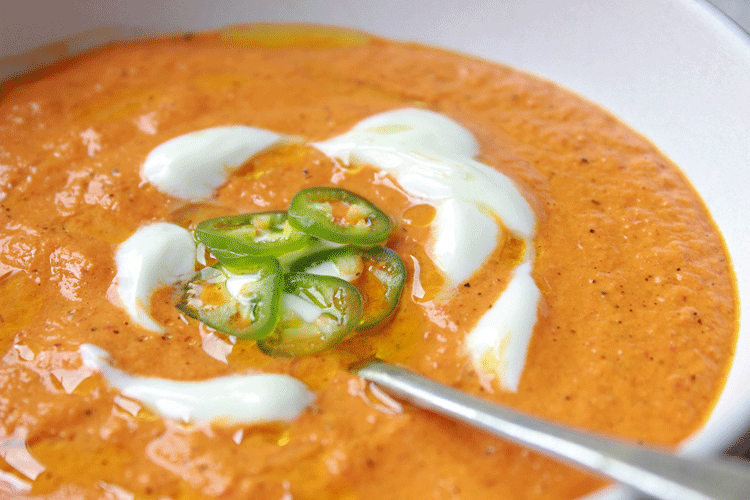
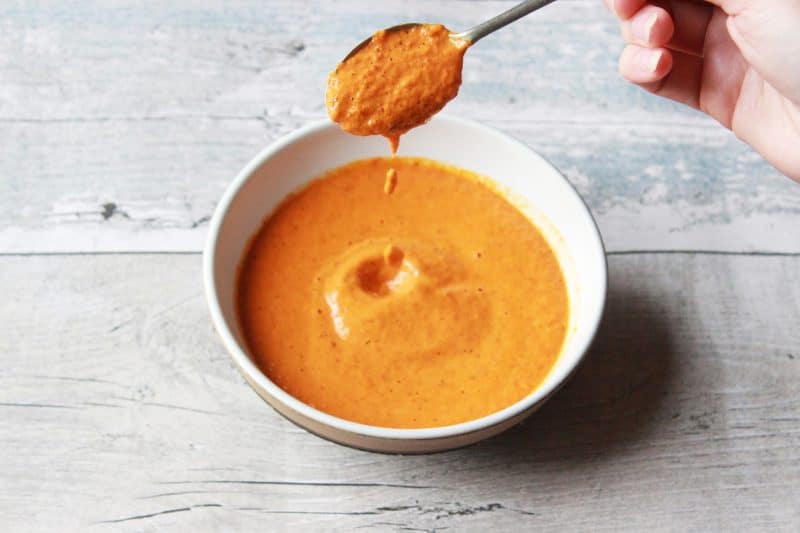
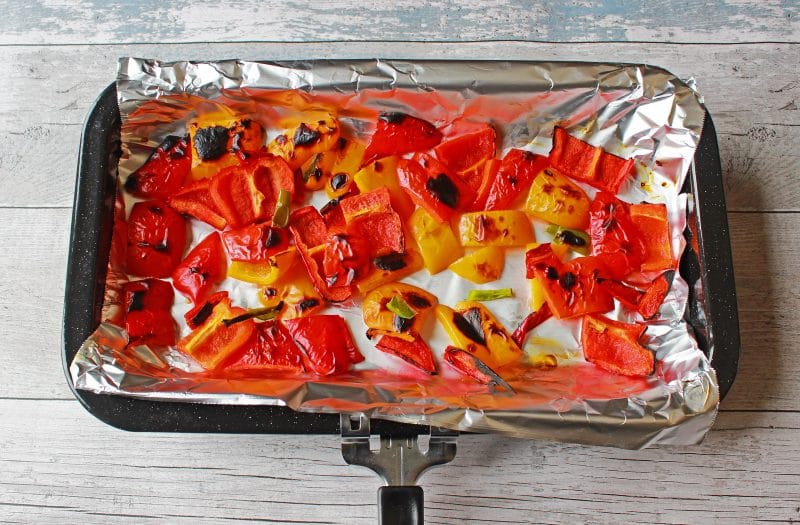
I say this as the chipotle sauce is used firstly as a marinade and then later as a sauce for the finishing touch to the chicken tinga burritos. The smokiness in the sauce comes from blackening the skins of the bell peppers and chilli peppers. I did this under the grill but you could also use a blow torch or balance over the flame of a gas hob, if you’re feeling up to the challenge of either. Whatever the method, the skins should be partially black to create a sweet yet smoky flavour.
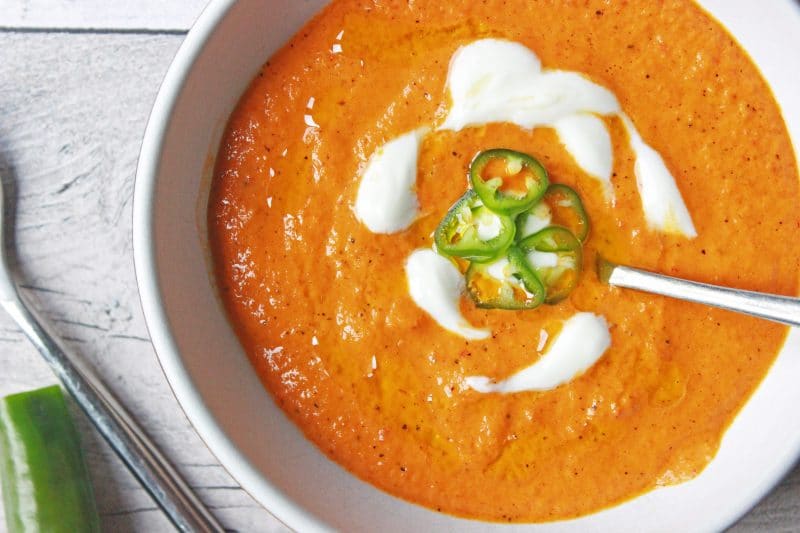
When I say smoky…..it can literally get quite smoky. If you don’t want your smoke alarm to deafen you then it’s definitely advisable to whip on the extractor fan and have the window open. Once the peppers are prepared, pop them into the blender along with the other sauce ingredients and pulse until smooth. It’s good to taste the sauce and add more heat with the tabasco if its needs an extra kick, or more yogurt if the chilli is too over powering. The finished product is a silky smooth deep orange sauce, with flecks of smoky black pepper skin and a fiery punch.
Marinating the chicken in the sauce isn’t essential but really intensifies the flavours if you have the time to do this.
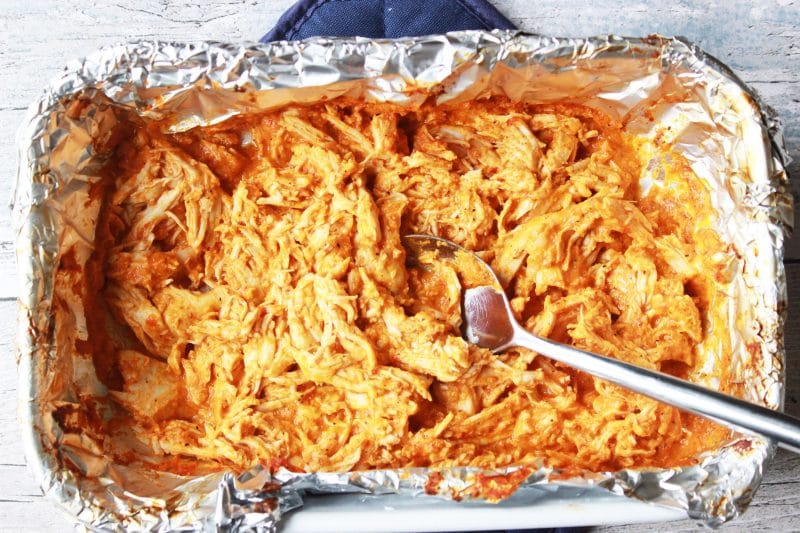
I used half the sauce to bake with and create the chicken tinga and saved the other half for a dip to drizzle over the finished burrito. The chicken tinga works best in a burrito if its shredded – it’s easier to shape and fold. So, after the chicken has been baking for about half an hour - 40 minutes, and whilst it is still very juicy and tender; I pulled apart the breasts using a fork and shredded into fine strips. Mix the chicken well to fully coat in all the lovely baking sauce and then pop the chicken tinga back in the oven for another 10 minutes.
And that is pretty much it for the cooking side of things – the rest is all about the build.
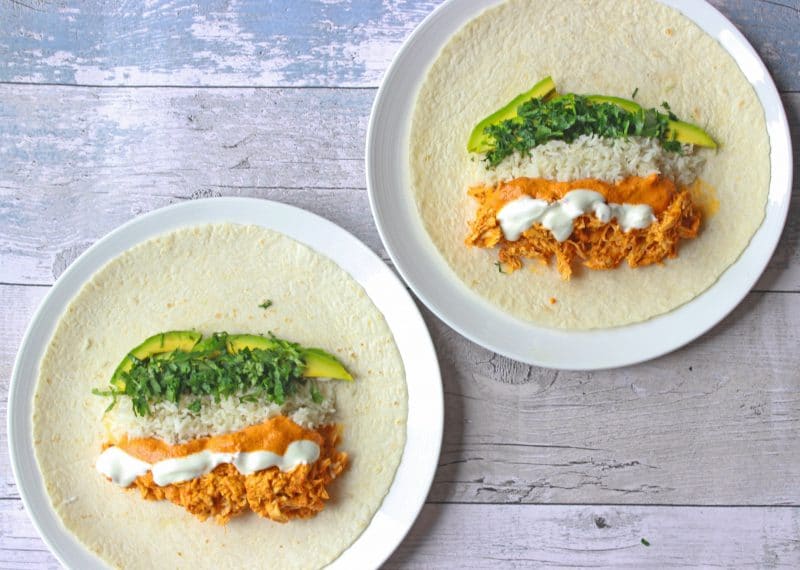
This is the fun bit. Lay out all the ingredients, preferably in the order they will go into the chicken burritos, heat the wraps for 10-20 seconds in the microwave (to loosen them and make them easier to fold), then get building. Ideally try to keep each ingredient in a line and don’t let the filling creep too close to the edge of the wrap. I usually keep the fillings towards the front end of the wrap.
The folding!! It’s quite easy once you know how.
The first step is to take the end of the wrap closest to you and fold it over the filling. At the same time fold in the wrap at either side and trap under the first fold. Continue to roll up and then secure by placing a blob of yogurt under the end flap of the wrap...and …voila! Easy, right? Maybe have a couple of practice runs if you don’t feel too confident – or just let everyone make their own 🙂

I like to slice my chicken tinga burritos on the diagonal, just because I think it looks fancy but each burrito can be served as it is, if you prefer. Any chicken burritos left over? Or not wanting to eat them right away? - Lay a sheet of baking parchment over a sheet of foil, then wrap up the burrito and pop in the fridge for later. It should keep for a couple of days. And trust me you’re gonna want to keep hold of these bad boys.
📖 Recipe

Chicken Tinga burritos with homemade chipotle sauce
Ingredients
For the spicy chipotle sauce:
- 2 Red bell peppers
- 1 orange bell pepper
- 2 red chilli peppers
- 1 green chilli pepper
- 2 cm piece fresh ginger peeled and chopped
- 1 clove garlic peeled and chopped
- 1 tablespoon walnut oil
- 2 dessert spoons of fat free Greek style yogurt
- Few drops of Tabasco sauce
- Pinch of sea salt
For the burritos:
- 4 Soft white tortilla wraps
- 4 Chicken breasts
- 200 g white rice cooked
- 1 avocado peeled and sliced
- Handful Fresh parsley chopped
- Greek yogurt for dressing
- Extra green chilli pepper for serving
Instructions
- Pre-heat the oven to 180 degrees C.
- Remove the seeds and stems from the bell peppers and chilli peppers,then chop up roughly. Place all peppers on a tray and grill for 5-10 mins until skins start to blacken. check and turn regularly.
- Place the charred peppers in a blender along with the rest of the sauce ingredients and blitz into a smooth paste. Taste and add more Tabasco or yogurt if required.
- Next prepare the chicken by scoring 3 lines, about half a cm deep, in the top of each breast. This will allow the marinade to infuse with the meat.
- Take a wide oven proof dish and line with foil. Spoon ⅓ of the chipotle sauce into the base of the dish and spread evenly over the foil. Then place the chicken, slit side down, on top of the sauce. Spoon another ⅓ of the sauce over the chicken and spread evenly over the meat.
- Place the remaining third of the sauce to one side. Cover the oven proof dish with foil and place in the oven for 40 minutes.
- After 40 minutes check the chicken and pour off any juices, then recover and return to the oven for another 10 minutes.
- Next remove the chicken and use a sharp knife and fork to shred each breast, allowing the chunks to mix with the sauce. Then recover and return to the oven for a final 10 minutes.
- Whilst the chicken is its final stages of cooking prepare the rice and lay out all the other fillings ready to load into the burritos. Once the chicken is ready heat the wraps for 10-20 seconds in the microwave and lay out ready to fill.
- Place the fillings on the wraps in rows, with the first row starting about inch in from the side of the wrap closest to you. Leave an inch of wrap either side of the row - do not fill to the edge.
- Follow the first row of chicken with rice, then sliced avocado. This can then be topped off with some of the chipotle sauce left over from earlier, any remaining yogurt and chopped parsley.
- To wrap the burritos, take the edge nearest to you over the fillings and at the same time fold in either side of the wrap and took under the first fold. continue to roll over and secure the wrap by placing a small blob of yogurt on the inner edge.
- Slice in half if desired and serve with any remaining chipotle sauce, yogurt and chilli
Nutrition

**Estimated nutritional information per serving and per 100g of chicken burrito with chipotle sauce. Refer to my Nutrition Information Guide to find out more about how this is calculated and the sources used.
The post Chicken Tinga burritos with homemade chipotle sauce appeared first on ProperFoodie.
]]>